项目需求及目标
开发环境
Json介绍muduo网络库编程服务器集群
基于发布-订阅的Redis——服务器中间件
数据库设计
本项目要用到的技术栈:
Json序列化和反序列化;muduo网络库开发;nginx源码编译安装和环境部署;nginx的tcp负载均衡器配置;redis缓存服务器编程实践;基于发布-订阅的服务器中间件redis消息队列编程实践;
MySQL数据库编程;CMake构建编译环境;Github托管项目
本项目的内容包含了:通常开发的服务器,网络、业务、数据模块(数据库、数据的操作),
项目需求
客户端新用户注册
客户端用户登录
添加好友和添加群组
好友聊天和群组聊天
nginx配置tcp负载均衡集群聊天系统支持客户端跨服务器通信
项目目标
掌握服务器的网络I/O模块,业务模块,数据模块分层的设计思想
掌握C++ muduo网络库的编程以及实现原理
掌握Json的编程应用
掌握nginx配置部署tcp负载均衡器的原理及应用
掌握服务器中间件的应用场景和基于发布-订阅的redis编程实践以及应用原理
掌握CMake构建自动化编程环境
muduo库基于boost库,需要先安装boost。
1
2
3
4
5
6
tar -zxvf boost_1_69_0.tar.gz cd boost_1_69_0/./bootstrap.sh ./b2 sudo ./b2 install
1
2
3
4
5
6
7
8
9
10
11
12
include目录是头文件放的位置。 server和client的代码在同一工程中,最后生成时可以把C/S分开生成到bin目录下。 可按server和client分类, 比如生成代码所需用到的头文件可以分别放在/include/server和/include/client, 而server和client共需的头文件直接放到/include下。比如消息的id。 src放源码。 thirdparty是第三方库文件夹,比如放json.hpp。 本项目没有生成lib库(.a/.so),所以没有lib文件夹。
1
2
3
4
5
6
7
8
9
10
11
cmake_minimum_required (VERSION 3.0 .0 )project (chat)set (CMAKE_CXX_FLAGS ${CMAKE_CXX_FLAGS} -g)set (EXECUTABLE_OUTPUT_PATH ${PROJECT_SOURCE_DIR} /bin)include_directories (${PROJECT_SOURCE_DIR} /include )include_directories (${PROJECT_SOURCE_DIR} /include /server)add_subdirectory (src)
/src
1 add_subdirectory (server)
/src/server
1 2 3 4 5 6 aux_source_directory (. SRC_LIST)add_executable (ChatServer ${SRC_LIST} )target_link_libraries (CharServer muduo_net muduo_base pthread)
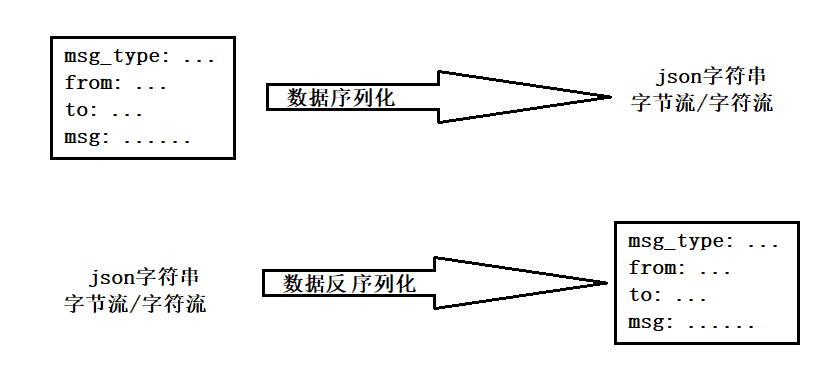
JSON,全拼:JavaScript Object Notation
JSON是一种轻量级的数据交换格式(也叫数据序列化方式)。
JSON采用完全独立于编程语言 的文本格式来存储和表示数据。
简洁和清晰的层次结构使得JSON成为理想的数据交换语言。
易于人阅读和编写,同时也易于机器解析和生成,并有效地提升网络传输效率。
JSON的用处就是下图:
本项目选用的是JSON for Modern C++,由德国人nlohmann编写的在C++下使用的JSON库。特点如下:
整个代码由一个头文件json.hpp包含,没有依赖关系,使用方便;
使用C++11标准编写;
使得JSON像STL容器一样,而且STL和JSON容器之间可以相互转换;
所有类都经过严格的单元测试,覆盖100%的代码,包括所有特殊的行为。此外,还检查了Valgrind是否有内存泄漏。为了保持高质量,该项目遵循“核心基础设施”倡议的最佳实践。
1 2 3 4 5 6 7 8 9 10 11 12 13 14 15 16 17 18 19 20 21 22 #include "json.hpp" using json = nlohmann::json;#include <iostream> #include <vector> #include <map> using namespace std;void func1 () json js; js["msg_type" ] = 2 ; js["from" ] = "zhang san" ; js["to" ] = "li si" ; js["msg" ] = "hello, i'm zhang san" ; cout << js << endl; } int main () func1 (); return 0 ; }
输出结果
1 {"from":"zhang san","msg":"hello, i'm zhang san","msg_type":2,"to":"li si"}
1 2 3 4 5 6 7 8 9 10 11 12 13 14 15 16 17 18 19 void func2 () json js; js["id" ] = {1 , 2 , 3 , 4 , 5 }; js["name" ] = "zhang san" ; js["msg" ]["zhang san" ] = "i'm zhang san" ; js["msg" ]["li si" ] = "i'm li si" ; cout << js << endl; } int main () func2 (); return 0 ; }
输出结果
1 {"id":[1,2,3,4,5],"msg":{"li si":"i'm li si","zhang san":"i'm zhang san"},"name":"zhang san"}
这个JSON库强大到直接把C++ STL中的容器内容可以直接序列化成Json字符串,代码如下:
1 2 3 4 5 6 7 8 9 10 11 12 13 14 15 16 17 18 void func3 () json js; vector<int > vec; vec.push_back (1 ); vec.push_back (2 ); vec.push_back (5 ); js["list" ] = vec; map<int , string> m; m.insert ({1 , "黄山" }); m.insert ({2 , "华山" }); m.insert ({3 , "泰山" }); js["path" ] = m; cout << js << endl; }
输出结果
1 {"list":[1,2,5],"path":[[1,"黄山"],[2,"华山"],[3,"泰山"]]}
生成的字符串内容和<< json的一样。返回一个string对象。
cout <<能输出 JSON 对象是因为重载了<<运算符;而要实际生成string可用dump(),生成的字符串内容和<< json的一样。传输数据时,不要传string对象,而是要传string实际指向的字符串首指针,c_str()。
1
2
3
4
5
6
7
8
9
10
void func1 () json js; js["msg_type" ] = 2 ; js["from" ] = "zhang san" ; js["to" ] = "li si" ; js["msg" ] = "hello, i'm zhang san" ; string sendBuf = js.dump (); cout << sendBuf.c_str () << endl; }
解析string类型的字符串,生成一个JSON对象。可以转换为容器。
1
2
3
4
5
6
7
8
9
10
11
12
13
14
15
16
17
18
void func1 () json js; js["msg_type" ] = 2 ; js["from" ] = "zhang san" ; js["to" ] = "li si" ; js["msg" ] = "hello, i'm zhang san" ; cout << js << endl; } int main () string recvBuf = func1 (); json json_obj = json::parse (recvBuf); cout << json_obj["msg_type" ] << endl; cout << json_obj["from" ] << endl; cout << json_obj["to" ] << endl; cout << json_obj["msg" ] << endl; }
输出结果:
1
2
3
4
2 "zhang san" "li si" "hello, what are you doing now?"
1
2
3
4
5
6
7
8
9
10
11
12
13
void func2 () json js; js["id" ] = {1 , 2 , 3 , 4 , 5 }; } int main () string recvBuf = func2 (); json json_obj = json::parse (recvBuf); auto arr = json_obj["id" ]; cout << json_obj["id" ] << endl; cout << arr[2 ] << endl; }
输出结果
1 2 3 4 5 6 7 8 9 10 11 12 13 14 15 16 17 18 19 20 21 22 23 24 25 26 27 28 29 30 31 32 33 void func3 () json js; vector<int > vec; vec.push_back (1 ); vec.push_back (2 ); vec.push_back (5 ); js["list" ] = vec; map<int , string> m; m.insert ({1 , "黄山" }); m.insert ({2 , "华山" }); m.insert ({3 , "泰山" }); js["path" ] = m; cout << js << endl; } int main () vector<int > vec = json_obj["list" ]; for (int & v : vec) { cout << v << " " ; } cout << endl; map<int , string> mymap = json_obj["path" ]; for (auto & p : mymap) { cout << p.first << " " << p.second << endl; } cout << endl; }
输出结果
诸如被kill、或者Ctrl + C终止服务器主程序时,需要处理信号,绑定回调void resetHandler(int)
1 2 3 4 5 6 7 8 9 10 11 12 13 14 15 16 17 18 19 20 21 22 23 24 25 26 27 #include "chatserver.hpp" #include <iostream> using namespace std;#include <signal.h> #include "chatservice.hpp" #include <muduo/base/Logging.h> using namespace muduo;void resetHandler (int ) ChatService::instance ()->reset (); LOG_INFO << "服务器因SIGINT信号退出,用户状态已重置。" ; exit (0 ); } int main () signal (SIGINT, resetHandler); EventLoop loop; InetAddress addr ("127.0.0.1" , 6000 ) ; ChatServer server (&loop, addr, "ChatServer" ) ; ChatService::instance ()->reset (); server.start (); loop.loop (); return 0 ; }
ChatService中的reset()函数,就是调用_userModel的resetAllState()方法。
1 2 3 4 5 6 void ChatService::reset () _userModel.resetAllState (); }
即重置所有用户的状态信息,把所有 online 的改成 offline 。
1 2 3 4 5 6 7 8 9 10 void UserModel::resetAllState () char sql[1024 ] = "update user set state = 'offline' where state = 'online'" ; MySQL mysql; if (mysql.connect ()) { mysql.update (sql); } }
TcpServer m_server - 基于事件驱动的、IO复用+epoll+线程池 的服务器类,完全基于Reactor模型 EventLoop *m_loop - mainLoop的指针, 保存事件循环. 有了事件循环的指针,可以在合适的时候调用quit退出事件循环;
1 2 3 4 5 private : TcpServer _server; EventLoop *_loop;
参数为loop指针, listenAddr, name, 用于初始化TcpServer
1 2 3 4 5 public :ChatServer (EventLoop* loop, const InetAddress& listenAddr, const string& nameArg);
start()
onConnection/onMessage
连接创建/断开的回调函数
读写事件发生的回调函数
1 2 3 4 5 private : void onConnection (const TcpConnectionPtr&) void onMessage (const TcpConnectionPtr&, Buffer*, Timestamp)
1 2 3 4 5 6 7 8 9 10 11 12 13 14 15 16 17 18 19 20 21 22 23 24 25 26 27 28 29 30 31 32 33 34 35 36 37 #ifndef CHATSERVER_H #define CHATSERVER_H #include <muduo/net/TcpServer.h> #include <muduo/net/EventLoop.h> using namespace muduo;using namespace muduo::net;class ChatServer { public : ChatServer (EventLoop* loop, const InetAddress& listenAddr, const string& nameArg); public : void start () private : void onConnection (const TcpConnectionPtr&) void onMessage (const TcpConnectionPtr&, Buffer*, Timestamp) private : TcpServer _server; EventLoop *_loop; }; #endif
本项目基于muduo库,模型是基于事件驱动的、IO复用+epoll+线程池 的网络,完全基于Reactor模型 ,线程暂时设置为 4 个,有一个主Reactor是 IO 线程,主要负责新用户的连接,3个 sub-Reactor 是工作线程,主要负责已连接用户的读写事件的处理。
需要知道,如果客户端异常断网的话,是不会发送TCP报文的,更不会发送JSON信息。
1 2 3 4 5 6 7 8 void ChatServer::onConnection (const TcpConnectionPtr& conn) if (!conn->connected ()) { ChatService::instance ()->cloentCloseException (conn); conn->shutdown (); } }
1 2 3 4 5 6 7 8 9 10 11 12 13 14 15 16 17 18 19 20 21 22 23 void ChatService::clientCloseException (const TcpConnectionPtr &conn) User user; { lock_guard<mutex> lock (_connMutex) ; for (auto it = _userConnMap.begin (); it != _userConnMap.end (); ++it) { if (it->second == conn) { user.setId (it->first); _userConnMap.erase (it); break ; } } } if (user.getId () != -1 ) { user.setState ("offline" ); _userModel.updateState (user); } }
User表
字段名称
字段类型
字段说明
约束
id
INT
用户id
PRIMARY KEY、AUTO_INCREMENT
name
VARCHAR(50)
用户名
NOT NULL
password
VARCHAR(50)
用户密码
NOT NULL
state
ENUM(‘online’, ‘offline’)
当前登录状态
DEFAULT ‘offline’
Friend表
字段名称
字段类型
字段说明
约束
userid
INT
用户id
NOT NULL、联合主键
friendid
INT
好友id
NOT NULL、联合主键
AllGroup表
字段名称
字段类型
字段说明
约束
id
INT
群组id
PRIMARY KEY、AUTO_INCREMENT
groupname
VARCHAR(50)
群组名称
NOT NULL
groupdesc
VARCHAR(200)
群组描述
DEFAULT ‘’
GroupUser表
字段名称
字段类型
字段说明
约束
groupid
INT
群组id
PRIMARY KEY
userid
INT
群组成员id
NOT NULL
grouprole
ENUM(‘creator’, ‘normal’)
群组身份
DEFAULT ‘normal’
OfflineMessage表
字段名称
字段类型
字段说明
约束
userid
INT
用户id
PRIMARY KEY
message
VARCHAR(500)
离线消息(JSON字符串)
NOT NULL
考虑问题:
让网络模块的代码和业务模块的代码解耦。
假设有一个用户在做登录业务,登录业务包含messageID,name,password,要验证用户名密码是否正确。
解耦的方案有两种:
使用基于面向接口的编程。(抽象基类)
基于回调函数 的操作。
登录 - LOGIN_MSG/ACK
注册 - REG_MSG/ACK
加好友 - ADD_FRIEND_MSG
一对一聊天 - ONE_CHAT_MSG
创建群组 - CREATE_GROUP_MSG
加入群组 - ADD_GROUP_MSG
群聊 - GROUP_CHAT_MSG
1 2 3 4 5 6 7 8 9 10 11 12 13 14 15 16 17 18 19 20 21 22 23 24 25 26 27 28 #ifndef PUBLIC_H #define PUBLIC_H enum EnMsgType { LOGIN_MSG = 1 , LOGIN_MSG_ACK, REG_MSG, REG_MSG_ACK, ADD_FRIEND_MSG, ONE_CHAT_MSG, CREATE_GROUP_MSG, ADD_GROUP_MSG, GROUP_CHAT_MSG }; enum EnLoginErrType { LOGIN_SUCCEESS = 0 , LOGIN_REPEAT = 1 , LOGIN_NOTFOUND = 2 , LOGIN_WRONGPWD = 3 }; #endif
业务类型
JSON示例
登录请求消息
"msgid":1,"id":22,"password":"123"
登录响应消息
"msgid":2,"errno":0,"id":22,"name":"xcg"或"msgid":2,"errno":1,"errmsg":"this account is online!"或"msgid":2,"errno":2,"errmsg":"id not found!"或"msgid":2,"errno":3,"errmsg":"password wrong!"
注册请求消息
"msgid":3,"name":"xcg","password":"123"
注册响应消息
"msgid":4,"errno":0,"id":22或"msgid":4,"errno":1
加好友请求消息
"msgid":5,"friendid":12
一对一聊天消息
"msgid":6,"to":12,"msg":"hello!"
创建群组请求消息
"msgid":7,"groupname":"group1","groupdesc":"this is a group."
加入群组请求消息
"msgid":8,"id":22,"groupid":10
群聊请求消息
"msgid":9,"id":22,"groupid":10,"msg":"hello, everyone!"
注销请求消息
"msgid":10,"id":22
1 2 #include "json.hpp" using json = nlohmann::json;
1 2 using MsgHandler = std::function<void (const TcpConnectionPtr&, json&, Timestamp)>;
m_msgHandlerMap
是一个unordered_map<int, MsgHandler>
映射消息类型id 和 事件回调函数
在启动业务服务之前,里面的key value都提前添加好了,不用处理线程安全问题。
1 2 3 private : unordered_map<int , MsgHandler> m_msgHandlerMap;
m_userConnectionMap
是一个unordered_map<int, TcpConnectionPtr>
存储在线用户的通信连接状态。这是聊天服务器实现长连接的基础 。
需要处理线程安全问题。
1 2 3 private : unordered_map<int , TcpConnectionPtr> m_userConnectionMap;
mutex m_connMutex
定义互斥锁,保证m_userConnectionMap的线程安全
1 2 3 private : mutex _connMutex;
UserModel - m_userModel
OfflineMsgModel - m_offlineMsgModel
FriendModel - friendModel
GroupModel - groupModel
1 2 3 4 5 private : UserModel _userModel; OfflineMsgModel _offlineMsgModel; FriendModel _friendModel; GroupModel _groupModel;
私有化, 单例处理
1 2 3 4 public : static ChatService * instance () private : ChatService ();
login - 登陆业务
reg - 注册业务
addFriend - 添加好友业务
oneChat - 一对一聊天业务
createGroup - 创建群组业务
addGroup - 加入群组业务
groupChat - 群组聊天业务
1 2 3 4 5 6 7 8 9 10 11 12 13 14 15 16 17 public : void login (const TcpConnectionPtr &conn, json &js, Timestamp time) void reg (const TcpConnectionPtr &conn, json &js, Timestamp time) void addFriend (const TcpConnectionPtr &conn, json &js, Timestamp time) void oneChat (const TcpConnectionPtr &conn, json &js, Timestamp time) void createGroup (const TcpConnectionPtr &conn, json &js, Timestamp time) void addGroup (const TcpConnectionPtr &conn, json &js, Timestamp time) void groupChat (const TcpConnectionPtr &conn, json &js, Timestamp time)
获取消息对应的处理器
1 2 3 public : MsgHandler getHandler (int msgid) ;
处理客户端异常退出
1 2 3 public : void clientCloseException (const TcpConnectionPtr & conn)
业务重置方法,通常在服务器异常退出时调用
1 2 3 4 5 6 7 8 9 10 11 12 13 14 15 16 17 18 19 20 21 22 23 24 25 26 27 28 29 30 31 32 33 34 35 36 37 38 39 40 41 42 43 44 45 46 47 48 49 50 51 52 53 54 55 56 57 58 59 60 61 62 63 64 65 66 67 68 69 70 71 72 73 74 75 #ifndef CHATSERVICE_H #define CHATSERVICE_H #include <muduo/net/TcpConnection.h> #include <unordered_map> #include <functional> #include "usermodel.hpp" #include "offlinemsgmodel.hpp" #include "friendmodel.hpp" #include "groupmodel.hpp" using namespace std;using namespace muduo;using namespace muduo::net;#include "json.hpp" using json = nlohmann::json;#include <mutex> using MsgHandler = std::function<void (const TcpConnectionPtr&, json&, Timestamp)>;class ChatService { public : static ChatService* instance () public : void login (const TcpConnectionPtr &conn, json &js, Timestamp time) void reg (const TcpConnectionPtr &conn, json &js, Timestamp time) void addFriend (const TcpConnectionPtr &conn, json &js, Timestamp time) void oneChat (const TcpConnectionPtr &conn, json &js, Timestamp time) void createGroup (const TcpConnectionPtr &conn, json &js, Timestamp time) void addGroup (const TcpConnectionPtr &conn, json &js, Timestamp time) void groupChat (const TcpConnectionPtr &conn, json &js, Timestamp time) public : MsgHandler getHandler (int msgid) ; public : void clientCloseException (const TcpConnectionPtr & conn) public : void reset () private : ChatService (); private : UserModel _userModel; OfflineMsgModel _offlineMsgModel; FriendModel _friendModel; GroupModel _groupModel; private : mutex _connMutex; private : unordered_map<int , MsgHandler> _msgHandlerMap; unordered_map<int , TcpConnectionPtr> _userConnectionMap; }; #endif
需要ChatService类中有一个记录用户的连接状态才行。
1 2 3 private : unordered_map<int , TcpConnectionPtr> _userConnMap; mutex _connMutex;
1 2 3 4 5 6 7 8 9 10 11 12 13 14 15 16 17 18 19 20 21 22 23 24 25 26 27 28 29 30 31 32 33 34 35 36 37 38 39 40 41 42 43 44 45 46 47 48 49 50 51 52 53 54 55 56 57 58 59 60 61 62 63 64 65 66 67 68 69 70 71 72 73 74 75 76 77 78 79 void ChatService::login (const TcpConnectionPtr &conn, json &js, Timestamp time) int id = js["id" ].get <int >(); string password = js["password" ]; User user = _userModel.query (id); json response; response["msgid" ] = LOGIN_MSG_ACK; if (user.getId () == id && user.getPassword () == password) { if (user.getState () == "online" ) { response["errno" ] = LOGIN_REPEAT; response["errmsg" ] = "该用户已经登录" ; } else if (user.getState () == "offline" ) { { lock_guard<mutex> lock (_connMutex); _userConnectionMap.insert ({id, conn}); } #ifdef __CLUSTER__ m_redis.subscribe (id); #endif user.setState ("online" ); _userModel.updateState (user); response["errno" ] = LOGIN_SUCCEESS; response["id" ] = user.getId (); response["name" ] = user.getName (); vector<string> offlineMsgVec = _offlineMsgModel.query (id); if (!offlineMsgVec.empty ()) { response["offlinemsg" ] = offlineMsgVec; _offlineMsgModel.remove (id); } vector<User> userVec = _friendModel.query (id); if (!userVec.empty ()) { vector<string> friendJsonInfoVec; for (User &user : userVec) { json js; js["id" ] = user.getId (); js["name" ] = user.getName (); js["state" ] = user.getState (); friendJsonInfoVec.push_back (js.dump ()); } response["friends" ] = friendJsonInfoVec; } } } else if (user.getId () != id) { response["errno" ] = LOGIN_NOTFOUND; response["errmsg" ] = "用户不存在" ; } else if (user.getPassword () != password) { response["errno" ] = LOGIN_WRONGPWD; response["errmsg" ] = "密码验证失败" ; } conn->send (response.dump ()); }
用OfflineMessage数据表存储离线消息。
当处于集群环境时,某一台服务器中的_userConnectionMap只记录了在该服务器在线的用户,User表中查询(_userModel.query(id); user.getState() == "online";)
1 2 3 4 5 6 7 8 9 10 11 12 13 14 15 16 17 18 19 20 21 22 23 24 25 26 27 28 29 30 void ChatService::oneChat (const TcpConnectionPtr &conn, json &js, Timestamp time) int to = js["to" ].get <int >(); { lock_guard<mutex> lock (_connMutex) ; auto it = _userConnectionMap.find (to); if (it != _userConnectionMap.end ()) { it->second->send (js.dump ()); return ; } } #ifdef __CLUSTER__ User user = _userModel.query (to); if (user.getState () == "online" ) { m_redis.publish (to, js.dump ()); return ; } #endif _offlineMsgModel.insert (to, js.dump ()); }
1 2 3 4 5 6 7 8 9 10 11 12 13 14 15 16 17 18 19 20 21 22 23 24 25 26 27 28 29 30 31 32 33 34 35 36 37 38 39 40 41 42 43 void ChatService::groupChat (const TcpConnectionPtr &conn, json &js, Timestamp time) int userid = js["id" ].get <int >(); int groupid = js["groupid" ].get <int >(); vector<int > useridVec = _groupModel.queryGroupUsers (userid, groupid); bool offline = true ; bool reallyOffline = true ; for (int id : useridVec) { { lock_guard<mutex> lock (_connMutex) ; auto it = _userConnectionMap.find (id); if (it != _userConnectionMap.end ()) { offline = false ; reallyOffline = false ; it->second->send (js.dump ()); } } #ifdef __CLUSTER__ if (offline) { User user = _userModel.query (id); if (user.getState () == "online" ) { reallyOffline = false ; m_redis.publish (id, js.dump ()); } } #endif if (reallyOffline) { _offlineMsgModel.insert (id, js.dump ()); } reallyOffline = true ; offline = true ; } }
1 2 3 4 5 6 7 8 9 10 11 12 13 14 15 16 17 18 19 20 21 22 23 24 25 26 27 28 29 30 31 32 33 34 35 36 37 38 39 40 41 42 43 44 45 46 47 48 49 50 51 52 53 54 55 56 57 58 59 60 61 62 63 64 65 66 67 68 69 70 71 72 73 74 75 76 77 78 79 void ChatService::login (const TcpConnectionPtr &conn, json &js, Timestamp time) int id = js["id" ].get <int >(); string password = js["password" ]; User user = _userModel.query (id); json response; response["msgid" ] = LOGIN_MSG_ACK; if (user.getId () == id && user.getPassword () == password) { if (user.getState () == "online" ) { response["errno" ] = LOGIN_REPEAT; response["errmsg" ] = "该用户已经登录" ; } else if (user.getState () == "offline" ) { { lock_guard<mutex> lock (_connMutex); _userConnectionMap.insert ({id, conn}); } #ifdef __CLUSTER__ m_redis.subscribe (id); #endif user.setState ("online" ); _userModel.updateState (user); response["errno" ] = LOGIN_SUCCEESS; response["id" ] = user.getId (); response["name" ] = user.getName (); vector<string> offlineMsgVec = _offlineMsgModel.query (id); if (!offlineMsgVec.empty ()) { response["offlinemsg" ] = offlineMsgVec; _offlineMsgModel.remove (id); } vector<User> userVec = _friendModel.query (id); if (!userVec.empty ()) { vector<string> friendJsonInfoVec; for (User &user : userVec) { json js; js["id" ] = user.getId (); js["name" ] = user.getName (); js["state" ] = user.getState (); friendJsonInfoVec.push_back (js.dump ()); } response["friends" ] = friendJsonInfoVec; } } } else if (user.getId () != id) { response["errno" ] = LOGIN_NOTFOUND; response["errmsg" ] = "用户不存在" ; } else if (user.getPassword () != password) { response["errno" ] = LOGIN_WRONGPWD; response["errmsg" ] = "密码验证失败" ; } conn->send (response.dump ()); }
Object Relation Map - 对象关系映射。
在这个框架中,业务层操作的都是对象,看不到具体的SQL操作。
在DAO层(数据层),才有具体的数据库操作。
解决了痛点:业务模块、数据模块之间的解耦。
(以下命令基于Ubuntu环境)
安装mysql-server和mysql开发包, 包括mysql头文件和动态库文件
1 2 sudo apt-get install mysql-server sudo apt-get install libmysqlclient-dev
初始的用户名和密码是自动生成的,按下面步骤修改mysql的root用户密码为123456
1 2 3 4 5 6 7 ~$ sudo cat /etc/mysql/debian.cnf [client] host = localhost user = debian-sys-maint password = Kk3TbShbFNvjvhpM socket = /var/run/mysqld/mysqld.sock
1 2 3 ~$ mysql -u debian-sys-maint -pKk3TbShbFNvjvhpM
更改密码:参考 https://blog.csdn.net/mrcan666/article/details/124163537?spm=1001.2014.3001.5502
设置MySQL字符编码utf-8,以支持中文操作
1 2 3 4 5 6 7 8 9 10 11 12 13 14 15 16 17 mysql> show variables like "char%"; # 先查看MySQL默认的字符编码 +--------------------------+----------------------------+ | Variable_name | Value | +--------------------------+----------------------------+ | character_set_client | utf8 | | character_set_connection | utf8 | | character_set_database | latin1 | | character_set_filesystem | binary | | character_set_results | utf8 | | character_set_server | latin1 |#不支持中文!!! | character_set_system | utf8 | | character_sets_dir | /usr/share/mysql/charsets/ | +--------------------------+----------------------------+ 8 rows in set (0.06 sec) mysql> set character_set_server=utf8; Query OK, 0 rows affected (0.00 sec)
修改表的字符编码:alter table user default character set utf8;
修改属性的字符编码:alter table user modify column name varchar(50) character set utf8;
需要引入mysql/mysql.h头文件
MYSQL *m_conn
记录MYSQL类型的指针, 以获取这个mysql连接
1 2 private : MYSQL *m_conn;
初始化/释放数据库连接
1 2 3 4 5 public : MySQL (); ~MySQL ();
获取连接, 即获取成员m_conn
1 2 3 public : MYSQL * getConnection () ;
连接数据库, 返回值为bool, 说明连接成功与否
1 2 3 public : bool connect ()
查询操作, 参数是string类型的sql语句, 返回值为MYSQL_RES, 即MySQL结果集类型
1 2 3 public : MYSQL_RES * query (string sql) ;
更新操作, 参数是string类型的sql语句, 返回值为bool, 说明更新成功与否
1 2 3 public : bool update (string sql)
前置全局声明
1 2 3 4 5 6 #include <muduo/base/Logging.h> static string server = "127.0.0.1" ;static string user = "root" ;static string password = "123" ;static string dbname = "chat" ;
调用mysql_init, 实际上只是对mysql连接进行空间资源的开辟, 返回一个指针赋给m_conn成员, 没有真正连接, 因此传入nullptr
1 2 3 4 5 MySQL::MySQL () { m_conn = mysql_init (nullptr ); }
调用mysql_close(m_conn), 对MySQL连接资源进行释放
1 2 3 4 5 6 7 8 MySQL::~MySQL () { if (m_conn != nullptr ) { mysql_close (m_conn); } }
获取连接, 即返回m_conn成员
1 2 3 4 5 MYSQL * MySQL::getConnection () return m_conn; }
连接数据库, 内部调用mysql_real_connect, 传入m_conn, 以及server地址, user号, 密码, 要连接的数据库name, 服务器端口;
1 2 3 4 5 6 7 8 9 10 11 12 13 14 15 16 17 bool MySQL::connect () MYSQL *p = mysql_real_connect (m_conn, server.c_str (), user.c_str (), password.c_str (), dbname.c_str (), 3306 , nullptr , 0 ); if (p != nullptr ) { mysql_query (m_conn, "set name gbk" ); LOG_INFO << "connect mysql success!" ; } else { LOG_INFO << "connect mysql failed!" ; } return p; }
查询操作
内部调用mysql_query, 传入m_conn, sql-string的C风格字符串首址;
mysql_query的返回值:
如果查询成功,返回0;
如果出现错误,返回非0值。
返回值需要调用mysql_use_result(m_conn)获取结果集, 再return
1 2 3 4 5 6 7 8 9 10 MYSQL_RES * MySQL::query (string sql) if (mysql_query (m_conn, sql.c_str ())) { LOG_INFO << __FILE__ << ":" << __LINE__ << ":" << sql << "查询失败!" ; return nullptr ; } return mysql_use_result (m_conn); }
update - 更新操作
内部调用mysql_query, 传入m_conn, sql-string的C风格字符串首址;
判断mysql_query的返回值, 若为非 0 则更新失败 ; 若为 0 则更新成功 ;
1 2 3 4 5 6 7 8 9 10 bool MySQL::update (string sql) if (mysql_query (m_conn, sql.c_str ())) { LOG_INFO << __FILE__ << ":" << __LINE__ << ":" << sql << "更新失败!" ; return false ; } return true ; }
以User类的操作为例
1 2 3 4 5 6 7 8 9 10 11 12 13 14 15 16 17 18 19 20 21 22 23 24 25 26 27 28 29 30 31 32 #ifndef USER_H #define USER_H #include <string> using namespace std;class User { public : User (int id = -1 , string name="" , string password="" , string state="offline" ) : id_ (id), name_ (name), password_ (password), state_ (state) { } public : void setId (int id) void setName (string name) void setPassword (string password) void setState (string state) public : int getId () const return id_;} string getName () const {return name_;} string getPassword () const {return password_;} string getState () const {return state_;} private : int id_; string name_; string password_; string state_; }; #endif
insert - 参数为User的引用, 返回值为bool
query - 参数为id, 返回值为User
updateState - 更新用户的状态信息, 参数为User的一个临时副本, 返回bool
resetAllState - 重置所有用户的状态信息
1 2 3 4 5 6 7 8 9 10 11 12 13 14 15 16 17 18 19 #ifndef USERMODEL_H #define USERMODEL_H #include "user.hpp" class UserModel { public : bool insert (User &user) public : User query (int id) ; public : bool updateState (User user) void resetAllState () }; #endif
1 2 3 4 5 6 7 8 9 10 11 12 13 14 15 16 17 18 19 20 21 22 23 24 25 26 27 28 29 30 31 32 33 34 35 36 37 38 39 40 41 42 43 44 45 46 47 48 49 50 51 52 53 54 55 56 57 58 59 60 61 62 63 64 65 66 67 68 69 70 71 72 73 74 75 76 77 78 79 80 #include "usermodel.hpp" #include "db.h" #include <iostream> using namespace std;bool UserModel::insert (User &user) char sql[1024 ] = {0 }; sprintf (sql, "insert into user(name, password, state) values('%s', '%s', '%s')" , user.getName ().c_str (), user.getPassword ().c_str (), user.getState ().c_str ()); MySQL mysql; if (mysql.connect ()) { if (mysql.update (sql)) { user.setId (mysql_insert_id (mysql.getConnection ())); return true ; } } return false ; } User UserModel::query (int id) char sql[1024 ] = {0 }; sprintf (sql, "select * from user where id = %d" , id); MySQL mysql; if (mysql.connect ()) { MYSQL_RES *res = mysql.query (sql); if (res != nullptr ) { MYSQL_ROW row = mysql_fetch_row (res); if (row != nullptr ) { User user; user.setId (atoi (row[0 ])); user.setName (row[1 ]); user.setPassword (row[2 ]); user.setState (row[3 ]); mysql_free_result (res); return user; } } } return User (); } bool UserModel::updateState (User user) char sql[1024 ] = {0 }; sprintf (sql, "update user set state = '%s' where id = %d" , user.getState ().c_str (), user.getId ()); MySQL mysql; if (mysql.connect ()) { if (mysql.update (sql)) { return true ; } } return false ; } void UserModel::resetAllState () char sql[1024 ] = "update user set state = 'offline' where state = 'online'" ; MySQL mysql; if (mysql.connect ()) { mysql.update (sql); } }
点对点聊天
点对点聊天的json格式:{"msgid":5,"from":"from_name","to":to_id,"msg":"......"}
1 2 3 # 注册 telnet 127.0.0.1 6000 {"msgid":3,"name":"test0511","password":"123"}
1 2 3 4 5 6 7 #登录后一对一聊天 {"msgid":1,"id":22,"password":"123"} {"msgid":6,"from":"test0511","to":13,"msg":"hello zhang san, i am test0511!"} {"msgid":1,"id":13,"password":"123456"} {"msgid":6,"from":"zhang san","to":22,"msg":"hello test0511, i'm zhang san!"}
1 2 3 4 5 6 7 8 9 telnet 127.0.0.1 6000 {"msgid" :1,"id" :22,"password" :"123" } {"msgid" :5,"from" :"xcg" ,"to" :13,"msg" :"hello zhang san, i'm xcg!" } {"msgid" :5,"from" :"xcg" ,"to" :13,"msg" :"hello - 1" } {"msgid" :5,"from" :"xcg" ,"to" :13,"msg" :"hello - 2" } {"msgid" :5,"from" :"xcg" ,"to" :13,"msg" :"hello - 3" }
1 2 3 4 5 telnet 127.0.0.1 6000 {"msgid" :1,"id" :13,"password" :"123456" } {"msgid" :6,"from" :"zhang san" ,"to" :22,"msg" :"hello xcg, i'm zhang san!" }#发送消息
显示有哪些已添加的好友,id
添加好友
但是业务并不严格,只要知道其id即可聊天。
总体业务流程:向服务器发起添加好友的请求,服务器就把关系添加到friend表中,初版本不用征询对方的同意。
friend表就两个字段:userid、friendid是联合主键。
添加好友、登陆成功后显示好友列表
添加好友的JSON格式:{"msgid":6,"id":22,"friendid":13}。此语句意为:id为22的用户主动添加id为13的用户为好友,建立双向关系。
添加后,查看friend表中是否有信息,应有一个id:22 - friendid:13。
1 2 3 4 5 6 7 8 9 10 telnet 127.0.0.1 6000 {"msgid" :1,"id" :22,"password" :"123" } {"msgid" :6,"id" :22,"friendid" :13} telnet 127.0.0.1 6000 {"msgid" :1,"id" :22,"password" :"123" }
管理员创建群
用户加入群
群聊
与群组业务相关的有两张表:一个是AllGroup表,一个是GroupUser表。
AllGroup表有三个字段:id、groupname、groupdesc(群组描述)
GroupUser表,因为群和成员之间是多对多的关系,所以需要此中间表来描述这个关系。有三个字段:groupid、userid、grouprole(成员在群中的权限)。
groupid和userid是联合主键。
这两张表都是处理群组业务的,所以对应的model只创建了一个。
groupmodel.hpp
负载均衡器, 亦叫做反向代理服务器, 在集群服务器架构中, 作为统一接收客户端请求的端口。
其根据配置所界定的负载算法,把客户端的请求分发到业务服务器上。
要做的三件事情:
把 client 的请求按照负载均衡算法分发到具体的业务服务器 ChatServer 上面;
相应地, 服务器的响应也要经过负载均衡器, 准确地返回给这个 client 。
服务器的响应消息,也可以通过服务器和客户端建立一个 IP 隧道实现,达到直接连接, 这样的效率更好;
能够和 ChatServer 保持心跳机制,监测 ChatServer 故障;
能够发现新添加的 ChatServer 设备,方便扩展服务器数量,最好是能够平滑地完成这个过程,而不是需要重启负载均衡服务器导致服务停止。
本项目选择 Nginx 的 TCP 负载均衡模块,要解决的问题
如何进行 Nginx 源码编译,包含 TCP 负载均衡模块
nginx.conf 配置文件中如何配置负载均衡Nginx 的平滑加载配置文件启动
nginx在1.9版本之前,只支持http协议web服务器的负载均衡,从1.9版本开始以后,Nginx开始支持 TCP 的长连接负载均衡 ,--with-stream参数来激活这个模块。
--with-stream)
以nginx-1.12.2.tar.gz为例;
nginx编译安装需要先安装pcre、openssl、zlib等库。
1 sudo apt-get install libpcre3 libpcre3-dev
对开源产品发行源代码的编译安装, 一般都是:
先执行./configure, 生产相应的makefile文件;
make, 进行编译make install, 进行安装
解压nginx-1.12.2.tar.gz后,进入nginx-1.12.2目录,./configure --with-stream生成Makefile后,make,最后make install。
编译完成后,默认安装在了/usr/local/nginx目录。
nginx目录下,可执行文件在sbin目录里,配置文件在conf目录里。
如何配置负载均衡?
/usr/local/nginx/conf/nginx.conf中, 可以看到http字段, 这是基于http的负载均衡配置;
1 2 3 4 5 6 7 8 9 10 11 12 13 14 15 16 17 18 19 20 21 22 23 24 25 worker_processes 1 ;events { worker_connections 1024 ; } http { include mime.types; default_type application/octet-stream; sendfile on ; keepalive_timeout 65 ; server { listen 80 ; server_name localhost; location / { root /var/www/hexo; index index.html index.htm; } error_page 500 502 503 504 /50x.html; location = /50x.html { root html; } } }
而本项目是 TCP 服务器, 需要写到stream下, 表示基于TCP的负载均衡配置;
server字段
listen - nginx负载均衡器将要监听的端口号
proxy_pass - 所有在listen字段端口号上的请求都将分发到这个标记字段所填充到信息中
upstream字段 - 可用于负载均衡的服务器信息
server IP:Port weight=权重 max_fail=最多失败次数 fail_timeout=最长等待响应时间
1 2 3 4 5 6 7 8 9 10 11 12 stream { upstream MyServer { server 127.0.0.1:6000 weight=1 max_fails=3 fail_timeout=30s ; server 127.0.0.1:6002 weight=1 max_fails=3 fail_timeout=30s ; } server { listen 8000 ; proxy_pass MyServer; } }
1 2 nginx -s reload nginx -s stop
我们上面的网络IO模块的 muduo 的网络设计是:reactors in threads - one loop per thread.
而 Nginx 服务器的网络模块设计是基于进程的,采用多个 Reactor 充当 I/O 进程和工作进程 ,通过一把 accept 锁完美解决多个 Reactors 的惊群现象。reactors in process - one loop per process
负载均衡也分为很多种,
可分为业务层负载均衡器,通过业务分发;
也可分为传输层的负载均衡器,通过UDP/TCP分发;
网络层的负载均衡器,通过IP分发;
数据链路层的负载均衡器,通过数据帧分发;
如何更进一步提高并发量?
可以把负载均衡器也进行集群处理, 前端使用一个偏底层的 LVS 负载均衡器, 即, 一台 LVS 加多台 Nginx 服务器的模型。
LVS的并发量很容易扩展到十几万;
本项目中, 用户间的通信模型无非有两种:一对一聊天、群聊。
集群环境中,即用户可能分布在不同服务器主机上。
如果按照之前的代码逻辑,每台服务器上的一个 Server 都只有一个m_userConnectionMap(因为这个是ChatService中的成员,而ChatService是单例模式)。
所以用户给对方发消息后,如果接收方用户不在同一台服务器上,那么该消息就会被当作离线消息,这显然是不对的。
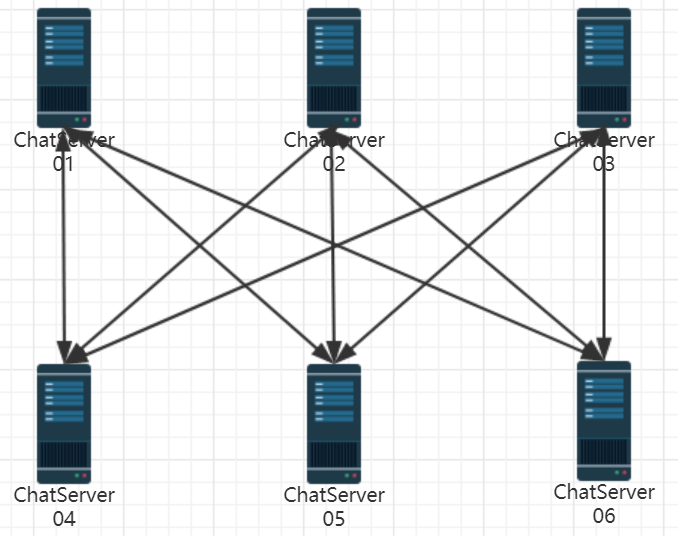
那么怎么解决跨服务器通信呢?
最直观的想法 是让各个ChatServer服务器互相之间直接建立TCP连接进行通信,相当于在服务器网络之间进行广播。
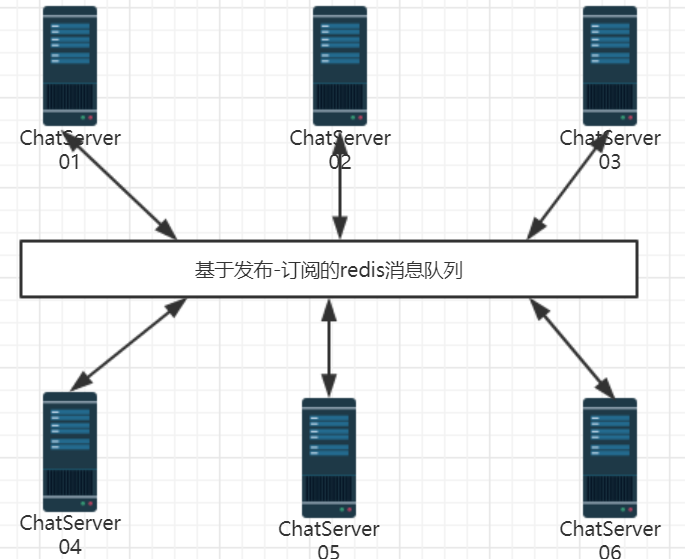
集群部署的服务器之间进行通信,最好的方式就是引入中间件消息队列,
所以答案是引入服务器中间件如消息队列。
如此一来, 服务器仅需做的工作是:向中间件发布订阅消息,之后等待中间件通知去取消息 。
在集群分布式环境中,经常使用的中间件消息队列有 ActiveMQ 、RabbitMQ 、Kafka 等,都是应用场景广泛并且性能很好的消息队列,供集群服务器之间,分布式服务之间进行消息通信。
限于本项目业务类型并不是非常复杂,对并发请求量也没有太高的要求,因此本项目中间件消息队列选型的是:基于发布-订阅模式的 Redis。
Ubuntu安装redis服务命令
1 sudo apt-get install redis-server
安装完成后会自动启动redis服务,通过ps命令确认; redis默认端口为6379
启动redis-cli客户端,连接redis server体验一下数据缓存功能
1 2 3 4 127.0.0.1:6379> set "abc" "hello world" #设置key-value OK 127.0.0.1:6379> get "abc" "hello world"
Redis 的发布-订阅机制:发布-订阅模式包含了两种角色,分别是消息的发布者和消息的订阅者。
订阅者可以订阅一个或者多个频道 channel ,发布者可以向指定的频道 channel 发送消息,所有订阅此频道的订阅者都会收到此消息。
订阅频道的命令是 subscribe,可以同时订阅多个频道,用法是subscribe channel1 [channel2] ...;
1 2 3 4 5 127.0.0.1:6379> subscribe 13 Reading messages... (press Ctrl-C to quit) 1) "subscribe" 2) "13" 3) (integer) 1
1 127.0.0.1:6379> publish 13 "hello, 13" #另一端推送消息给13
订阅了13频道 的用户收到的消息:
1 2 3 1) "message" 2) "13" 3) "hello, 13"
由于服务器是集群化的, 所以登录到本系统的用户可能不在同一聊天服务器上, 需要观察Redis中间件来获取消息;
即, 用户是观察者, 消息队列是被观察者;
某一用户登陆到聊天系统后,
服务器需要向 Redis 订阅某一频道的消息, 这个频道的id号即为该用户的id号;
当该用户给另一用户发送消息时, 发现其不在本服务器中, 需要向该频道发布消息;
redis支持多种不同的客户端编程语言,例如 Java 对应 Jedis ,PHP对应 phpredis ,C++对应的是 hiredis 。
git clone https://github.com/redis/hiredismake && make install
1 2 3 4 5 6 cd hiredismake ... sudo make install
hiredis同步上下文对象
一个专门负责publish消息
一个专门负责subscribe消息
1 2 3 4 5 private : redisContext * m_publish_context; redisContext * m_subscribe_context;
回调操作, 收到订阅的消息, 给service层上报
1 2 3 private : MessageCallback m_notify_handler;
对于"hiredis上下文对象"的理解:
相当于一个redis-cli, 存储了连接相关的信息;
为什么要写两个上下文对象?
如果上下文对象正在subscribe那么其将会阻塞, 所以 subscribe 和 publish 需要分开操作;
1 2 3 public : Redis (); ~Redis ();
连接Redis服务器
1 2 3 public : bool connect ()
1 2 3 4 5 6 7 public : bool publish (int channel, string message) bool subscribe (int channel) bool unsubscribe (int channel)
observer_channel_message
在独立线程中接收订阅频道中的消息
1 2 3 public : void observer_channel_message ()
init_notify_handler
初始化向业务层上报频道消息 的回调函数, 需要用到一个int(频道号), 一个消息内容字符串
1 2 3 4 public : using MessageCallback = function<void (int , string)>; void init_notify_handler (MessageCallback cb)
只是对两个上下文对象指针赋nullptr, 没有实际构造
1 2 3 4 Redis::Redis () : m_publish_context (nullptr ), m_subscribe_context (nullptr ) { }
调用redisFree释放上下文对象资源
1 2 3 4 5 6 7 8 9 10 11 Redis::~Redis () { if (m_publish_context != nullptr ) { redisFree (m_publish_context); } if (m_subscribe_context != nullptr ) { redisFree (m_subscribe_context); } }
对context进行实际的申请资源/构造, 返回指针赋给成员, 底层调用redisConnect
创建线程, 执行observer_channel_message, 即循环等待Redis频道的reply
1 2 3 4 5 6 7 8 9 10 11 12 13 14 15 16 17 18 19 20 21 22 23 24 25 26 27 28 29 bool Redis::connect () m_publish_context = redisConnect ("127.0.0.1" , 6379 ); if (nullptr == m_publish_context) { cerr << "connect redis failed!" << endl; return false ; } m_subscribe_context = redisConnect ("127.0.0.1" , 6379 ); if (nullptr == m_subscribe_context) { cerr << "connect redis failed!" << endl; return false ; } thread t ( [&]() { observer_channel_message();} ) t.detach (); cout << "connect redis-server success!" << endl; return true ; }
相当于向redis-server发送命令, reply接收命令执行结果
1 2 3 4 5 6 7 8 9 10 11 12 13 bool Redis::publish (int channel, string message) redisReply * reply = (redisReply*)redisCommand ( m_publish_context, "PUBLISH %d %s" , channel, message.c_str ()); if (nullptr == reply) { cerr << "publish command failed!" << endl; return false ; } freeReplyObject (reply); return true ; }
相当于把redisCommand细化了, 只操作了发命令, 接收结果交给单独的线程做了, 详见observer_channel_message
1 2 3 4 5 6 7 8 9 10 11 12 13 14 15 16 17 18 19 20 21 22 23 24 bool Redis::subscribe (int channel) if (REDIS_ERR == redisAppendCommand ( m_subscribe_context, "SUBSCRIBE %d" , channel)) { cerr << "subscribe command failed!" << endl; return false ; } int done = 0 ; while (!done) { if (REDIS_ERR == redisBufferWrite (m_subscribe_context, &done)) { cerr << "subscribe command failed!" << endl; return false ; } } return true ; }
1 2 3 4 5 6 7 8 9 10 11 12 13 14 15 16 17 18 19 20 21 22 23 24 bool Redis::unsubscribe (int channel) if (REDIS_ERR == redisAppendCommand ( m_subscribe_context, "UNSUBSCRIBE %d" , channel)) { cerr << "unsubscribe command failed!" << endl; return false ; } int done = 0 ; while (!done) { if (REDIS_ERR == redisBufferWrite (m_subscribe_context, &done)) { cerr << "unsubscribe command failed!" << endl; return false ; } } return true ; }
observer_channel_message
Redis频道如果有消息, 则有三个字段,
对应的是redisGetReply返回的reply->element[0],[1],[2];
本项目的element[1]对应的是频道号;
本项目的element[2]对应的是消息体;
1 2 3 4 5 6 7 8 9 10 11 12 13 14 15 16 17 18 19 20 21 22 23 24 void Redis::observer_channel_message () redisReply *reply = nullptr ; int res = REDIS_ERR; while (REDIS_OK==(res = redisGetReply ( m_subscribe_context, (void **)&reply))) { if (reply != nullptr && reply->element[2 ] != nullptr && reply->element[2 ]->str != nullptr ) { m_notify_handler (atoi (reply->element[1 ]->str), reply->element[2 ]->str ); } freeReplyObject (reply); } if (res == REDIS_ERR) { cerr << "redisGetReply err" << endl; return ; } cerr << "observer_channel_message quit" << endl; }
init_notify_handler
设置m_notify_handler回调
1 2 3 4 void Redis::init_notify_handler (MessageCallback cb) m_notify_handler = cb; }
redisCommand和redisAppendCommand的区别:
redisAppendCommand只是把命令先写到本地缓存中;
写到缓存之后还需要调用redisBufferWrite把缓存中的命令发送到Redis服务器;
最后, 如果要获得reply, 还需要调用redisGetReply获取结果, 这个操作对于subscribe是阻塞的;
由于publish操作一般不会阻塞, 所以直接调用redisCommand;
由于subscribe操作最后的redisGetReply将会阻塞, 所以我们把这几个步骤单独写出来, 粒度减小, 追求效率;
首先, 需要在chatservice.hpp中, 引入头文件"redis.hpp"; 然后在ChatService的类成员变量中声明一个Redis m_redisredis操作对象;
1 2 private : Redis m_redis;
在ChatService类中, 添加一个处理redis业务的成员函数handleRedisSubscribeMessage
1 2 public : void handleRedisSubscribeMessage (int channel, string message)
在chatservice.cpp中, ChatService的构造函数中, 需要添加连接redis服务器的操作;handleRedisSubscribeMessage, 参数为chatservice对象指针, channel, message;
1 2 3 4 5 6 7 8 9 ChatService::ChatService () { if (m_redis.connect ()) { m_redis.init_notify_handler (std::bind ( &ChatService::handleRedisSubscribeMessage, this , _1, _2)); } }