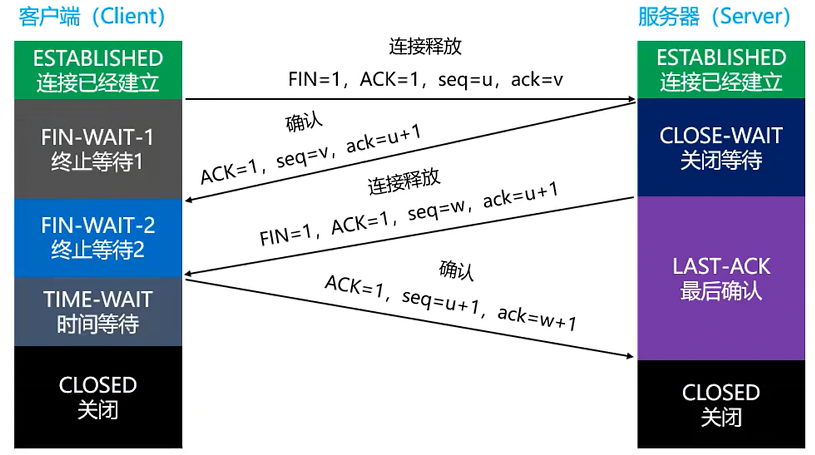
学习muduo库的思想

内容

  1. 阻塞、非阻塞、同步、异步
  2. 五种IO模型
  3. 好的网路服务器设计思路
  4. Reactor模型
  5. select/poll/epollLT/ET模式对比
  6. muduo网络库编程环境配置
  7. muduo网络库的多线程模型
  8. 基于muduo的服务器程序实例
  9. muduo网络库提供的类
  10. muduo网络库中TcpServer类中的回调类型
  11. 代码示例ChatServer及运行测试结果

阻塞、非阻塞、同步、异步

网络IO阶段分为两个:数据准备和数据读写

  • 数据准备–根据系统IO操作的就绪状态
    • 阻塞:调用IO方法的线程进入阻塞状态
    • 非阻塞:不会改变线程的状态,通过返回值判断
  • 数据读写(IO层面的同步和异步)–根据应用程序和内核的交互方式
    • 同步:用户的recv完成了所有的动作,而且因此阻塞或者空转等待。数据是用户从TCP的接收缓冲区搬移的。
    • 异步:应用程序把任务交给操作系统,自己去做别的事情,操作系统处理完后,通知用户层“buf的数据已经准备好了”。可以通过sigio通知或者实现约定的回调方式通知
1
2
3
4
5
6
7
8
9
10
ssize_t recv(int sockfd, void* buf, size_t len, int flags);
int size = recv(sockfd, buf, 1024, 0); //recv阻塞至sockfd上有数据准备好
//如果recv的属性设置为set non-block,则即使sockfd没有数据也会返回,cpu空转

/*
返回值:
size == -1; # 原因可能为1.系统内部错误; 2.当前处于非阻塞模式,无数据
若 errno == EAGAIN 则说明 当前的错误是因为处于非阻塞模式。
size == 0; # 是由于远端的正常close而返回
*/

陈硕:(非)阻塞和异/同步IO的关系:在处理IO的时候,阻塞和非阻塞都是同步IO,只有使用了特殊的API才是异步IO。
image-20220316211609059

即使epoll也是同步的IO,返回发生事件的event,读的时候需要调用recv,所以是同步IO。

  • 业务层面的一个逻辑处理是同步还是异步?
    • 同步:A操作等待B操作完毕,得到返回值,继续处理
    • 异步:A操作告诉B操作它感兴趣的事件及通知方式,A操作继续执行自己的业务逻辑了,等B监听到相应。

总结

一个典型的网络IO接口调用,分为两个阶段,分别是“数据就绪”和“数据读写”,数据就绪阶
段分为阻塞和非阻塞,表现得结果就是,阻塞当前线程或是直接返回。

同步表示A向B请求调用一个网络IO接口时(或者调用某个业务逻辑API接口时),数据的读写都
是由请求方A自己来完成的(不管是阻塞还是非阻塞);异步表示A向B请求调用一个网络IO接口
时(或者调用某个业务逻辑API接口时),向B传入请求的事件以及事件发生时通知的方式,A就
可以处理其它逻辑了,当B监听到事件处理完成后,会用事先约定好的通知方式,通知A处理结
果。

五种IO模型

  • 阻塞 blocking
  • 非阻塞 non-blocking
  • IO复用 IO multiplexing
  • 信号驱动 signal-driven
  • 异步 asynchronous

好的网络服务器设计

在这个多核时代,服务端网络编程如何选择线程模型?libevent作者的观点:one loop(事件循环, 一般用IO复用作为事件分发器) per thread is usually a good model. 多线程服务端编程的问题就转换为如何设计一个高效且易用的event loop,然后每个线程run一个event loop就行了【即muduo库的思想】(当然线程间的同步、互斥少不了,还有其他的耗时事件需要起另外的线程来做)。

  • event loop是non-blocking网络编程的核心,在现实生活中,non-blocking几乎总是和IO-multiplexing一起使用,原因有二:
    • 不要单独使用非阻塞IO:没有人真的会用轮询(busy-polling)来检查某个non-blocking IO操作是否完成,太浪费CPU资源
    • 不要单独使用IO复用(比如阻塞的IO复用):IO multiplexing一般不能和blocking IO用在一起,因为blocking IO中read()/write()/accept()/connect()都有可能阻塞当前线程,这样线程就没办法处理其他socket上的IO操作了
    • 所以当我们提到non-blocking的时候,实际上指的是non-blocking + IO multiplexing,单用其中任何一个都没有办法很好地实现功能。
    • 结论:epoll + 非阻塞IO + 线程池(线程的数目一般对应电脑的CPU核数)

nginx使用的是epoll + fork,是不是不如epoll + pthread?

nginx采用了epoll+fork模型作为网络模块的架构设计,实现了简单好用的负载算法,使各个fork网络进程不会忙的越忙、闲的越闲,并且通过一把乐观锁解决了该模型导致的服务器惊群现象,功能十分强大。

Reactor模型

muduo库和libevent库都是“基于事件驱动的Reactor模型”。

Wikipedia给出的Reactor Design Pattern的解释:

The Reactor design pattern is an event handling pattern for handling service requests delivered concurrently to a service handler by one or more inputs. The service handler then demultiplexes the incoming requests and dispatchers them synchronously to the associated request handlers.

Google Translate:

Reactor 设计模式是一种事件处理模式,用于处理通过一个或多个输入同时交付给服务处理程序的服务请求。 然后,服务处理程序对传入的请求进行多路分解,并将它们同步分配给相关联的请求处理程序。

  • Reactor四个重要组件
    • Event事件
    • Reactor反应堆
    • Demultiplex事件分发器
    • EventHandler事件处理器
1
2
3
4
5
6
7
8
9
10
11
12
13
14
15
16
17
%%时序图例子
sequenceDiagram
participant Event
participant Reactor
participant Demultiplex
participant EventHandler
Event ->> Reactor: 注册Event和Handler
loop 事件集合
Reactor -> Reactor:Event集合
end
Reactor ->> Demultiplex: 向Epoll add/mod/del Event
Reactor ->> Demultiplex: 启动反应堆
loop 事件分发器
Demultiplex -> Demultiplex:开启事件循环epoll_wait
end
Demultiplex ->> Reactor: 返回发生事件的Event
Reactor ->> EventHandler: 调用Event对应的事件处理器EventHandler

epoll

select和poll的缺点

  • select的缺点:
    • 单个进程能够监视的文件描述符的数量存在最大限制,通常是1024(可更改:#define __FD_SETSIZE 1024),但由于select采用轮询的方式扫描文件描述符,则文件描述符数量越多,性能就越差。
    • 内核/用户空间内存拷贝问题,select需要复制大量的句柄数据结构,产生巨大的开销
    • select返回的是含有整个句柄的数组,应用程序需要遍历整个数组才能发现哪些句柄发生了事件
    • select的触发方式是水平触发,应用程序如果没有完成对一个已经就绪的文件描述符进行IO操作,那么之后每次select调用还是会将这些文件描述符通知进程(意思就是一件事情处理得太拖沓,拖延好几次才完成,影响效率)。其实epoll的LT模式也是这样。但是ET模式效率不一定比LT好。
  • poll
    • 相比select模型,poll使用链表保存文件描述符,因此没有了监视文件数量的限制,但其他三个缺点依然存在。

以select模型为例,假设我们的服务器需要支持100万的并发连接,则在__FD_SETSIZE 为1024的情况下,则我们至少需要开辟1k个进程才能实现100万的并发连接。除了进程间上下文切换的时间消耗外,从内核/用户空间大量的句柄结构内存拷贝、数组轮询等,是系统难以承受的。因此,基于select模型的服务器程序,要达到100万级别的并发访问,是一个很难完成的任务。

epoll原理及优势

epoll的实现机制与select/poll机制完全不同。

epoll通过在Linux内核中申请一个简易的文件系统,提升了效率。

文件系统一般用什么数据结构实现——B+树,磁盘IO消耗低、效率很高。

把原先的select/poll调用分成以下3个部分:

  1. 调用epoll_create()建立一个epoll对象(在epoll文件系统中为这个句柄对象分配资源)

    • epoll_create在内核上创建的eventpoll结构如下:

      1
      2
      3
      4
      5
      6
      7
      8
      9
      struct eventpoll
      {
      //...
      /* 红黑树的根节点,这棵树中存储着所有添加到epoll中的需要监控的事件*/
      struct rb_root rbr;
      /* 双链表中则存放着将要通过epoll_wait返回给用户的满足条件的事件*/
      struct list_head rdlist;
      //...
      }
  2. 调用epoll_ctlepoll对象中添加这100万个连接的套接字

  3. 调用epoll_wait收集发生的事件的fd资源

如此一来,要实现上面说的场景,只需在进程启动时建立一个epoll对象,然后在需要时像这个epoll对象中添加或者删除事件。同时epoll_wait时,并没有向操作系统复制这100万个连接的句柄数据,内核也不需要去遍历全部的事件。

  • LT模式,muduo采用的是LT模式
    • 特点:内核数据没被读完,就会一直上报数据
    • 不会丢失数据或者消息
      • 应用没有读取完数据,内核会不断上报
    • 低延迟处理
      • 每次读数据只需要一次系统调用,照顾了多个连接的公平性,不会因为某个连接上的数据量过大而影响其他连接处理消息
    • 跨平台处理
      • 像select一样可以跨平台使用
  • ET模式
    • 特点:内核数据只上报一次,效率相对较高

muduo网络库编程准备

开发环境

  1. ubuntu linux
  2. 安装json开发库
  3. 安装boost + muduo网络库开发环境muduo库源码编译安装
  4. 安装redis环境
  5. 安装mysql数据库环境
  6. 安装nginx
  7. 安装cmake环境

安装流程

  1. muduo库是基于boost开发的,所以需要先在Linux平台上安装boost库。需要注意,boost库的编译需要安装gcc、make等基础工具才行。环境:Ubuntu 20.04.6,太新的Ubuntu由于无法兼容旧代码,不能安装。
    1. tar -xzvf boost_1_69_0.tar.gz解压

    2. 执行./bootstrap.sh:也可以在后面加--prefix=/usr/local指定安装目录(默认路径)

    3. ./b2安装(如果Linux系统没有安装g++编译器,需要先安装)

    4. 最后,再把上面的boost库头文件和lib库文件安装在默认的Linux系统头文件和库文件的搜索路径下,运行下面命令(因为要给/usr目录下拷贝文件,需要先进入root用户):sudo ./b2 install

    5. sudo ldconfig​更新链接库缓存

    6. 验证安装boost是否成功,通过下面的代码验证一下:

      1
      2
      3
      4
      5
      6
      7
      8
      9
      10
      11
      12
      13
      14
      15
      16
      17
      18
      19
      #include <iostream>
      #include <boost/bind.hpp>
      #include <string>
      using namespace std;

      class Hello
      {
      public:
      void say(string name)
      { cout << name << " say: hello world!" << endl; }
      };

      int main()
      {
      Hello h;
      auto func = boost::bind(&Hello::say, &h, "zhang san");
      func();
      return 0;
      }//运行结果zhang san say: hello world!
  2. unzip muduo-master.zip
  3. cd muduo-master
  4. muduo库源码编译会编译很多unit_test测试用例代码,编译耗时长,我们用不到,vim编辑上面源码目录里面的CMakeLists.txt文件,如下修改:


7. ./build.sh源码编译构建程序,运行该程序(注意:muduo是用cmake来构建的,需要先安装cmake,ubuntu下sudo apt-get install cmake就可以,redhat或者centos可以从yum仓库安装)
8. 编译完成后,输入./build.sh install命令进行muduo库安装。但这个./build.sh install实际上把muduo的头文件和lib库文件放到了muduo-master同级目录下的build目录下的release-install-cpp11文件夹下面了

1
2
3
4
5
6
7
8
root@tony-virtual-machine:/home/tony/package# ls
build muduo-master muduo-master.zip
root@tony-virtual-machine:/home/tony/package# cd build/
root@tony-virtual-machine:/home/tony/package/build# ls
release-cpp11 release-install-cpp11
root@tony-virtual-machine:/home/tony/package/build# cd release-install-cpp11/
root@tony-virtual-machine:/home/tony/package/build/release-install-cpp11# ls
include lib

所以上面的install命令并没有把它们拷贝到系统路径下,导致我们每次编译程序都需要指定muduo库的头文件和库文件路径,很麻烦,所以我们选择直接把inlcude(头文件)和lib(库文件)目录下的文件拷贝到系统目录下(需要sudo):

1
2
3
4
5
6
7
8
9
10
11
12
13
14
root@tony-virtual-machine:/home/tony/package/build/release-install-cpp11# ls
include lib
root@tony-virtual-machine:/home/tony/package/build/release-install-cpp11# cd include/
root@tony-virtual-machine:/home/tony/package/build/release-install-cpp11/include# ls
muduo
root@tony-virtual-machine:/home/tony/package/build/release-install-cpp11/include# mv muduo/ /usr/include/
root@tony-virtual-machine:/home/tony/package/build/release-install-cpp11/include# cd ..
root@tony-virtual-machine:/home/tony/package/build/release-install-cpp11# ls
include lib
root@tony-virtual-machine:/home/tony/package/build/release-install-cpp11# cd lib/
root@tony-virtual-machine:/home/tony/package/build/release-install-cpp11/lib# ls
libmuduo_base.a libmuduo_http.a libmuduo_inspect.a libmuduo_net.a
root@tony-virtual-machine:/home/tony/package/build/release-install-cpp11/lib# mv * /usr/local/lib/
root@tony-virtual-machine:/home/tony/package/build/release-install-cpp11/lib#

拷贝完成以后使用muduo库编写C++网络程序,不用在指定头文件和lib库文件路径信息了,因为g++会自动从/usr/include/usr/local/lib路径下寻找所需要的文件。

测试代码

测试muduo是否能够正常使用,编写一个简单的echo回显服务器,如下:

1
2
3
4
5
6
7
8
9
10
11
12
13
14
15
16
17
18
19
20
21
22
23
24
25
26
27
28
29
30
31
32
33
34
35
36
37
38
39
40
41
42
43
44
45
46
47
48
49
50
51
52
53
54
55
56
57
58
59
60
61
62
63
64
65
66
67
#include <muduo/net/TcpServer.h>
#include <muduo/base/Logging.h>
#include <boost/bind.hpp>
#include <muduo/net/EventLoop.h>

// 使用muduo开发回显服务器
class EchoServer
{
public:
EchoServer(muduo::net::EventLoop* loop,
const muduo::net::InetAddress& listenAddr);

void start();

private:
void onConnection(const muduo::net::TcpConnectionPtr& conn);

void onMessage(const muduo::net::TcpConnectionPtr& conn,
muduo::net::Buffer* buf,
muduo::Timestamp time);

muduo::net::TcpServer server_;
};

EchoServer::EchoServer(muduo::net::EventLoop* loop,
const muduo::net::InetAddress& listenAddr)
: server_(loop, listenAddr, "EchoServer")
{
server_.setConnectionCallback(
boost::bind(&EchoServer::onConnection, this, _1));
server_.setMessageCallback(
boost::bind(&EchoServer::onMessage, this, _1, _2, _3));
}

void EchoServer::start()
{
server_.start();
}

void EchoServer::onConnection(const muduo::net::TcpConnectionPtr& conn)
{
LOG_INFO << "EchoServer - " << conn->peerAddress().toIpPort() << " -> "
<< conn->localAddress().toIpPort() << " is "
<< (conn->connected() ? "UP" : "DOWN");
}

void EchoServer::onMessage(const muduo::net::TcpConnectionPtr& conn,
muduo::net::Buffer* buf,
muduo::Timestamp time)
{
// 接收到所有的消息,然后回显
muduo::string msg(buf->retrieveAllAsString());
LOG_INFO << conn->name() << " echo " << msg.size() << " bytes, "
<< "data received at " << time.toString();
conn->send(msg);
}


int main()
{
LOG_INFO << "pid = " << getpid();
muduo::net::EventLoop loop;
muduo::net::InetAddress listenAddr(8888);
EchoServer server(&loop, listenAddr);
server.start();
loop.loop();
}

使用g++进行编译,注意链接muduo和pthread的库文件,编译命令如下:

1
g++ main.cpp -lmuduo_net -lmuduo_base -lpthread -std=c++11

编译链接完成,生成a.out可执行程序,上面的echo服务器监听8888端口,运行上面的a.out回显服务器如下:

1
2
root@tony-virtual-machine:/home/tony/code# ./a.out 
20190404 08:00:15.254790Z 42660 INFO pid = 42660 - main.cpp:61

等待客户端连接,可以打开一个新的shell命令行用netcat命令模拟客户端连接echo服务器进行功能测试,命令如下:

1
2
3
tony@tony-virtual-machine:~$ echo "hello world" | nc localhost 8888

hello world #客户端数据回显

客户端数据回显正确,看看服务器接日志信息打印如下:

1
2
3
4
5
root@tony-virtual-machine:/home/tony/code# ./a.out 
20190404 08:00:15.254790Z 42660 INFO pid = 42660 - main.cpp:61
20190404 08:00:59.438626Z 42660 INFO TcpServer::newConnection [EchoServer] - new connection [EchoServer-0.0.0.0:8888#1] from 127.0.0.1:33480 - TcpServer.cc:80
20190404 08:00:59.438707Z 42660 INFO EchoServer - 127.0.0.1:33480 -> 127.0.0.1:8888 is UP - main.cpp:42
20190404 08:00:59.438812Z 42660 INFO EchoServer-0.0.0.0:8888#1 echo 12 bytes, data received at 1554364859.438723 - main.cpp:53

到此,muduo安装成功,能够正常进行C++网络程序开发!

配置链接库、头文件

muduo库的使用需要链接lib库文件,一般为.so文件。一般.so文件都在/usr/lib或/usr/local/lib路径下。

编译链接使用muduo库的程序需要加后缀-l ...

1
2
3
4
# /usr/lib or /usr/local/lib
# 3 lib: libmuduo_base.so; libmuduo_net.so; libpthread.so
-lmuduo_net -lmuduo_base -lpthread
# 注意顺序,net需要写在前面,因为net依赖base;base写中间,因为依赖phtread

如何在vscode配置这三个库?

vscode中按F1键,搜索edit configurations,将会打开:

项目目录下的.vscode文件夹下的c_cpp_properties.json

1
2
3
4
5
6
7
8
9
10
11
12
13
14
15
16
{
"configurations": [
{
"name": "Linux",
"includePath": [
"${workspaceFolder}/**"
],
"defines": [],
"compilerPath": "/usr/bin/gcc",
"cStandard": "c17",
"cppStandard": "c++20",
"intelliSenseMode": "linux-gcc-x64"
}
],
"version": 4
}

build构建项目的快捷键是ctrl+shift+B键,但若你没有配置过build流程,将会弹出选项让你配置。实际上就是让你配置.vscode下的tasks.json

除了上面这两个json文件,vscode下的cpp项目中还有一个json配置文件是launch.json,是关于调试的配置信息。

1
2
3
4
5
6
7
8
9
10
11
12
13
14
15
16
17
18
19
20
21
22
23
24
25
{
// See https://go.microsoft.com/fwlink/?LinkId=733558
// for the documentation about the tasks.json format
"version": "2.0.0",
"tasks": [
{
"type": "shell",
"label": "build",
"command": "/usr/bin/g++",
"args": [
"-g",
"${file}",
"-o",
"${fileDirname}/${fileBasenameNoExtension}",
],
"options": {
"cwd": "/usr/bin"
},
"problemMatcher": [
"$gcc"
],
"group": "build"
}
]
}

其中,args键就是build时编译链接命令后面加的参数。

我们在此使用muduo库,若想用vscode来一键build,则可以在args里加上三个参数。

1
2
3
4
5
6
7
8
9
10
{
// ...
"args": [
// ...
"-lmuduo_net",
"-lmuduo_base",
"-lpthread"
],
// ...
}

如果配置文件写好了,则就可以在vscode下一键build。

muduo网络库的多线程模型

  • 网络服务器编程常用模型
    1. accept + read/write : 不是并发服务器
    2. accpet + fork (process-pre-connection) : 适合并发连接数不大,计算任务工作量大于fork的开销
    3. accept + thread (thread-pre-connection) : 比方案2的开销小了一点,但是并发造成线程堆积过多
    4. reactors in threads (one loop per thread) : 是muduo的网络设计。有一个main reactor负载accept连接,然后把连接分发到某个sub reactor(采用round-robin的方式来选择sub reactor),该连接的操作都在sub reactor所处的线程中完成。多个连接可能被分派到多个线程中,以充分利用CPU。
    5. reactors in process (one loop pre process) : 是nginx服务器的网络模块设计,基于进程设计,采用多个Reactors充当I/O进程和工作进程,通过一把accept锁完美解决多个Reactors的“惊群现象”。
  • muduo底层的模型

muduo的网络设计:reactors in threads - one loop per thread.

方案的特点是"one loop per thread",有一个main reactor负责accept连接,然后把连接分发到某个sub reactor(轮询方式选择)。该连接的所有操作都在该reactor所处的线程中完成。多个连接可能被分派到多个线程中,以充分利用CPU。如果有过多的耗费CPU IO的计算任务,可以设置一个专门处理耗时计算任务的线程负责处理该类任务。

reactor poll的大小根据CPU核心的数目确定。

1
2
//设置EventLoop的线程个数,底层通过EventLoopThreadPool线程池管理线程类EventLoopThread
_server.setThreadNum(10);

基于muduo的服务器程序

muduo网络库提供的类

  1. TcpServer:用于编写服务器程序的。
  2. TcpClient:用于编写客户端程序的。

这两个类,实际上就是把epoll+线程池封装在一起了。好处就是把网络IO代码和业务代码区分开,使程序员可以专心开发业务代码。

业务代码关注的两件事情:

  1. 用户的连接与断开
  2. 用户的可读写事件

但这两件事情,如果我们使用了网络库,则如何监听、何时发生事件全都由网络库给程序员上报。

muduo库中TcpServer类中重要的回调属性

1
2
3
4
5
6
7
8
void setConnectionCallback(const ConnectionCallback& cb)
{
connectionCallback_ = cb;
}
void setMessageCallback(const MessageCallback & cb)
{
messageCallback_ = cb;
}
1
2
typedef std::function<void (const TcpConnectionPtr&)> ConnectionCallback;
typedef std::function<void (const TcpConnectionPtr&, Buffer*, Timestamp)> MessageCallback;

代码示例 - ChatServer

需要包含的头文件

1
2
3
4
5
#include<muduo/net/TcpServer.h>
#include<muduo/net/EventLoop.h>
#include<functional>
using namespace std::placeholders;
#include<iostream>
1
2
3
4
5
6
7
8
9
10
11
12
13
14
15
16
17
18
19
20
21
22
23
24
25
26
27
28
29
30
31
32
33
34
35
36
37
38
39
40
41
class ChatServer
{
public:
/* 在其中:
* 1、类内构造TcpServer,初始化EventLoop指针
* 2、给TcpServer注册用户连接的创建、连接的断开回调
* 3、给TcpServer注册用户读写事件回调
* 4、设置TcpServer的线程数量,muduo库会自己分配IO线程和工作线程
*/
ChatServer(muduo::net::EventLoop* loop, //事件循环
const muduo::net::InetAddress& listenAddr, //IP+port
const std::string& nameArg) //服务器的名字
: m_server(loop, listenAddr, nameArg),
m_loop(loop)
{
m_server.setConnectionCallback(std::bind(&ChatServer::onConnection, this, _1));
m_server.setMessageCallback(std::bind(&ChatServer::onMessage, this, _1, _2, _3));
m_server.setThreadNum(4);
}
//开启事件循环
void start()
{
m_server.start();
}
private:
//当发生用户的连接创建、连接断开事件后,调用函数
void onConnection(const muduo::net::TcpConnectionPtr &conn)
{

}
//读写事件发生后,调用函数
void onMessage(const muduo::net::TcpConnectionPtr &conn,
muduo::net::Buffer * buffer,
muduo::Timestamp time)
{

}
private:
muduo::net::TcpServer m_server;
muduo::net::EventLoop * m_loop;
};

编写回调函数

OnConnection和OnMessage

1
2
3
4
5
6
7
8
9
10
11
12
13
14
15
16
17
18
19
20
21
22
23
24
25
26
//当发生用户的连接创建、连接断开事件后,调用函数
void onConnection(const muduo::net::TcpConnectionPtr &conn)
{
std::cout << conn->peerAddress().toIpPort() << " -> " <<
conn->localAddress().toIpPort() << " state:";
if(conn->connected())
{
std::cout << " online.";
}
else
{
std::cout << " offline."
conn->shutdown();
//_loop->quit();
}
std::cout << std::endl;
}
//读写事件发生后,调用函数
void onMessage(const muduo::net::TcpConnectionPtr &conn,
muduo::net::Buffer * buffer,
muduo::Timestamp time)
{
std::string buf = buffer->retrieveAllAsString();
std::cout << "recv data: " << buf << " time: " << time.toString() << std::endl;
conn->send(buf);
}

主函数

1
2
3
4
5
6
7
8
int main()
{
muduo::net::EventLoop loop; //相当于创建了一个epoll
muduo::net::InetAddress addr("127.0.0.1", 6000);
ChatServer chatserver(&loop, addr, "mychat");
chatserver.start();
loop.loop(); //相当于调用epoll_wait,以阻塞方式等待新用户连接事件、已连接用户的读写事件
}

测试服务器程序

首先,编译链接需要加后缀-lmuduo_net -lmuduo_base -lpthread

编译链接后,执行程序。

1
./chatserver

可以通过telnet连接服务器。

1
telnet 127.0.0.1 6000

运行结果

1
2
3
4
5
6
7
8
9
xcg@ubuntu:~$ telnet 127.0.0.1 6000
Trying 127.0.0.1...
Connected to 127.0.0.1.
Escape character is '^]'.
hello! #客户端输入显示到屏幕上的,发送给服务器的内容
hello! #收到的服务器复制后回发的一模一样的内容。
^]
telnet> quit
Connection closed.
1
2
3
4
5
6
7
xcg@ubuntu:~/muduo-0528$ ./chatserver 
20220528 08:10:49.554317Z 8116 INFO TcpServer::newConnection [mychat] - new connection [mychat-127.0.0.1:6000#1] from 127.0.0.1:60338 - TcpServer.cc:80
127.0.0.1:60338 -> 127.0.0.1:6000 state: online.
recv data: hello!
time: 1653725453.563665
127.0.0.1:60338 -> 127.0.0.1:6000 state: offline.
20220528 08:10:56.835295Z 8116 INFO TcpServer::removeConnectionInLoop [mychat] - connection mychat-127.0.0.1:6000#1 - TcpServer.cc:109

Cpp_线程库

内容

  1. 线程的构造
  2. detach、join
  3. mutexrecursive_mutexshared_mutex
  4. lock_guardunique_lockshared_lock
  5. chrono
  6. std::ref
  7. jthread
    1. 线程取消
  8. 条件变量
    1. wait、wait_forwait_until
  9. future、promise
    1. packaged_task
    2. async
  10. 信号量
  11. 闩锁(latch)、屏障(Barrier)

chrono

std::this_thread::sleep_for可以用于线程睡眠。

  1. 可以使用<chrono>库下的std::chrono::milliseconds(n)来指定时间单位。
  2. C++17之后可以使用using namespace std::chrono_literals用于把字面常量标识符映射为秒、毫秒等。

thread创建线程 - 卖票程序

  1. std::thread构造。
    1. 参数1填函数地址。
    2. 参数2填函数参数,没有则不填。
    3. 遵循的是RAII,构造完即开始运行。
  2. 线程对象有detach方法用来脱离主线程的管理。防止主线程先于子线程结束导致线程因为整个进程提前终止而未执行完毕。
  3. 也可以使用th.join()方法来让主线程等待子线程执行结束。相当于WaitForSingleObject
1
2
3
4
5
6
7
8
9
10
11
12
13
14
15
16
17
18
19
20
21
22
23
24
25
26
27
28
29
30
31
32
33
34
35
36
37
38
39
40
41
42
43
#include <thread>
#include <chrono>
constinit int tickets = 100;
void station(void);
void station2(void);

int main()
{
std::thread th(&station);
std::thread th2(&station2);
th.detach();
th2.detach();
//std::this_thread::sleep_for(std::chrono::milliseconds(5000));
std::this_thread::sleep_for(5000ms);
}
void station(void)
{
while (true)
{
if (tickets > 0)
{
std::wcout << L"Station #1: " << tickets-- << std::endl;
}
else
{
break;
}
}
}
void station2(void)
{
while (true)
{
if (tickets > 0)
{
std::wcout << L"Station #2: " << tickets-- << std::endl;
}
else
{
break;
}
}
}

输出

1
2
3
4
5
6
7
8
9
10
11
12
13
14
15
16
17
18
19
20
21
22
23
24
25
26
27
28
29
30
Station #1: 100
Station #1: 99
...
Station #1: ...
...
Station #1: 89
Station #1: 88
Station #1: 87
Station #2: 86
Station #2: 85
...
Station #2: ...
...
Station #2: 67
Station #2: 66
Station #2: 65
Station #2: 64
Station #2: 63
Station #2: 62
Station #1: 61
Station #1: 60
...
Station #1: ...
...
Station #1: 5
Station #1: 4
Station #1: 3
Station #1: 2
Station #1: 1
Station #2: 0

发现把0号票卖掉了,错误。

mutex(互斥量)

定义于<mutex>中。

mutex特性:构造函数以及不可复制性

mutex构造函数中指出,构造一个mutex对象,初始状态是解锁。
mutex对象不能被复制、移动(复制构造函数和赋值运算符都被删除)
因此,要特别注意你创建的mutex的生命周期,不建议建立在栈帧随时塌陷的位置。

recursive_mutex(多次互斥量)

单纯的mutex只能锁一次。
recursive_mutex可以锁多次,也可以解锁多次。

基于C++标准线程库互斥量的卖票程序

1
2
3
4
5
6
7
8
9
10
11
12
13
14
15
16
17
18
19
20
21
22
23
24
25
26
27
28
29
30
31
32
33
34
35
36
37
38
39
40
41
42
43
44
45
46
47
48
#include <iostream>
#include <print>
#include <thread>
#include <mutex>
#include <vector>
#include <chrono>
using namespace std::literals;
void seller(std::string const& name, int& ticketsNum, std::mutex& mx);
int main()
{
std::vector<std::jthread> vec_jthreads;
int tickets = 1000;
std::mutex mx;
// start new thread
for (int i = 0; i < 10; ++i)
{
std::stringstream ss;
ss << "seller " << i;
vec_jthreads.emplace_back(seller, ss.str(), std::ref(tickets), std::ref(mx));
}

for (auto& jth : vec_jthreads)
{
jth.join();
}

std::println("Finally, tickets remain: {}", tickets);
return 0;
}
void seller(std::string const& name, int& tickets, std::mutex& mx)
{
std::this_thread::sleep_for(1000ms);
while (true)
{
mx.lock();
if (tickets > 0)
{
std::println("{}: {}", name, tickets);
--tickets;
mx.unlock();
}
else
{
mx.unlock();
break;
}
}
}

输出

1
2
3
4
5
6
7
8
9
10
11
12
13
14
15
16
17
18
Station #1: 500
Station #1: 499
...
Station #1: ...
...
Station #1: 394
Station #1: 393
----------------------
Station #2: 392
Station #2: 391
...
Station #2: ...
...
Station #2: 5
Station #2: 4
Station #2: 3
Station #2: 2
Station #2: 1

分析

可以看到线程1、2各自持有锁的跨度还是挺大的,这是因为在跨平台C++线程库在Windows下的执行是用Windows临界区实现的。

作为引用传入线程函数参数(std::ref

  1. std::mutex锁是不可复制的。只能通过引用传递。
1
2
3
4
5
6
7
8
9
10
11
void station(std::mutex& mx);
int main()
{
std::mutex mx;
std::thread th(&station, mx); // error
th.join();
}
void station(std::mutex& mx)
{
// ...
}

此时,虽然线程函数参数类型为引用,但实际写的代码中,“mx”这个形式和值类型的形式不能区分,编译器无法对其直接解析为引用,产生二义性。(即编译器默认都先按照值传递处理,之后才去处理、区分是否为引用)
2. 因此不能直接裸传,为了显式指出此变量为引用类型,要包装一层“引用包裹器”。std::reference_wrapper(mx),也可以简写为std::ref(mx)。在实际使用到该引用类型变量时,包裹器会自己释放出实际内容。

1
2
3
4
5
6
7
8
9
10
11
12
13
14
15
16
17
18
void station(std::mutex& mx);
void station2(std::mutex& mx);
int main()
{
std::mutex mx;
std::thread th(&station, std::ref(mx));
std::thread th2(&station2, std::ref(mx));
th.join();
th2.join();
}
void station(std::mutex& mx)
{
// ...
}
void station2(std::mutex& mx)
{
// ...
}

解析std::ref

1
2
3
4
5
6
7
8
9
10
11
12
13
14
15
16
17
18
void fun(int n, int & ret)
{
for (int i = 1; i <= n; ++i)
{
cout << "thread fun" << endl;
std::this_thread::sleep_for(std::chrono::milliseconds(100));
}
ret = n;
cout << "thread fun end" << endl;
return n;
}
int main()
{
int x = 10;
std::thread tha(fun, 5, std::ref(x));
tha.join();
cout << x << endl; //输出5
}
1
2
3
4
5
6
7
int main()
{
int x = 10;
std::thread tha(fun, 5, x); //编译不通过
tha.join();
cout << x << endl;
}

为什么直接传x不能编译通过呢?因为thread的构造距离start线程中间有一层可变参模板组件:

1
2
template<class Function, class... Args>
explicit thread(Function&& f, Args&&... args);
1
2
3
4
5
template <class _Fn, class... _Args>
explicit thread(_Fn&& _Fx, _Args&&... _Ax)
{
_Start(_STD forward<_Fn>(_Fx), _STD forward<_Args>(_Ax)...);
}

thread的构造需要先通过这个组件,则由于args是按[模板 &&]接收,如果直接单纯传x,则会识别为普通的int值传递,在到达_Start接口后,xint类型与参数类型int &不匹配,无法编译通过。

所以需要一个特殊的机制,用std::ref显式指出把x按引用方式传递(传地址),如此,在经过模板时,按转发引用处理,经过_Start接口的完美转发后作为右值隐式转换int &类型,如此便可编译通过,达到按引用传参的目的。

为什么是隐式转换?

1
2
3
4
5
6
7
8
9
10
11
12
13
14
15
16
17
18
19
20
21
//std::ref的底层是reference_wrapper类,其中有隐式转换
template <class _Ty>
class reference_wrapper
{
public:
using type = _Ty;

template <class _Uty>
reference_wrapper(_Uty&& _Val)
{
_Ty& _Ref = static_cast<_Uty&&>(_Val);
_Ptr = &_Ref; /*_STD addressof(_Ref);*/
}

operator _Ty&() const noexcept
{
return *_Ptr;
}
private:
_Ty* _Ptr{};
};

测试

1
2
3
4
5
6
7
8
9
10
11
12
13
14
15
16
17
18
19
20
21
22
23
24
25
26
27
28
29
30
31
32
33
34
35
36
37
38
39
40
41
42
43
44
#include<iostream>
#include<thread>
using namespace std;
//std::ref的底层是reference_wrapper类,其中有隐式转换

template <class _Ty>
class my_reference_wrapper
{
public:
using type = _Ty;

template <class _Uty>
my_reference_wrapper(_Uty&& _Val)
{
_Ty& _Ref = static_cast<_Uty&&>(_Val);
_Ptr = &_Ref; /*_STD addressof(_Ref);*/
}

operator _Ty&() const noexcept
{
return *_Ptr;
}
private:
_Ty* _Ptr{};
};
int fun(int n, int& x)
{
for (int i = 1; i <= n; ++i)
{
cout << "thread fun" << endl;
std::this_thread::sleep_for(std::chrono::milliseconds(100));
}
x = n;
cout << "thread fun end" << endl;
return n;
}
int main()
{
int x = 10;

std::thread tha(fun, 5, my_reference_wrapper<int>(x));
tha.join();
cout << x << endl;
}
1
2
3
4
5
template <class _Fn, class... _Args>
explicit thread(_Fn&& _Fx, _Args&&... _Ax)
{
_Start(_STD forward<_Fn>(_Fx), _STD forward<_Args>(_Ax)...);
}

构造tha时的第三个参数是my_reference_wrapper<int>(x),是个右值!传入thread可变参模板函数,完美转发,右值叠加右值,依然是右值,调用_Start时优先匹配&&类型的参数,但是发现没有,而且只有一个匹配的选项是:(int n, int & x),是int&类型,于是乎,无奈之举,调用成员函数operator _Ty(),即为隐式转换为&Ty的左值引用类型。

如此一来,即可把线程函数外部的x按引用传递。

变量的作用域

Modern Cpp引入了一些变量的作用域关键字。
变量的作用域类型:

  1. 全局
  2. auto(局部):在当前栈帧下
  3. thread_local:用于修饰全局变量。不同线程访问相同名字的全局变量,会自动生成副本,对此名字变量的操作只在当前线程有效,不会影响到其他人。

lock_guard

定义于<mutex>中。用于帮助管理mutex。
RAII对象。自动管理生命周期。
需要一个mutex锁来构造。构造后立刻对mutex上锁,直到lock_guard自身析构时对mutex解锁。
与mutex一样,lock_guard对象无法复制/移动。

lock_guard是一个模板类,需要一个模板参数,如填写<std::mutex>。在C++17后,不用填写模板参数,可以自动判断程序代码大括号中的参数类型。

1
2
3
4
5
6
7
8
9
10
11
12
13
14
15
16
17
18
19
20
21
22
23
24
25
26
27
28
29
30
31
32
33
34
35
36
37
38
39
40
void station(std::mutex& mx);
void station2(std::mutex& mx);
int main()
{
std::mutex mx;
std::thread th(&station, std::ref(mx));
std::thread th2(&station2, std::ref(mx));
th.join();
th2.join();
}
void station(std::mutex& mx)
{
while (true)
{
std::lock_guard<std::mutex> lck{ mx };
if (tickets > 0)
{
std::wcout << L"Station #1: " << tickets-- << std::endl;
}
else
{
break;
}
} // 退出此括号时,lck析构
}
void station2(std::mutex& mx)
{
while (true)
{
std::lock_guard lck{ mx }; // 在`C++17`后,不用填写模板参数,可以自动判断程序代码大括号中的参数类型。
if (tickets > 0)
{
std::wcout << L"Station #2: " << tickets-- << std::endl;
}
else
{
break;
}
} // 退出此括号时,lck析构
}

unique_lock

lock_guard的多功能版,可以自己控制unlock、转移所有权。
定义于<mutex>

  1. lock_guard用法一样,但是unique_lock支持转移给另一个unique_lock。(需要使用std::move
  2. 有unlock、release、swap方法。
  3. 可以管理普通mutex,也可以管理shared_mutex
1
2
3
4
5
6
7
8
9
10
11
12
13
14
15
16
17
18
19
20
21
22
23
24
25
26
27
void station(std::mutex& mx);
void station2(std::mutex& mx);
int main()
{
std::mutex mx;
std::thread th(&station, std::ref(mx));
std::thread th2(&station2, std::ref(mx));
th.join();
th2.join();
}
void station(std::mutex& mx)
{
while (true)
{
std::unique_lock lck{ mx };
if (tickets > 0)
{
std::wcout << L"Station #1: " << tickets-- << std::endl;
std::unique_lock lck2 = std::move(lck);
}
else
{
break;
}
} // 退出此括号时,lck2、lck析构
}
// station2 ...

输出

1
2
3
4
5
6
7
8
9
10
11
12
13
14
15
16
17
18
19
20
Station #1: 100
Station #1: 99
...
Station #1: ...
...
Station #1: 67
Station #1: 66
Station #2: 65
Station #2: 64
...
Station #2: ...
...
Station #2: 8
Station #2: 7
Station #2: 6
Station #2: 5
Station #2: 4
Station #2: 3
Station #2: 2
Station #2: 1

shared_mutex(共享互斥量)

定义于<shared_mutex>C++17给出的共享互斥量。

Shared mutexes are especially useful when shared data can be safely read by any number of threads simultaneously, but a thread may only write the same data when no other thread is reading or writing at the same time.

消费者可以共同访问,但不能和生产者一起共享。

  1. 提供的方法:
    1. lock_shared用于消费者共享互斥量。
    2. lock用于生产者独占互斥量。
    3. locklocklocklock_shared都互斥。
  2. 在生产者消费者模型中,lock_sharedunlock_shared用于n个消费者一起进入消费。lockunlock用于阻断所有消费者、其他生产者进入。
1
2
3
4
5
6
7
8
9
10
11
12
13
14
15
16
17
18
19
20
21
22
23
24
25
26
27
28
29
30
31
32
33
34
35
36
37
38
39
40
41
42
43
44
45
46
47
48
49
50
51
52
53
54
55
56
57
58
59
60
61
62
63
64
65
#include <shared_mutex>
#include <iostream>
#include <thread>
#include <chrono>
#include <mutex>
constinit int tickets{ 0 };
void station(std::shared_mutex& mx);
void station2(std::shared_mutex& mx);
void produce(std::shared_mutex& mx);
using namespace std::chrono_literals;

int main()
{
std::shared_mutex mx;
std::thread consumer(&station, std::ref(mx));
std::thread consumer2(&station2, std::ref(mx));
std::thread producer(&produce, std::ref(mx));

consumer.join();
consumer2.join();
producer.join();
}
void produce(std::shared_mutex& mx)
{
while (true)
{
mx.lock();
std::wcout << L"Producer: " << ++tickets << std::endl;
std::this_thread::sleep_for(500ms);
mx.unlock();

}
}
void station(std::shared_mutex& mx)
{
while (true)
{
mx.lock_shared();
if (tickets > 0)
{
std::wcout << L"Station #1: " << tickets-- << std::endl;
mx.unlock_shared();
}
else
{
mx.unlock_shared();
}
}
}
void station2(std::shared_mutex& mx)
{
while (true)
{
mx.lock_shared();
if (tickets > 0)
{
std::wcout << L"Station #2: " << tickets-- << std::endl;
mx.unlock_shared();
}
else
{
mx.unlock_shared();
}
}
}

输出

1
2
3
4
5
6
7
8
9
10
11
12
13
14
15
16
17
18
19
20
21
22
23
Producer: 1
Station #2: 1
Station #1: 0
Producer: 0
Producer: 1
Producer: 2
Producer: 3
Station #2: 3
Station #1: 2
Station #1: 1
Producer: 1
Producer: 2
Producer: 3
Station #2: 3
Station #2: 2
Station #2: 1
Producer: 1
Station #2: 1
Producer: 1
Producer: 2
Producer: 3
Producer: 4
...

分析

  1. 输出中看到1个producer和2个consumer是互斥的,有一方在则另一方不动。
  2. 输出中看到0号票有时候也会被卖掉。证明了mx.lock_shared()只是让n个消费者同时拿到锁,并且没有做进一步的同步管理。

shared_lock和unique_lock搭配管理shared_mutex

  1. shared_mutex的开锁解锁的动作让锁管理器(shared_lockunique_lock)接管。
  2. shared_mutex的lock、unlock动作让unique_lock接管
  3. shared_mutex的lock_shared、unlock_shared动作让shared_lock接管。
1
2
3
4
5
6
7
8
9
10
11
12
13
14
15
16
17
18
19
20
21
22
23
24
25
26
27
28
29
30
31
32
33
34
35
36
37
38
39
40
41
42
43
44
45
46
47
48
49
50
51
52
53
54
55
56
57
58
59
#include <shared_mutex>
#include <iostream>
#include <thread>
#include <chrono>
#include <mutex>
constinit int tickets{ 0 };
void station(std::shared_mutex& mx);
void station2(std::shared_mutex& mx);
void produce(std::shared_mutex& mx);
using namespace std::chrono_literals;

int main()
{
std::shared_mutex mx;
std::thread consumer(&station, std::ref(mx));
std::thread consumer2(&station2, std::ref(mx));
std::thread producer(&produce, std::ref(mx));

consumer.join();
consumer2.join();
producer.join();
}
void produce(std::shared_mutex& mx)
{
while (true)
{
std::unique_lock lck{ mx };
std::wcout << L"Producer: " << ++tickets << std::endl;
std::this_thread::sleep_for(500ms);
}
}
void station(std::shared_mutex& mx)
{
while (true)
{
std::shared_lock lck{ mx };
if (tickets > 0)
{
std::wcout << L"Station #1: " << tickets-- << std::endl;
}
else
{
}
}
}
void station2(std::shared_mutex& mx)
{
while (true)
{
std::shared_lock lck{ mx };
if (tickets > 0)
{
std::wcout << L"Station #2: " << tickets-- << std::endl;
}
else
{
}
}
}

C++多线程与lambda表达式结合

使用lambda表达式定义一个线程函数:每100ms打印从0到100。

1
2
3
4
5
6
7
8
9
10
11
12
13
14
15
16
17
#include <iostream>
#Include <thread>
#include <chrono>

using namespace std::chrono_literals;
int main()
{
std::thread t1([]() -> void
{
for (int i = 0; i <= 100; ++i)
{
std::cout << i << std::endl;
std::this_thread::sleep_for(100ms);
}
});
t1.join();
}

lambda函数参数的处理

lambda表达式作为线程函数,如果有其自己的内部参数,那么就需要传入lambda表达式后,再传入其使用的参数。

1
2
3
4
5
6
7
8
9
10
11
12
13
14
15
16
17
18
19
20
21
22
23
24
25
26
27
28
29
#include <iostream>
#Include <thread>
#include <chrono>

using namespace std::chrono_literals;
int main()
{
auto nums{ 100 };
std::thread t1([](auto nu) -> void
{
for (int i = 0; i <= nu; ++i)
{
std::cout << i << std::endl;
std::this_thread::sleep_for(100ms);
}
nu = 50; // 带不回去
}, nums);
std::thread t2([](int& nu) -> void
{
for (int i = 0; i <= nu; ++i)
{
std::cout << i << std::endl;
std::this_thread::sleep_for(100ms);
}
nu = 50; // 带回去修改了nums的值
}, std::ref(nums));
t1.join();
t2.join();
}
  1. 参数按值传递:lambda形参类型可以用auto。
  2. 参数按引用传递:传参时必须用std::ref。此时由于有引用包裹器,auto不能推导。所以lambda形参类型不可以用auto &,也不可以用auto &&,必须明确ClassName &

jthread

C++20下的加强版thread类

  1. 如果main函数中没写t1的join,那么会先到return 0;,之后在main即将return 0时,t1析构时,自动地为t1调用join,则最后主线程等待t1结束后一起退出。如果明确写了join则按照普通thread的join时机。
  2. 如果只写detach,那么最后就不会自动加join,主线程退出时子线程也会退出。

线程取消


这些 stop_XXX 类型都在<stop_token>中定义,旨在使jthread取消,尽管它们也可以独立使用 std::jthread - 例如,中断std::condition_variable_any等待函数,或用于自定义线程管理实现。事实上,它们甚至不需要用于“停止”任何东西,而是可以用于线程安全的一次性函数调用触发器。(这段话的意思大概是,stop_token只是叫做“停止”,但实际上没有真的停止动作)

stop_token、stop_requested

  1. token会共享一个标记性的对象

  2. 线程可以get_stop_token获得token

  3. 线程可以request_stop通知停止

    1. 旧的让线程停止的手段:需要建立如Windows下的Event,通过Event让线程停止。现在这种stop_token方法使线程停止更简洁了。
  4. 如果要传入stop_token,jthread的线程函数中内部的第1个参数必须写std::stop_token

  5. jthread提供了request_stop函数。提供了get_stop_token函数。

以下程序表示:

  1. 主线程创建t1,内部有一个tok每100ms查看是否有外部请求停止。
  2. 程序执行3s后,主线程调用t1.request_stop()请求t1停止。
1
2
3
4
5
6
7
8
9
10
11
12
13
14
15
16
17
18
19
20
21
22
23
24
25
#include <iostream>
#include <thread>

using namespace std::chrono_literals;
int main()
{
std::jthread t1([](std::stop_token tok) -> void
{
for (int i = 0; i <= 100; ++i)
{
std::cout << i << std::endl;
if (tok.stop_requested())
{
break;
}
std::this_thread::sleep_for(100ms);
}
});

std::this_thread::sleep_for(3s);
t1.request_stop();

t1.join();
return 0;
}

应用场景

传输文件过程中,通过token这种类似于信号的东西,用于控制另一个线程。(传统方法是需要WaitForSingleObject,较为繁琐)
这是一种面向对象的设计,token可以通过传参传递,按照事件通知的方式,按需快速使用。

stop_possible

可看std::stop_token::stop_possible中的代码示例。

stop_source

jthread对象可以通过调用get_stop_source,返回与 jthread 对象内部保存的相同共享停止状态关联的 std::stop_source

获取到jthread的source后就不用操作jthread了,可以通过source进行:

  1. source.get_token(),就相当于t1.get_stop_token()
  2. source.request_stop()
1
2
3
4
5
6
7
8
9
10
11
12
13
14
15
16
17
18
19
20
21
22
23
#include <iostream>
#include <thread>
#include<stop_token>
using namespace std::chrono_literals;
int main()
{
std::jthread t1([](std::stop_token tok) -> void
{
for (int i = 0; i <= 100; ++i)
{
std::cout << i << std::endl;
if (tok.stop_requested())
{
break;
}
std::this_thread::sleep_for(100ms);
}
});

auto source = t1.get_stop_source();
std::this_thread::sleep_for(3s);
source.request_stop();
}

stop_callback

定义于<stop_token>,用于搭配stop_token使用,指示线程取消后进行的回调操作。

  1. 需要一个stop_token和一个函数作为构造
  2. 当该stop_token对应的线程得到stop_requested信号时,调用stop_callback构造时绑定的函数。
1
2
3
4
5
6
7
8
9
10
11
12
13
14
15
16
17
18
19
20
21
22
23
24
25
26
27
#include <iostream>
#include <thread>
#include <stop_token>
using namespace std::chrono_literals;
int main()
{
std::jthread t1([](std::stop_token tok) -> void
{
for (int i = 0; i <= 100; ++i)
{
std::cout << i << std::endl;
if (tok.stop_requested())
{
break;
}
std::this_thread::sleep_for(100ms);
}
});

std::stop_callback cb{ t1.get_stop_token(), []() -> void
{
std::wcout << L"Stopped!" << std::endl;
} };

std::this_thread::sleep_for(3s);
t1.request_stop();
}

可能的输出:

1
2
3
4
5
6
7
8
9
10
11
12
13
14
15
16
17
18
19
20
21
22
23
24
25
26
27
28
29
30
0
1
2
3
4
5
6
7
8
9
10
11
12
13
14
15
16
17
18
19
20
21
22
23
24
25
26
27
Stopped!
28

条件变量(wait)

C++11就开始引入了

类似于Windows下的信号(事件)。

Modern C++中通用的用于通知、等待的工具。

需要和锁配套使用,因为cv的wait方法需要传入一个std::unique_lock<std::mutex>参数

以下程序说的是:

  1. 创建一个t1线程
  2. t1线程尝试拿mx锁
  3. 拿到mx后,在mx锁上面wait,释放锁,之后休眠(进入等待队列)
  4. 如果没有通知则一直阻塞。
  5. 主线程休眠3s
  6. 主线程notify通知等待队列,唤醒了t1线程。
  7. 子线程t1被唤醒后,必须重新获取锁,才能返回从而继续下一步。

综上所述,wait有三大步骤:

  1. 释放锁
  2. 休眠,进入等待队列
  3. 被唤醒,尝试获取锁。
    1. 如果成功则进行下一步操作。
    2. 如果暂时没拿到锁则阻塞,直到拿到锁后才能进行下一步。
      1. 但这是因抢锁而导致阻塞,和wait的等待队列是两码事!
      2. 也就是说(再次强调):wait是主动阻塞(wait之前拿到了锁,但是条件为假,主动放弃了锁)。而一旦条件为真,且被唤醒后,抢锁没抢到,则是被动阻塞。

除了这三大步骤,还有一大前提:系统假定在wait调用前,其中的mx互斥量已上锁。所以必须在拿到锁之后才能wait。

1
2
3
4
5
6
7
8
9
10
11
12
13
14
15
16
17
18
19
20
21
#include <condition_variable>
#include <mutex>
std::mutex mx;
std::condition_variable cv;
using namespace std::chrono_literals;
int main()
{
std::jthread t1([]() -> void
{
std::unique_lock lck{ mx };
cv.wait(lck);
for (int i = 0; i <= 100; ++i)
{
std::cout << i << std::endl;

std::this_thread::sleep_for(100ms);
}
});
std::this_thread::sleep_for(3s);
cv.notify_one();
}

注意事项

据《操作系统导论》P252 30.1节 中的提示:

推荐在发notify信号时总是持有锁

尽管并不是所有情况下都严格需要,但有效且简单的做法还是在使用条件变量发送notify信号时持有锁(指要发送notify的线程)。有的例子是必须加锁的情况,但也有一些情况可以不加锁,而这可能是你应该避免(避免再去分情况考虑)的。因此,为了简单,请在调用 signal(也就是notify) 时持有锁(hold the lock when calling signal)。

这个提示的反面,即调用 wait 时持有锁,但这就不只是建议了,wait 的语义是强制要求前提持有锁的。因为 wait 调用总是假设你调用它时已经持有锁、调用者睡眠之前会释放锁以及返回前重新持有锁。

因此,可以提出一般化形式,保证程序正确:调用 signal 和 wait 时都要持有锁(hold the lock when calling signal or wait)。

就拿上面的例子来说,如果不对notify_one加以同步控制的话,有可能t1线程在lck上锁的时候,主线程恰好notify_one,导致在其wait之前唤醒,则wait之后再也没有唤醒的机会,程序就一直阻塞了。

所以,在主线程中的cv.notify_one()语句之前加锁(记得和t1中mutex变量一致)。
而且既然在cv.notify_one()之前加了锁,就要在cv.notify_one()之后解锁,是因为wait被唤醒之后还需要得到锁才能脱离阻塞继续下一步操作。

1
2
3
4
5
6
7
8
9
10
11
int main()
{
// t1 ...

std::this_thread::sleep_for(3s);

std::unique_lock lck{ mx }; // add
cv.notify_one();
lck.unlock(); // add

}

wait_for

1
2
template <class Rep, class Period>
cv_status wait_for (unique_lock<mutex>& lck, const chrono::duration<Rep,Period>& rel_time);

在wait的基础上,既可以通过获得通知得到唤醒,也可以计时超时得到唤醒。
即:超时后与被notify的行为一样,尝试获取锁,如果成功则下一步,如果失败则阻塞。
但返回值有特点,超时则返回std::cv_status::timeout,其他情况返回std::cv_status::no_timeout

用处:结合notify来停止线程

wait是用于通知线程开始下一步动作。
wait_for则可以用于通知线程停止

以下程序是说:2个条件变量,cvcv2cv用于wait,以决定何时开始。cv2用于wait_for,结合返回值status,在一段时间等待停止的信号。
主线程:

  1. 在释放了cv对应的lck后,子线程wait成功获取到锁开始下一步。
  2. 休眠3s,保证子线程可以至少执行3s。
  3. 之后与子线程竞争lck2锁,一旦主线程拿到了,当即notify给cv2,之后释放锁。

子线程:

  1. 在cv上等待,一旦获取lck则下一步。
  2. 每次for循环都先抢lck2锁
    1. 在主线程休眠的3s内,肯定能抢到。并且每次wait_for释放锁也不会被别人抢,即不会被notify,所以返回值应该都是timeout
    2. 3s主线程唤醒后,与主线程竞争lck2锁
      1. 如果子先抢到了,则这一次for循环在wait_for时lck2释放50ms,如果主线程在此期间抢到了,并且发了notify,则status为no_timeout,子线程break结束。此情况下只能打印一半。
      2. 也有可能:for每次循环结束时,释放锁,主线程在很小很小的空挡内抢到锁,导致提前notify,错过cv2等待的时机,但是这个可能很小。此情况下1000个数全部输出。
1
2
3
4
5
6
7
8
9
10
11
12
13
14
15
16
17
18
19
20
21
22
23
24
25
26
27
28
29
30
31
32
33
34
35
36
37
38
39
40
#include <condition_variable>
#include <mutex>
#include <iostream>
std::mutex mx, mx2;
std::condition_variable cv, cv2;
using namespace std::chrono_literals;
int main()
{
std::jthread t1([]() -> void
{
std::unique_lock lck{ mx };
cv.wait(lck);
std::cout << "Got the Notify to Start!" << std::endl;

for (int i = 0; i <= 1000; ++i)
{
std::cout << i << std::endl;

std::unique_lock lck2{ mx2 };
if (auto status = cv2.wait_for(lck2, 50ms);
status == std::cv_status::no_timeout)
{
std::cout << "Got the Notify to Out!" << std::endl;
break;
}
else
{
std::cout << "Timeout: No Notify" << std::endl;
}
}
});
std::this_thread::sleep_for(1s);
std::unique_lock lck{ mx };
cv.notify_one();
lck.unlock();
std::this_thread::sleep_for(3s);
std::unique_lock lck2{ mx2 };
cv2.notify_one();
lck2.unlock();
}

输出

1
2
3
4
5
6
7
8
9
10
11
12
13
14
15
16
17
18
19
20
21
22
23
24
25
26
27
28
29
30
31
32
33
34
35
36
37
38
39
40
41
42
43
44
45
46
47
48
49
50
51
52
53
54
55
56
57
58
59
60
61
62
63
64
65
66
67
68
69
70
71
72
73
74
75
76
77
78
79
80
81
82
83
84
85
86
87
88
89
90
91
92
93
94
95
96
97
98
99
Got the Notify to Start!
0
Timeout: No Notify
1
Timeout: No Notify
2
Timeout: No Notify
3
Timeout: No Notify
4
Timeout: No Notify
5
Timeout: No Notify
6
Timeout: No Notify
7
Timeout: No Notify
8
Timeout: No Notify
9
Timeout: No Notify
10
Timeout: No Notify
11
Timeout: No Notify
12
Timeout: No Notify
13
Timeout: No Notify
14
Timeout: No Notify
15
Timeout: No Notify
16
Timeout: No Notify
17
Timeout: No Notify
18
Timeout: No Notify
19
Timeout: No Notify
20
Timeout: No Notify
21
Timeout: No Notify
22
Timeout: No Notify
23
Timeout: No Notify
24
Timeout: No Notify
25
Timeout: No Notify
26
Timeout: No Notify
27
Timeout: No Notify
28
Timeout: No Notify
29
Timeout: No Notify
30
Timeout: No Notify
31
Timeout: No Notify
32
Timeout: No Notify
33
Timeout: No Notify
34
Timeout: No Notify
35
Timeout: No Notify
36
Timeout: No Notify
37
Timeout: No Notify
38
Timeout: No Notify
39
Timeout: No Notify
40
Timeout: No Notify
41
Timeout: No Notify
42
Timeout: No Notify
43
Timeout: No Notify
44
Timeout: No Notify
45
Timeout: No Notify
46
Timeout: No Notify
47
Timeout: No Notify
48
Got the Notify to Out!

问题

上面那个程序,经过VS编译运行在Windows11时,很有可能会出现这种情况:
(为了让问题更加明显,主线程部分代码改为以下:加长了第二段睡眠时间,并且在睡眠前后加输出提示)

1
2
3
4
5
6
7
8
9
10
11
12
13
14
15
16
17
int main()
{
// ...
std::this_thread::sleep_for(1s);
std::wcout << L"After Sleep 1s..." << std::endl;

std::unique_lock lck{ mx };
cv.notify_one();
lck.unlock();

std::wcout << L"Before Sleep 8s..." << std::endl;
std::this_thread::sleep_for(8s);
std::wcout << L"After Sleep 8s..." << std::endl;
std::unique_lock lck2{ mx2 };
cv2.notify_one();
lck2.unlock();
}

主线程明明8秒后才会notify_one,但是某时的输出结果下,居然很快就让子线程停止了,这是怎么回事?
观察输出信息,发现,主线程还没输出After Sleep 8s...,子线程就被通知了,证明notify肯定不是主线程发出的。

1
2
3
4
5
6
7
8
9
10
11
12
13
14
15
16
After Sleep 1s...
Before Sleep 8s...
Got the Notify to Start!
0
Timeout: No Notify
1
Timeout: No Notify
2
Timeout: No Notify
3
Timeout: No Notify
4
Timeout: No Notify
5
Got the Notify to Out!

假唤醒

在wait(普通、for、until)等待过程中,线程可能会因为假唤醒而提前被唤醒,而不是因为条件变量被通知。

假唤醒可以看作是操作系统故意替程序员notify_one,会让子线程会认为wait_for已经被唤醒,从而退出循环。

普通的wait在Windows下不会假唤醒。而在Unix、Linux、Solaris、AIX中行为可能会不同。

在当前的代码中,当wait_for返回时,仅通过检查timeout与否来决定是否退出循环。如果是因为假唤醒而返回,status == std::cv_status::no_timeout可能依然为真,这会导致线程提前结束。

为了防止假唤醒带来的问题,通常的做法是在等待后检查共享条件变量状态是否满足。你可以通过在wait_for之后再检查一个bool标志(例如stop_requested)来决定是否退出循环。
在上面的程序中,在全局区定义它,初值为false,并且在cv2.notify_one语句之前置为true。这样,不仅要通过判断是否timeout,还要判断bool标志,以确信是我们自己发出的唤醒。

1
2
3
4
5
6
7
8
9
10
11
12
13
14
15
16
17
18
19
20
21
22
23
24
25
26
27
28
29
30
31
32
33
34
35
36
37
38
39
40
41
42
43
44
45
46
47
48
#include <condition_variable>
#include <mutex>
#include <iostream>
std::mutex mx, mx2;
std::condition_variable cv, cv2;
bool stop_requested = false;
using namespace std::chrono_literals;
int main()
{
std::jthread t1([]() -> void
{
std::unique_lock lck{ mx };
cv.wait(lck);
std::cout << "Got the Notify to Start!" << std::endl;

for (int i = 0; i <= 1000; ++i)
{
std::cout << i << std::endl;

std::unique_lock lck2{ mx2 };
if (auto status = cv2.wait_for(lck2, 50ms);
status == std::cv_status::no_timeout && stop_requested == true)
{
std::cout << "Got the Notify to Out!" << std::endl;
break;
}
else
{
std::cout << "Timeout: No Notify" << std::endl;
}
}
});
std::this_thread::sleep_for(1s);
std::wcout << L"After Sleep 1s..." << std::endl;

std::unique_lock lck{ mx };
cv.notify_one();
lck.unlock();

std::wcout << L"Before Sleep 8s..." << std::endl;
std::this_thread::sleep_for(8s);
std::wcout << L"After Sleep 8s..." << std::endl;

std::unique_lock lck2{ mx2 };
stop_requested = true;
cv2.notify_one();
lck2.unlock();
}

可用lambda表达式作为谓词简化代码

1
wait(lck, [&stop_requested]() -> bool { return stop_requested; });

输出

1
2
3
4
5
6
7
8
9
10
11
12
13
14
15
16
17
18
19
20
21
22
23
24
25
26
27
28
29
30
31
32
33
34
35
36
37
38
39
40
41
42
43
44
45
46
47
48
49
50
51
52
53
54
55
56
57
58
59
60
61
62
63
64
65
66
67
68
69
70
71
72
73
74
75
76
77
78
79
80
81
82
83
84
85
86
87
88
89
90
91
92
93
94
95
96
97
98
99
100
101
102
103
104
105
106
107
108
109
110
111
112
113
114
115
116
117
118
119
120
121
122
123
124
125
126
127
128
129
130
131
132
133
134
135
136
137
138
139
140
141
142
143
144
145
146
147
148
149
150
151
152
153
154
155
156
157
158
159
160
161
162
163
164
165
166
167
168
169
170
171
172
173
174
175
176
177
178
179
180
181
182
183
184
185
186
187
188
189
190
191
192
193
194
195
196
197
198
199
200
201
202
203
204
205
206
207
208
209
210
211
212
213
214
215
216
217
218
219
220
221
222
223
224
225
226
227
228
229
230
231
232
233
234
235
236
237
238
239
240
241
242
243
244
245
246
247
248
249
250
251
252
253
254
255
256
257
258
259
260
261
262
263
264
265
After Sleep 1s...
Before Sleep 8s...
Got the Notify to Start!
0
Timeout: No Notify
1
Timeout: No Notify
2
Timeout: No Notify
3
Timeout: No Notify
4
Timeout: No Notify
5
Timeout: No Notify
6
Timeout: No Notify
7
Timeout: No Notify
8
Timeout: No Notify
9
Timeout: No Notify
10
Timeout: No Notify
11
Timeout: No Notify
12
Timeout: No Notify
13
Timeout: No Notify
14
Timeout: No Notify
15
Timeout: No Notify
16
Timeout: No Notify
17
Timeout: No Notify
18
Timeout: No Notify
19
Timeout: No Notify
20
Timeout: No Notify
21
Timeout: No Notify
22
Timeout: No Notify
23
Timeout: No Notify
24
Timeout: No Notify
25
Timeout: No Notify
26
Timeout: No Notify
27
Timeout: No Notify
28
Timeout: No Notify
29
Timeout: No Notify
30
Timeout: No Notify
31
Timeout: No Notify
32
Timeout: No Notify
33
Timeout: No Notify
34
Timeout: No Notify
35
Timeout: No Notify
36
Timeout: No Notify
37
Timeout: No Notify
38
Timeout: No Notify
39
Timeout: No Notify
40
Timeout: No Notify
41
Timeout: No Notify
42
Timeout: No Notify
43
Timeout: No Notify
44
Timeout: No Notify
45
Timeout: No Notify
46
Timeout: No Notify
47
Timeout: No Notify
48
Timeout: No Notify
49
Timeout: No Notify
50
Timeout: No Notify
51
Timeout: No Notify
52
Timeout: No Notify
53
Timeout: No Notify
54
Timeout: No Notify
55
Timeout: No Notify
56
Timeout: No Notify
57
Timeout: No Notify
58
Timeout: No Notify
59
Timeout: No Notify
60
Timeout: No Notify
61
Timeout: No Notify
62
Timeout: No Notify
63
Timeout: No Notify
64
Timeout: No Notify
65
Timeout: No Notify
66
Timeout: No Notify
67
Timeout: No Notify
68
Timeout: No Notify
69
Timeout: No Notify
70
Timeout: No Notify
71
Timeout: No Notify
72
Timeout: No Notify
73
Timeout: No Notify
74
Timeout: No Notify
75
Timeout: No Notify
76
Timeout: No Notify
77
Timeout: No Notify
78
Timeout: No Notify
79
Timeout: No Notify
80
Timeout: No Notify
81
Timeout: No Notify
82
Timeout: No Notify
83
Timeout: No Notify
84
Timeout: No Notify
85
Timeout: No Notify
86
Timeout: No Notify
87
Timeout: No Notify
88
Timeout: No Notify
89
Timeout: No Notify
90
Timeout: No Notify
91
Timeout: No Notify
92
Timeout: No Notify
93
Timeout: No Notify
94
Timeout: No Notify
95
Timeout: No Notify
96
Timeout: No Notify
97
Timeout: No Notify
98
Timeout: No Notify
99
Timeout: No Notify
100
Timeout: No Notify
101
Timeout: No Notify
102
Timeout: No Notify
103
Timeout: No Notify
104
Timeout: No Notify
105
Timeout: No Notify
106
Timeout: No Notify
107
Timeout: No Notify
108
Timeout: No Notify
109
Timeout: No Notify
110
Timeout: No Notify
111
Timeout: No Notify
112
Timeout: No Notify
113
Timeout: No Notify
114
Timeout: No Notify
115
Timeout: No Notify
116
Timeout: No Notify
117
Timeout: No Notify
118
Timeout: No Notify
119
Timeout: No Notify
120
Timeout: No Notify
121
Timeout: No Notify
122
Timeout: No Notify
123
Timeout: No Notify
124
Timeout: No Notify
125
Timeout: No Notify
126
Timeout: No Notify
127
Timeout: No Notify
128
Timeout: No Notify
129
After Sleep 8s...
Got the Notify to Out!

wait_until

1
2
template <class Clock, class Duration>
cv_status wait_until (unique_lock<mutex>& lck, const chrono::time_point<Clock,Duration>& abs_time);

wait_for行为一样,不同点在于:

  1. wait_for的时间是时间段、间隔。
  2. wait_until的时间是时间点。

future

在标头 <future> 中定义

顾名思义,future就是为了用于获取返回值的。内部包装了一个任务或函数。

future是给期待方使用来get获取值的。
promise是给承诺方使用来set设置值的。

以下程序表示:子线程期待一个值,此值由主线程提供。通过给子线程传入future实现。
主线程定义一个promise,生成一个该promise的future传给t子线程函数。
子线程调用fut.get()阻塞式等待主线程对fut相应的promise发送信息。
一旦主线程向promise发送信息,子线程就会被通知,随后返回得到val。

1
2
3
4
5
6
7
8
9
10
11
12
13
14
15
16
17
18
#include <future>
#include <chrono>
using namespace std::chrono_literals;
int main()
{
std::promise<int> prom;
std::future<int> fut = prom.get_future();
std::jthread t([](std::future<int> fut) -> void
{
std::wcout << L"Start & Wait..." << std::endl;
int val = fut.get();
std::wcout << L"Got a value: " << val << std::endl;
}, std::move(fut));

std::this_thread::sleep_for(5s);
prom.set_value(50);
std::this_thread::sleep_for(1s);
}

输出:

1
2
Start & Wait...
Got a value: 50

shared_future

shared_future可以让多个线程同时监听一个共享的future。
调用fut.share()即可获得shared_future类型的future,可以传入到线程函数中使用。

不要多次调用fut.share(),否则之前的shared_future会失效。

1
2
3
4
5
6
7
8
9
10
11
12
13
14
15
16
17
18
19
20
21
22
int main()
{
std::promise<int> prom;
auto fut = prom.get_future();
auto shared_fut = fut.share();

std::jthread t1([](std::shared_future<int> shared_fut) -> void
{
std::wcout << L"t1 Start & Wait..." << std::endl;
auto val = shared_fut.get();
std::wcout << L"t1 Got a value: " << val << std::endl;
}, shared_fut);
std::jthread t2([](std::shared_future<int> shared_fut) -> void
{
std::wcout << L"t2 Start & Wait..." << std::endl;
auto val = shared_fut.get();
std::wcout << L"t2 Got a value: " << val << std::endl;
}, shared_fut);
std::this_thread::sleep_for(5s);
prom.set_value(50);
std::this_thread::sleep_for(1s);
}

输出:

1
2
3
4
t2 Start & Wait...
t1 Start & Wait...
t2 Got a value: 50
t1 Got a value: 50

packaged_task

用于从子线程获得输出值。

与promise一样,packaged_task 是承诺方,是给出值的。可以调用get_future获得其对应的future。期待方可以通过此future获取其返回值。

创建子线程时,传入定义好的 packaged_task,需要std::move移动。

以下程序表示:主线程期待一个值,此值由子线程提供。通过给子线程传入 packaged_task 实现。

1
2
3
4
5
6
7
8
9
10
11
12
13
14
15
16
17
18
19
20
21
#include <future>
using namespace std::chrono_literals;
int main()
{
std::packaged_task<int(int)> pkg{ [](int v) -> int
{
for (auto i = v; i >= 0; --i)
{
std::cout << i << std::endl;
std::this_thread::sleep_for(200ms);
}
return 3;
}};

auto fut = pkg.get_future();

std::jthread t(std::move(pkg), 50);

int v = fut.get(); // block
std::wcout << L"main thread got a value: " << v << std::endl;
}

async

相当于包装好的thread(packaged_task, ...)。可以直接返回一个future。并且定义后相当于直接创建了子线程。

  1. 参数1:Launch Policy
    1. 有两个选项:std::launch::deferredstd::launch::async
    2. 默认是std::launch::async,意为立即执行。
    3. std::launch::deferred意为在他人fut.get()时才执行。
  2. 参数2:fn
  3. 参数3:函数参数

以下程序表示:主线程期待一个值,此值由子线程提供。通过async创建子线程实现。

1
2
3
4
5
6
7
8
9
10
11
12
13
14
int main()
{
auto fut = std::async([](int v) -> int
{
for (auto i = v; i > 0; --i)
{
std::cout << i << std::endl;
std::this_thread::sleep_for(200ms);
}
return 3;
}, 50);
int v = fut.get();
std::wcout << L"main thread got a value: " << v << std::endl;
}

以上是async的简单应用。

异步特性(async)

还有一些特性:所谓异步,就是主线程、async动作互不干扰。比如:
async启动后,主线程打印内容至屏幕、Sleep等等,不会出现和子线程输出的错乱(除了换行以外)。

1
2
3
4
5
6
7
8
9
10
11
12
13
14
15
16
17
18
int main()
{
auto fut = std::async([](int v) -> int
{
for (auto i = v; i > 0; --i)
{
std::cout << i << std::endl;
std::this_thread::sleep_for(200ms);
}
return 3;
}, 50);

std::wcout << L"main thread begin to Sleep..." << std::endl;
std::this_thread::sleep_for(5s);
std::wcout << L"main thread Wake up" << std::endl;
int v = fut.get();
std::wcout << L"main thread got a value: " << v << std::endl;
}

输出:

1
2
3
4
5
6
7
8
9
10
11
12
13
14
15
16
17
18
19
20
21
22
23
24
25
26
27
28
29
30
31
32
33
34
35
36
37
38
39
40
41
42
43
44
45
46
47
48
49
50
51
52
53
54
main thread begin to Sleep...50

49
48
47
46
45
44
43
42
41
40
39
38
37
36
35
34
33
32
31
30
29
28
27
26
main thread Wake up
25
24
23
22
21
20
19
18
17
16
15
14
13
12
11
10
9
8
7
6
5
4
3
2
1
main thread got a value: 3

deferred特性

至于std::launch::deferred。经过测试:

1
2
3
4
5
6
7
8
9
10
11
12
13
14
15
16
17
18
19
int main()
{
auto fut = std::async(std::launch::deferred,
[](int v) -> int
{
for (auto i = v; i > 0; --i)
{
std::cout << i << std::endl;
std::this_thread::sleep_for(200ms);
}
return 3;
}, 50);

std::wcout << L"main thread begin to Sleep..." << std::endl;
std::this_thread::sleep_for(5s);
std::wcout << L"main thread Wake up" << std::endl;
int v = fut.get();
std::wcout << L"main thread got a value: " << v << std::endl;
}

发现,输出:

1
2
3
4
5
6
7
8
9
10
11
12
13
14
15
16
17
18
19
20
21
22
23
24
25
26
27
28
29
30
31
32
33
34
35
36
37
38
39
40
41
42
43
44
45
46
47
48
49
50
51
52
53
54
main thread begin to Sleep...
main thread Wake up
50
49
48
47
46
45
44
43
42
41
40
39
38
37
36
35
34
33
32
31
30
29
28
27
26
25
24
23
22
21
20
19
18
17
16
15
14
13
12
11
10
9
8
7
6
5
4
3
2
1
main thread got a value: 3

意味着,该启动策略表示等待主线程先执行一部分内容,直到主线程开始fut.get()时,async再启动。

信号量

信号量和条件变量的对比

条件变量的场景用于精确控制线程的同步,适合同步条件更复杂的场景(条件变量可以搭配一个计数器来达到信号量的效果)。

信号量的使用场景是可以简单地控制对资源的并发访问数量。

条件变量的使用较为灵活,需要手动精确控制加锁。
而信号量的使用就很简单,简单地对计数器加减就是线程安全的。

API

C++20开始。定义于<semaphore>
根据cppreference,信号量是一种轻量级同步原语,用于限制对共享资源的并发访问。信号量相比条件变量更高效,因为条件变量用到了mutex。
分两种:

  1. counting_semaphore,非负值。
  2. binary_semaphore,二值。
1
2
3
4
template<std::ptrdiff_t = /* implementation-defined */>
class counting_semaphore;

using binary_semaphore = std::counting_semaphore<1>;

示例:改写Windows信号量API

C++线程库信号量改写——《Windows_多线程》中示例:多个进度条同时动画
比如:std::counting_semaphore<5> semaphore(3);代表最大值为5,初始值为3。如果最大值不填,则默认给一个超大的数。
以下例子:std::counting_semaphore<2> semaphore(2);代表最大值为2,初始值为2。

1
2
3
4
5
6
7
8
9
10
11
12
13
14
15
16
17
18
19
20
#include <semaphore>
std::counting_semaphore<2> semaphore(2);

// ...
{
{
std::jthread t([]() -> void
{
std::unique_lock lck{ start_mx };
start_cv.wait(lck);
lck.unlock();
semaphore.acquire();
for (int i = 0; i < 100; ++i)
{
// ...
}
semaphore.release();
});
}
}

二值信号量当作条件变量使用

其实就是:using binary_semaphore = std::counting_semaphore<1>;

1
2
3
4
5
6
7
8
9
10
11
12
13
14
15
16
17
18
19
20
21
22
23
24
25
26
27
28
29
std::binary_semaphore bin_sema{ 0 };
// ...
{
// ...
case /* ... */:
{
std::jthread t([]() -> void
{
bin_sema.acquire();
bin_sema.release(1);

semaphore.acquire();
for (int i = 0; i < 100; ++i)
{
// ...
}
semaphore.release();
});
}
// ...
case WM_KETDOWN:
{
if (wParam == 'F')
{
bin_sema.release(1);
}
}

}

闩锁(Latch)、屏障(Barrier)

闩锁和屏障是线程协调机制,允许任意数量的线程阻塞,直到预期数量的线程到达。闩锁不能重复使用,而屏障可以重复使用。

主要用于等待n个线程到位,之后做一些事情。
屏障(Barrier)使用之后可以reset重新使用。