这里的异步修饰的是等待、选择,指的不是同时通信,而是同时等待。一个线程可以同时监控多个对象。但是只是监控SOCKET的活动,具体业务还是需要程序员完善(比如某个socket有数据只是返回通知一下,不会主动帮你读)。
Select:在类Unix系统下,几乎都用的这个,Berkeley Socket
WSAAsyncSelect
WSAEventSelect
上面讨论的是异步选择模型,此处的功能更强大了,叫做异步通信模型,意思是一个线程不仅可以同时监控多个连接,还可以处理通信业务(比如某个socket有数据,会主动帮你读,通过系统内部的线程或中断,自动填入你之前给它的缓冲区。等到它通知你时,读写已经处理完毕)。
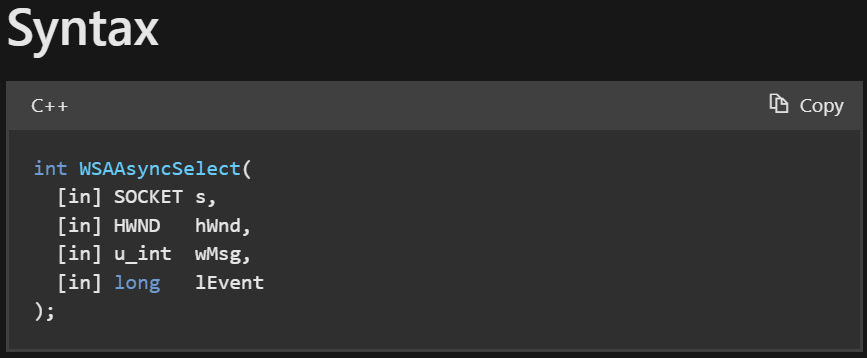
WSAAsyncSelect function (winsock.h)
参数1:Socket,需要监控哪个socket
参数2:窗口句柄,用于标识在发生网络事件时将接收消息的窗口。
参数3:发生网络事件时要接收的消息类型(投送到消息队列的消息类型)。
参数4:指定对哪个或哪些网络事件感兴趣,用位掩码表示。
返回值:成功返回0,失败时返回SOCKET_ERROR,可以通过调用WSAGetLastError来检索错误号。
由于WSAAsyncSelect需要消息循环,需要创建一个Windows Desktop Wizard项目,取名为WSAAsyncSelectModel,选择Application Type为Desktop Application (.exe),Additional Options选择Empty Project。wsa_async_select.cpp。file_server.cpp中从初始化到建立listen_sock的代码。
需要注意,#pragma comment(lib, "Ws2_32.lib")别忘了复制过去,否则会报以下的错误:WSACleanup())
1 2 3 4 5 6 7 8 9 10 11 12 Build started at 8:10 AM... 1>------ Build started: Project: WSAAsyncSelectModel, Configuration: Debug x64 ------ 1>wsa_async_select.cpp 1>C:\Users\mrcan\source\repos\MetaLearning\WSAAsyncSelectModel\wsa_async_select.cpp(68,15): warning C4244: 'return': conversion from 'WPARAM' to 'int', possible loss of data 1>wsa_async_select.obj : error LNK2019: unresolved external symbol __imp_socket referenced in function wWinMain 1>wsa_async_select.obj : error LNK2019: unresolved external symbol __imp_WSAStartup referenced in function wWinMain 1>wsa_async_select.obj : error LNK2019: unresolved external symbol __imp_WSAGetLastError referenced in function wWinMain 1>wsa_async_select.obj : error LNK2019: unresolved external symbol __imp_WSAAsyncSelect referenced in function wWinMain 1>C:\Users\mrcan\source\repos\MetaLearning\x64\Debug\WSAAsyncSelectModel.exe : fatal error LNK1120: 4 unresolved externals 1>Done building project "WSAAsyncSelectModel.vcxproj" -- FAILED. ========== Build: 0 succeeded, 1 failed, 0 up-to-date, 0 skipped ========== ========== Build completed at 8:10 AM and took 00.582 seconds ==========
编译失败的原因是链接器无法找到 WinSock 库中的相关函数定义。WinSock 函数如 socket()、WSAStartup()、WSAGetLastError() 和 WSAAsyncSelect() 都在 Ws2_32.lib 中定义,因此需要在项目中显式地链接该库。
WSAAsyncSelect函数自动将套接字s设置为非阻塞模式,而不考虑lEvent的值。要将套接字s设置回阻塞模式,首先必须通过调用将lEvent设置为零的WSAAsyncSelect来清除与套接字s关联的事件记录。然后可以调用ioctlsocket或WSAIoctl将套接字设置为阻塞模式。ioctlsocket function (winsock.h)
1 2 3 4 5 6 7 8 9 10 11 12 13 14 15 16 17 18 19 20 21 22 23 24 25 26 27 28 29 30 31 32 33 34 35 #include <winsock2.h> #include <stdio.h> #pragma comment(lib, "Ws2_32.lib" ) void main () WSADATA wsaData; int iResult; u_long iMode = 0 ; iResult = WSAStartup (MAKEWORD (2 ,2 ), &wsaData); if (iResult != NO_ERROR) printf ("Error at WSAStartup()\n" ); SOCKET m_socket; m_socket = socket (AF_INET, SOCK_STREAM, IPPROTO_TCP); if (m_socket == INVALID_SOCKET) { printf ("Error at socket(): %ld\n" , WSAGetLastError ()); WSACleanup (); return ; } iResult = ioctlsocket (m_socket, FIONBIO, &iMode); if (iResult != NO_ERROR) printf ("ioctlsocket failed with error: %ld\n" , iResult); }
lEvent参数是通过使用下表中列出的任意值的按位OR运算符构造的。
Value
Meaning
FD_READ Set to receive notification of readiness for reading.
FD_WRITE Wants to receive notification of readiness for writing.
FD_OOB Wants to receive notification of the arrival of OOB data.
FD_ACCEPT Wants to receive notification of incoming connections.
FD_CONNECT Wants to receive notification of completed connection or multipoint join operation.
FD_CLOSE Wants to receive notification of socket closure.
FD_QOS Wants to receive notification of socket Quality of Service (QoS) changes.
FD_GROUP_QOS Wants to receive notification of socket group Quality of Service (QoS) changes (reserved for future use with socket groups). Reserved.
FD_ROUTING_INTERFACE_CHANGE Wants to receive notification of routing interface changes for the specified destination(s).
FD_ADDRESS_LIST_CHANGE Wants to receive notification of local address list changes for the socket protocol family.
为套接字发出WSAAsyncSelect将取消这个套接字的任何先前的WSAAsyncSelect或WSAEventSelect。例如,要接收读写通知,应用程序必须使用FD_READ和FD_WRITE调用WSAAsyncSelect,如下所示
1 rc = WSAAsyncSelect (s, hWnd, wMsg, FD_READ|FD_WRITE);
不能为不同的事件指定不同的消息。下面的代码将不起作用:第二个调用将取消第一个的效果,并且只有FD_WRITE事件将与消息wMsg2一起报告:
1 2 rc = WSAAsyncSelect (s, hWnd, wMsg1, FD_READ); rc = WSAAsyncSelect (s, hWnd, wMsg2, FD_WRITE);
要取消所有通知,指示Windows套接字不应发送与套接字上的网络事件相关的其他消息,请将lEvent设置为零。
1 rc = WSAAsyncSelect (s, hWnd, 0 , 0 );
把此函数放到窗口初始化、显示完毕和消息循环开始之间。
1 2 3 4 5 6 7 8 9 10 11 12 13 14 15 16 17 18 19 20 21 22 23 24 25 26 27 28 29 30 31 32 33 34 35 36 37 38 39 40 41 42 43 44 45 46 47 48 49 50 51 52 53 54 55 56 57 58 59 60 61 62 63 64 65 66 67 68 69 70 71 72 73 74 75 76 77 78 79 80 81 82 83 84 85 86 87 88 89 90 91 92 93 94 95 #include <windows.h> #include <WinSock2.h> #include <WS2tcpip.h> #define MY_WMACCEPT WM_USER + 0x1 LRESULT __stdcall WndProcdure (HWND hWnd, UINT message, WPARAM wParam, LPARAM lParam) ;int __stdcall wWinMain (HINSTANCE hInstance, HINSTANCE hPreInstance, wchar_t * lpCmdLine, int iCmdShow) WORD wVersionRequested; WSADATA wsaData; int err; wVersionRequested = MAKEWORD (2 , 2 ); err = ::WSAStartup (wVersionRequested, &wsaData); if (err != 0 ) { return 1 ; } SOCKET listen_sock = ::socket (AF_INET, SOCK_STREAM, IPPROTO_TCP); if (listen_sock == INVALID_SOCKET) { err = ::WSAGetLastError (); return 1 ; } sockaddr_in server_addr; server_addr.sin_family = AF_INET; if (1 != ::inet_pton (AF_INET, "127.0.0.1" , &server_addr.sin_addr)) { err = ::WSAGetLastError (); return 1 ; } server_addr.sin_port = htons (9008 ); if (SOCKET_ERROR == ::bind (listen_sock, reinterpret_cast <const sockaddr*>(&server_addr), sizeof (server_addr))) { err = ::WSAGetLastError (); return 1 ; } if (SOCKET_ERROR == ::listen (listen_sock, SOMAXCONN)) { err = ::WSAGetLastError (); return 1 ; } wchar_t szAppName[] = L"WinApp" ; WNDCLASSEX wcex = { 0 }; wcex.cbSize = sizeof (wcex); wcex.style = CS_HREDRAW | CS_VREDRAW; wcex.lpfnWndProc = &WndProcdure; wcex.cbClsExtra = 0 ; wcex.cbWndExtra = 0 ; wcex.hInstance = hInstance; wcex.hIcon = LoadIcon (NULL , IDI_APPLICATION); wcex.hCursor = LoadCursor (NULL , IDC_ARROW); wcex.hbrBackground = (HBRUSH)(GetStockObject (WHITE_BRUSH)); wcex.lpszMenuName = NULL ; wcex.lpszClassName = szAppName; wcex.hIconSm = wcex.hIcon; if (!RegisterClassEx (&wcex)) { return -1 ; } HWND hWnd = NULL ; hWnd = CreateWindowEx (WS_EX_OVERLAPPEDWINDOW, szAppName, L"App" , WS_OVERLAPPEDWINDOW, CW_USEDEFAULT, 0 , CW_USEDEFAULT, 0 , NULL , NULL , hInstance, NULL ); ShowWindow (hWnd, iCmdShow); UpdateWindow (hWnd); if (SOCKET_ERROR == ::WSAAsyncSelect (listen_sock, hWnd, MY_WMACCEPT, FD_ACCEPT)) { err = ::WSAGetLastError (); } MSG msg; while (GetMessage (&msg, NULL , 0 , 0 )) { TranslateMessage (&msg); DispatchMessage (&msg); } ::WSACleanup (); return msg.wParam; }
先编译运行一下,发现提示:
1 2 3 4 5 6 7 8 Build started at 8:16 AM... 1>------ Build started: Project: WSAAsyncSelectModel, Configuration: Debug x64 ------ 1>wsa_async_select.cpp 1>C:\Users\mrcan\source\repos\MetaLearning\WSAAsyncSelectModel\wsa_async_select.cpp(68,15): warning C4244: 'return': conversion from 'WPARAM' to 'int', possible loss of data 1>C:\Users\mrcan\source\repos\MetaLearning\WSAAsyncSelectModel\wsa_async_select.cpp(57,27): error C4996: 'WSAAsyncSelect': Use WSAEventSelect() instead or define _WINSOCK_DEPRECATED_NO_WARNINGS to disable deprecated API warnings 1>Done building project "WSAAsyncSelectModel.vcxproj" -- FAILED. ========== Build: 0 succeeded, 1 failed, 0 up-to-date, 0 skipped ========== ========== Build completed at 8:16 AM and took 00.538 seconds ==========
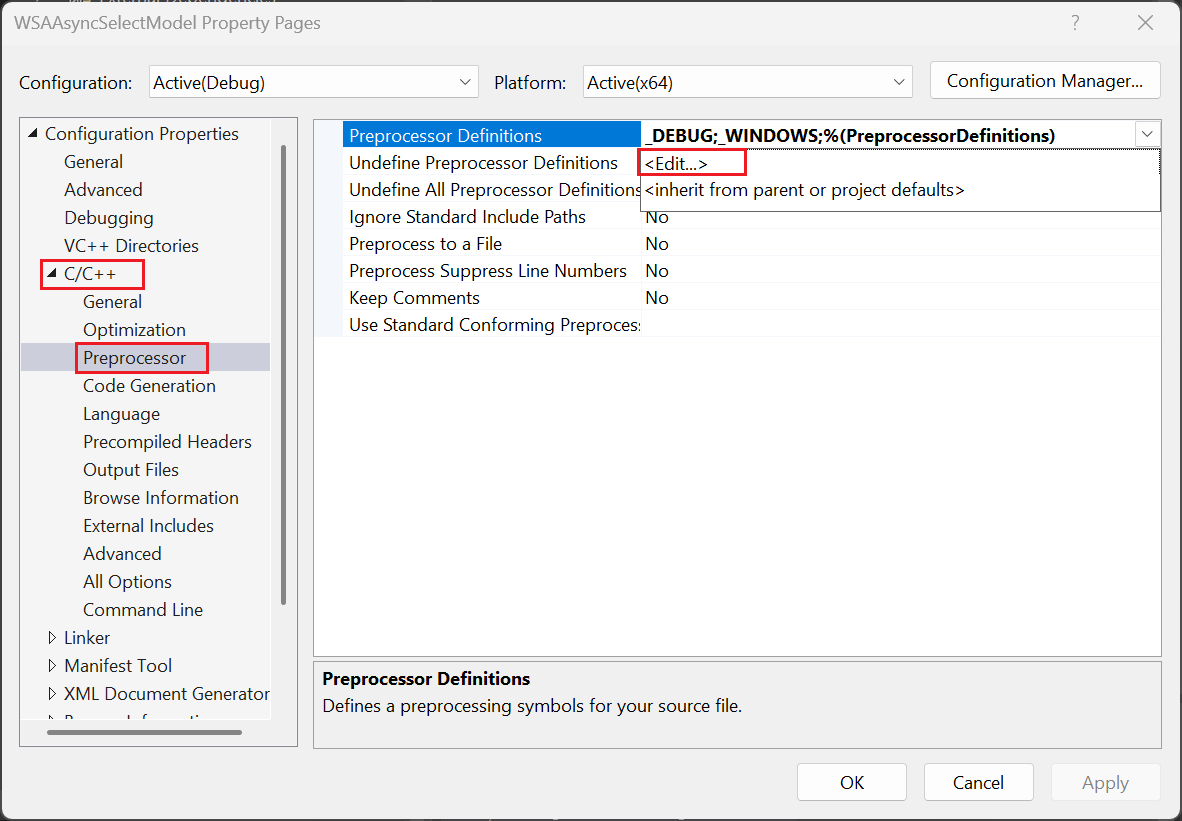
MS建议我们使用WSAEventSelect()作为代替,因为WSAAsyncSelect被废弃了,如果要使用,需要define _WINSOCK_DEPRECATED_NO_WARNINGS。可以右键项目,属性,C/C++,Preprocessor,下拉Preprocessor Definitions,选择<Edit...>。在输入文本框中已有内容的最下面写一行这串符号上去。
主要处理消息循环时,不同消息类型的处理,此处我们处理自定义消息类型MY_WMACCEPT,即我们在WSAAsyncSelect给socket绑定的事件通知的消息类型。
1 2 3 4 5 6 7 8 9 10 11 12 13 14 15 16 17 18 19 20 21 22 23 24 25 26 27 28 LRESULT __stdcall WndProcdure (HWND hWnd, UINT message, WPARAM wParam, LPARAM lParam) HDC hDC = NULL ; PAINTSTRUCT ps; switch (message) { case WM_CREATE: { return 0 ; } case WM_PAINT: { hDC = BeginPaint (hWnd, &ps); EndPaint (hWnd, &ps); return 0 ; } case MY_WMACCEPT: { return 0 ; } case WM_DESTROY: { PostQuitMessage (0 ); return 0 ; } } return DefWindowProc (hWnd, message, wParam, lParam); }
断点可以设置在case MY_WMACCEPT中的break上。wsa_async_select后,再运行一个SocketClient项目中的basic_stream_client。
case MY_WMACCEPT
1 2 3 4 5 6 7 8 9 10 11 12 13 14 15 16 17 18 { case MY_WMACCEPT: { sockaddr_in client_addr; int addrlen{ sizeof (client_addr) }; SOCKET work_sock = ::accept ( listen_sock, reinterpret_cast <sockaddr*>(&client_addr), &addrlen); if (work_sock == INVALID_SOCKET) { err = ::WSAGetLastError (); return 1 ; } return 0 ; } }
如此写,需要调整listen_sock和err为全局变量。
1 2 3 4 SOCKET listen_sock = INVALID_SOCKET; int err;
接着,补充上之前服务端、客户端的收发代码。服务端还要显示连接的客户端的信息,由于项目是Windows Application,不能进行cout输出,因此需要用MessageBox替换。
1 2 3 4 5 6 7 8 9 10 11 12 13 14 15 16 17 18 19 20 21 22 23 24 25 26 27 28 29 30 31 32 33 34 35 36 { case MY_WMACCEPT: { wchar_t addr_str[46 ] = L"" ; InetNtopW (AF_INET, reinterpret_cast <void *>(&client_addr.sin_addr), addr_str, 46 ); std::wstring info = std::format(L"client address: {}, port: {}\n" , addr_str, ntohs (client_addr.sin_port)); ::MessageBox (hWnd, info.c_str (), L"info" , MB_OK); std::wstring message{ L"Welcome to server!" }; ::send ( work_sock, reinterpret_cast <const char *>(message.c_str ()), sizeof (wchar_t ) * message.size (), 0 ); wchar_t buf[100 ] = { 0 }; int bytes_received = ::recv (work_sock, reinterpret_cast <char *>(buf), sizeof (wchar_t ) * sizeof (buf), 0 ); if (bytes_received > 0 ) { ::MessageBox (hWnd, buf, L"recv" , MB_OK); } else { err = ::WSAGetLastError (); } ::closesocket (work_sock); work_sock = INVALID_SOCKET; return 0 ; } }
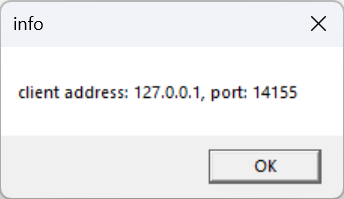
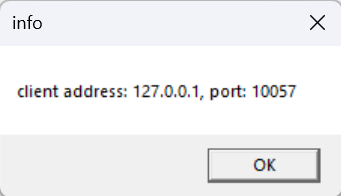
刚打开客户端时,服务端窗口会弹出:
经过调试,发现服务端的recv返回-1。
在accept之后,通过ioctlsocket函数设置work_sock为阻塞。FIONBIO。见ioctlsocket示例
1 2 3 4 5 6 7 8 9 10 11 12 13 14 15 16 17 18 19 20 21 22 case MY_WMACCEPT: { sockaddr_in client_addr; int addrlen{ sizeof (client_addr) }; SOCKET work_sock = ::accept ( listen_sock, reinterpret_cast <sockaddr*>(&client_addr), &addrlen); if (work_sock == INVALID_SOCKET) { err = ::WSAGetLastError (); return 1 ; } u_long iMode = 0 ; if (SOCKET_ERROR == ::ioctlsocket (work_sock, FIONBIO, &iMode)) { err = ::WSAGetLastError (); }
但是只这样不行:注意(非阻塞模式) :将lEvent设置为零的WSAAsyncSelect来清除与套接字s关联的事件记录。然后再调用ioctlsocket或WSAIoctl将套接字设置为阻塞模式。WSAAsyncSelect的最后一个参数,由FD_ACCEPT改为0。
1 2 3 4 5 6 7 8 9 10 11 12 13 14 15 16 if (SOCKET_ERROR == ::WSAAsyncSelect (listen_sock, hWnd, MY_WMACCEPT, 0 )) { err = ::WSAGetLastError (); } MSG msg; while (GetMessage (&msg, NULL , 0 , 0 )) { TranslateMessage (&msg); DispatchMessage (&msg); } ::WSACleanup (); return msg.wParam; }
至此,socket成功被设置为阻塞模式了。
先运行服务端。work_sock上的读写事件通知是我们在select有了连接事件后同时向消息队列投出MY_WMACCEPT消息,在回调函数中的switch-case才去处理读写。
在原有程序的基础上,修改case WM_ACCEPT中的操作:不再阻塞式读取数据。而是在其中再一次select。
添加select,关注FD_READ,发出WM_READ
修改iMode为1。见ioctlsocket示例
1 2 3 4 5 6 7 8 9 10 11 12 13 14 15 16 17 18 19 20 21 22 23 24 25 26 27 28 29 30 31 32 33 case MY_WMACCEPT: { sockaddr_in client_addr; int addrlen{ sizeof (client_addr) }; SOCKET work_sock = ::accept ( listen_sock, reinterpret_cast <sockaddr*>(&client_addr), &addrlen); if (work_sock == INVALID_SOCKET) { err = ::WSAGetLastError (); return 1 ; } if (::WSAAsyncSelect (work_sock, hWnd, MY_WMREAD, FD_READ) == SOCKET_ERROR) { err = ::WSAGetLastError (); } u_long iMode = 1 ; if (SOCKET_ERROR == ::ioctlsocket (work_sock, FIONBIO, &iMode)) { err = ::WSAGetLastError (); } }
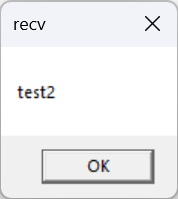
见:显示客户端信息、收发数据 case MY_WMREAD,里面的动作就对应于原先case MY_WMACCEPT中的recv操作了。即recv操作剪切过来。work_sock在此作用域中不明,需要传入。但是好在select函数为我们处理了:微软官方文档中指出:WSAAsyncSelect function (winsock2.h) s上发生指定的网络事件之一时,应用程序窗口hWnd接收消息wMsg。wParam参数标识发生网络事件的套接字。lParam的低位字指定已发生的网络事件。lParam的高位字包含任何错误代码。错误代码可以是Winsock2.h中定义的任何错误。FD_READ事件后,它就会自动向wMain程序的wParam填充work_sock,那么我们在用到这个套接字时,从wParam取出即可。
还要注意,如果服务端程序到一定阶段后,不需要再关注FD_READ事件了,那需要做收尾处理(再次调用select,置关注的事件为0)
1 2 3 4 5 6 7 8 9 10 11 12 13 14 15 16 17 18 19 20 21 22 23 24 25 26 case MY_WMREAD: { SOCKET work_sock = wParam; wchar_t buf[100 ] = { 0 }; int bytes_received = ::recv (work_sock, reinterpret_cast <char *>(buf), sizeof (wchar_t ) * sizeof (buf), 0 ); if (bytes_received > 0 ) { ::MessageBox (hWnd, buf, L"recv" , MB_OK); } else { err = ::WSAGetLastError (); } if (::WSAAsyncSelect (work_sock, hWnd, MY_WMREAD, 0 ) == SOCKET_ERROR) { err = ::WSAGetLastError (); } ::closesocket (work_sock); work_sock = INVALID_SOCKET; return 0 ; }
WSAAsyncSelect 是轮询模式。微软目前已经不建议使用。
WSAEventSelect 不需要窗口程序,普通的控制台程序即可。wsa_event_select.cppbasic_stream_server.cpp的内容。
在原先有accept操作的while循环之前,调用 WSACreateEvent 创建Event。无参数,返回类型为HANDLE。
WSAEventSelect function (winsock2.h)
参数1,填入要与event绑定的socket,比如:如果我们要观察一个accept事件,就需要绑定listen_sock
参数2,填入要观察的event事件。这个event用WSACreateEvent创建。
参数3,事件类型,比如:FD_ACCEPT。
1 2 3 4 5 6 7 8 9 10 11 12 13 HANDLE accept_ev = ::WSACreateEvent (); if (SOCKET_ERROR == ::WSAEventSelect (listen_sock, accept_ev, FD_ACCEPT)) { err = ::WSAGetLastError (); return 1 ; } while (true ) { }
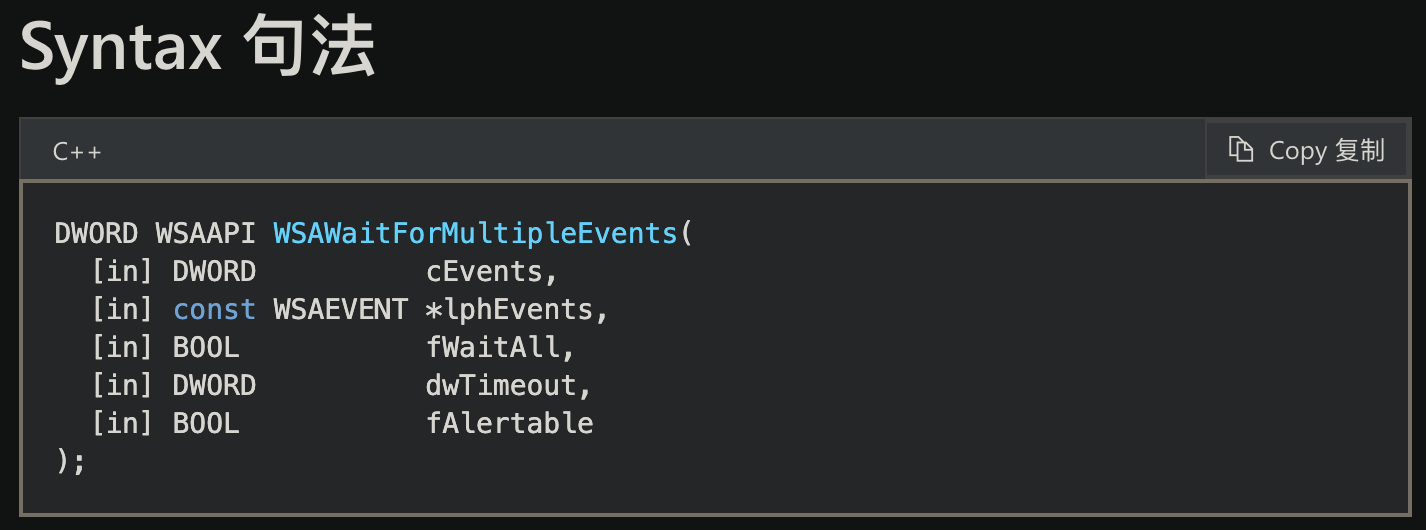
在select后,就可以用while循环中调用WSAWaitForMultipleEvents等待Events了。代替了原先代码简单的accept。WSAWaitForMultipleEvents function (winsock2.h)
参数1:lphEvents指向的数组中事件对象句柄的数量。事件对象句柄的最大数量为WSA_MAXIMUM_WAIT_EVENTS。必须指定一个或多个事件。
参数2:指向事件对象句柄数组的指针。该数组可以包含不同类型的对象的句柄。如果fWaitAll参数设置为TRUE,则它可能不包含同一句柄的多个副本。如果在等待仍处于挂起状态时关闭这些句柄之一,则WSAWaitForMultipleEvents的行为未定义。
指定等待类型的值。如果为TRUE,则当lphEvents数组中所有对象的状态发出信号时,该函数返回。如果为FALSE,则当任何事件对象发出信号时该函数返回。在后一种情况下,返回值减去WSA_WAIT_EVENT_0表示其状态导致函数返回的事件对象的索引。如果在调用期间有多个事件对象发出信号,则这是发出信号的事件对象的数组索引,其中索引值是所有发出信号的事件对象中最小的。
超时间隔,以毫秒为单位。如果超时间隔到期,即使不满足fWaitAll参数指定的条件,WSAWaitForMultipleEvents也会返回。如果dwTimeout参数为0,WSAWaitForMultipleEvents测试指定事件对象的状态并立即返回。如果dwTimeout为WSA_INFINITE,则将永远等待。
指定线程是否处于可警报等待状态,以便系统可以执行 I/O 完成例程。如果为TRUE \,则线程将置于可警报等待状态,并且当系统执行 I/O 完成例程时,WSAWaitForMultipleEvents可以返回。在这种情况下,将返回WSA_WAIT_IO_COMPLETION,并且尚未发出正在等待的事件的信号。应用程序必须再次调用WSAWaitForMultipleEvents函数。如果为FALSE,则线程不会置于可警报等待状态,并且不会执行 I/O 完成例程。
返回值:如果失败,则返回值为WSA_WAIT_FAILED。如果成功,则为以下之一。
WSA_WAIT_EVENT_0 to (WSA_WAIT_EVENT_0 + cEvents - 1)WSA_WAIT_IO_COMPLETIONWSA_WAIT_TIMEOUT
由参数2,需要把每一个创建的event放到统一的数组中进行管理。需要在全局定义一个vector。WSAEventSelect绑定了socket和event,但是WSAWaitForMultipleEvents只能找到event对应的events下标值,不提供socket的追溯。
因此我们还需要map额外记录event和哪个socket绑定。
1 2 3 #include <vector> std::vector<HANDLE> events; std::map<HANDLE, SOCKET> ev_entries;
1 2 3 4 5 6 7 8 9 10 11 12 13 14 15 16 17 18 19 20 21 22 23 24 events.emplace_back (accept_ev); ev_entries[accept_ev] = listen_sock; while (true ) { auto res = ::WSAWaitForMultipleEvents ( events.size (), events.data (), false , WSA_INFINITE, false ); if (int n = res - WSA_WAIT_EVENT_0; n < events.size ()) { auto event = events[n]; auto sock = ev_entries[event]; } }
在得到Wait的返回值后(并且计算出了index),还需要使用WSAEnumNetworkEvents WSAEventSelect function (winsock2.h) Enum代码示例 WSANETWORKEVENTS的结构体指针,函数要填充发生了的事件。具体结构可看:WSANETWORKEVENTS structure (winsock2.h)
1 2 3 4 5 6 7 8 9 10 11 12 13 14 15 16 17 18 19 20 21 22 23 24 25 26 27 28 29 30 WSANETWORKEVENTS network_events{}; while (true ) { auto res = ::WSAWaitForMultipleEvents ( events.size (), events.data (), false , WSA_INFINITE, false ); if (int n = res - WSA_WAIT_EVENT_0; n < events.size ()) { auto event = events[n]; auto sock = ev_entries[event]; if (SOCKET_ERROR == ::WSAEnumNetworkEvents (sock, event, &network_events)) { continue ; } if (network_events.lNetworkEvents & FD_ACCEPT) { } } }
1 2 3 4 5 6 7 8 9 10 11 12 13 14 15 16 17 18 19 20 21 22 23 24 25 26 27 28 29 30 31 while (true ) { { if (network_events.lNetworkEvents & FD_ACCEPT) { sockaddr_in client_addr; int addrlen{ sizeof (client_addr) }; SOCKET work_sock = accept (sock, reinterpret_cast <sockaddr*>(&client_addr), &addrlen); if (INVALID_SOCKET == work_sock) { err = ::WSAGetLastError (); continue ; } wchar_t addr_str[46 ] = L"" ; InetNtopW (AF_INET, reinterpret_cast <void *>(&client_addr.sin_addr), addr_str, 46 ); std::wstring info = std::format(L"client address: {}, port: {}\n" , addr_str, ntohs (client_addr.sin_port)); std::wcout << info << std::endl; std::wstring message{ L"Welcome to server!" }; ::send ( work_sock, reinterpret_cast <const char *>(message.c_str ()), sizeof (wchar_t ) * message.size (), 0 );
在完成显示客户端地址、send消息的处理后,我们还要想方设法完成接收客户端的消息。work_sock和read_event绑定,并且把这两个分别放到map和vector容器中。
1 2 3 4 5 6 7 8 9 10 11 12 13 14 15 16 17 18 auto read_event = ::WSACreateEvent (); if (SOCKET_ERROR == ::WSAEventSelect (work_sock, read_event, FD_READ)) { err = ::WSAGetLastError (); continue ; } events.emplace_back (read_event); ev_entries[read_event] = work_sock; } else if (network_events.lNetworkEvents & FD_READ) { } } }
接收完毕后,记得调用WSAEventSelect进行解除绑定,把参数3(即关注的事件)设为0即可。
1 2 3 4 5 6 7 8 9 10 11 12 13 14 15 16 17 18 19 20 21 22 23 24 25 26 27 28 29 30 31 32 33 34 35 36 37 38 39 40 41 42 43 44 45 46 47 48 #include <algorithm> #include <ranges> { else if (network_events.lNetworkEvents & FD_READ) { auto work_sock = sock; wchar_t buf[100 ] = { 0 }; int bytes_received = ::recv (work_sock, reinterpret_cast <char *>(buf), sizeof (wchar_t ) * sizeof (buf), 0 ); if (bytes_received > 0 ) { std::wcout << buf << std::endl; } else { err = ::WSAGetLastError (); } ::WSAEventSelect (work_sock, event, 0 ); auto it = std::ranges::remove_if ( events, [event](auto && v) -> bool { return v == event; }); events.erase (it.begin (), it.end ()); ev_entries.erase (event); ::closesocket (work_sock); work_sock = INVALID_SOCKET; } } } ::closesocket (listen_sock); listen_sock = INVALID_SOCKET; ::WSACleanup (); return 0 ; }
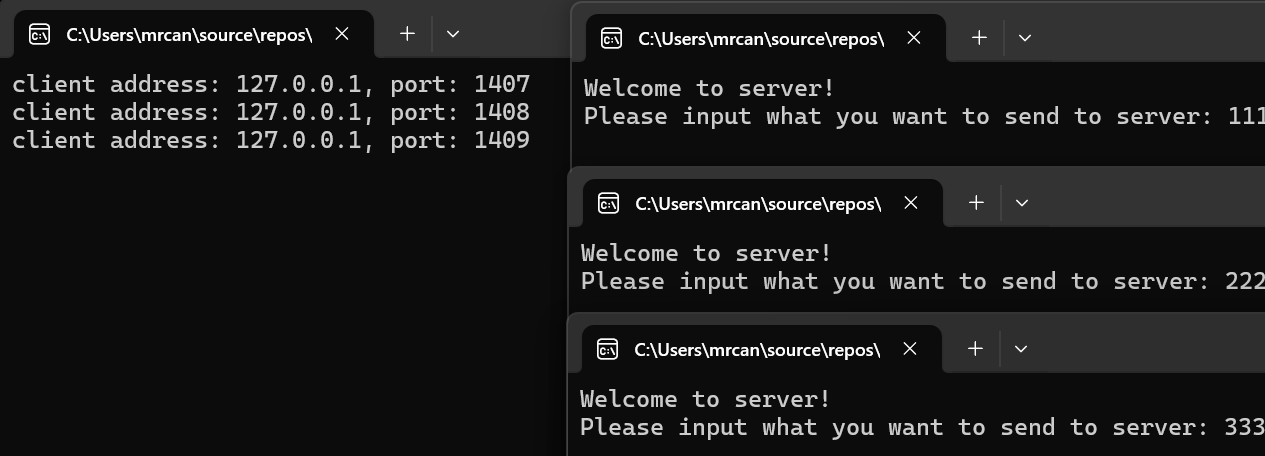
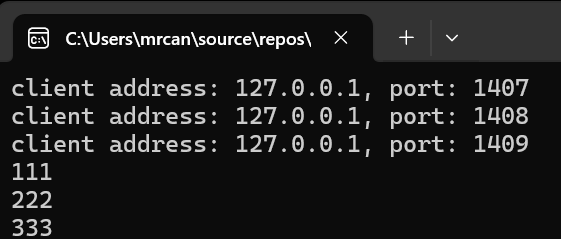
开启一个服务端,3个客户端:
可以“同时”按顺序处理。select的异步效果即为此。但是此程序目前并没有用多线程,而是在单线程上的按顺序快速一对多处理,从而看起来像是多线程。
像select一样,这也是异步的。但是,select只会通知你有什么事件,你需要自己处理。而重叠的意思在于,不仅像select一样非阻塞轮询,它还会帮你处理事件,所以假如有可读事件时,在通知你的时候,它已经帮你读完了,内容存到了缓冲区中,后续自己处理缓冲区即可。
Overlapped I/O 不需要窗口程序,普通的控制台程序即可。overlapped_io.cpp
仍需要对WSA进行启动(旧方法)。WSASocket代替socket创建)。sockaddr_in地址,填充ip地址、端口号(旧方法)。bind、listen(旧方法)。
1 2 3 4 5 6 7 8 9 10 11 12 13 14 15 16 17 18 19 20 21 22 23 24 25 26 27 28 29 30 31 32 33 34 35 36 37 38 39 40 41 42 43 44 45 46 47 48 49 50 #include <WinSock2.h> #include <mswsock.h> #include <WS2tcpip.h> #include <format> #include <iostream> #pragma comment(lib,"Ws2_32.lib" ) #pragma comment(lib, "Mswsock.lib" ) int main () WSADATA wsaData; int err; auto wVersionRequested = MAKEWORD (2 , 2 ); err = ::WSAStartup (wVersionRequested, &wsaData); if (err != 0 ) { std::wcout << std::format(L"WSAStartup failed with error : {}\n" , err); return 1 ; } SOCKET listen_sock = ::WSASocket (AF_INET, SOCK_STREAM, IPPROTO_TCP, nullptr , 0 , WSA_FLAG_OVERLAPPED); if (listen_sock == INVALID_SOCKET) { err = ::WSAGetLastError (); return 1 ; } sockaddr_in server_addr; server_addr.sin_family = AF_INET; if (1 != ::inet_pton (AF_INET, "127.0.0.1" , &server_addr.sin_addr)) { err = ::WSAGetLastError (); return 1 ; } server_addr.sin_port = htons (9008 ); if (SOCKET_ERROR == ::bind (listen_sock, reinterpret_cast <const sockaddr*>(&server_addr), sizeof (server_addr))) { err = ::WSAGetLastError (); return 1 ; } if (SOCKET_ERROR == ::listen (listen_sock, SOMAXCONN)) { err = ::WSAGetLastError (); return 1 ; } }
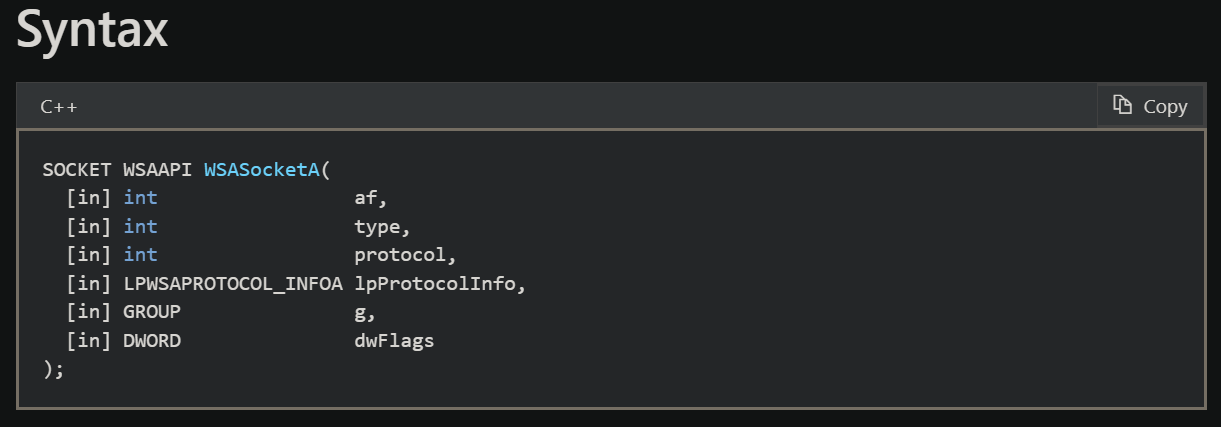
不再使用伯克利API,而是使用微软异步模型API:WSASocket。WSASocketA function (winsock2.h)
af即地址家族,填AF_INETtype,填SOCK_STREAMprotocol,填IPPROTO_TCPlpProtocolInfo,暂时不用,填nullptrg,暂时不用,填0dwFlags,对应要赋予socket的特性。填WSA_FLAG_OVERLAPPED返回类型:socket。
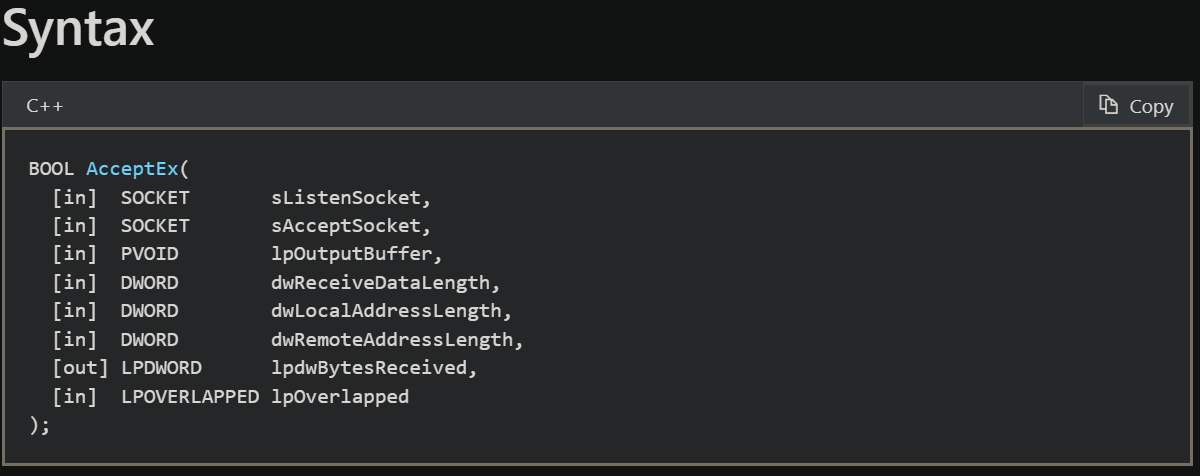
Overlapped I/O 与之前的accept流程不同的是,不需要再手动创建一个Event,也就不需要手动绑定event和socket,而你只需要提供各种参数,然后全部集中到AcceptEx处理。
这个函数在winsock.h和mswsock.h均有定义。但是实际使用时,若引用的是winsock.h编译器不认识该函数名。所以应该引用mswsock.h。#pragma comment(lib, "Mswsock.lib"),否则链接器不认识。
sListenSocket,即第一步创建好的listen_sock
sAcceptSocket,还需要单独预创建一个work_sock,不能是绑定了的、连接了的,而是由本函数在调用后帮你填充好。
3
4
5
6
7
lpOverlapped,这个结构体中包含了event。
最后一个参数比较重要:lpOverlapped,我们需要创建一个OVERLAPPED结构,再在里面的hEvent成员构建Event,从而进行事件的绑定。
如果失败,返回FALSE 。然后可以调用WSAGetLastError函数来返回错误信息。如果WSAGetLastError返回ERROR_IO_PENDING ,则操作已成功启动并且仍在进行中。如果错误是WSAECONNRESET,则说明传入了连接,但随后在接受呼叫之前被远程方终止。
1 2 3 4 5 6 7 8 9 10 11 12 13 14 15 16 17 18 19 20 21 22 23 24 25 26 27 28 29 30 31 32 33 34 SOCKET work_sock = ::WSASocket (AF_INET, SOCK_STREAM, IPPROTO_TCP, nullptr , 0 , WSA_FLAG_OVERLAPPED); char * address_buf = new char [sizeof (sockaddr_in) * 2 + 32 ]; DWORD length_received{ 0 }; OVERLAPPED ovl; ovl.hEvent = ::WSACreateEvent (); bool res = AcceptEx ( listen_sock, work_sock, address_buf, 0 , sizeof (sockaddr_in) + 16 , sizeof (sockaddr_in) + 16 , &length_received, &ovl); if (!res) { if (ERROR_IO_PENDING != ::WSAGetLastError ()) { return 1 ; } } ::closesocket (listen_sock); listen_sock = INVALID_SOCKET; ::WSACleanup (); return 0 ; }
可以进行测试,断点打在if (!res)位置。返回值 ,如果AcceptEx返回false,但错误信息是ERROR_IO_PENDING时,也算是启动成功的,只是仍在进行中。
根据最后一个参数:如何与Event结合 。WSAEventSelect ,需要提前构建vector容器来管理event。
1 2 3 4 #include <vector> #include <map> std::vector<HANDLE> events; std::map<HANDLE, SOCKET> ev_entries;
之后,便可以在AcceptEx成功之后的位置,向容器投入event。
1 2 3 4 5 6 7 8 9 10 11 12 13 14 15 16 17 18 19 20 21 22 23 24 25 26 { OVERLAPPED ovl; ovl.hEvent = ::WSACreateEvent (); bool res = AcceptEx ( listen_sock, work_sock, address_buf, 0 , sizeof (sockaddr_in) + 16 , sizeof (sockaddr_in) + 16 , &length_received, &ovl); if (!res) { if (ERROR_IO_PENDING != ::WSAGetLastError ()) { return 1 ; } } events.emplace_back (ovl.hEvent); ev_entries[ovl.hEvent] = listen_sock; }
以往的ev_entries是管理<HANDLE, SOCKET>,为了便于管理在OverlappedIO下的事件对应的每一个SOCKET的其他属性,把这些属性都封装在Entry中。则改进为ev_entries管理<HANDLE, Entry>。
1 2 3 4 5 6 7 8 9 10 11 12 13 14 15 16 enum class EventType { ET_ACCEPT = 0 , ET_READ }; class Entry { public : EventType _event_type; SOCKET _listen_sock; SOCKET _work_sock; char * _buf{ nullptr }; WSAOVERLAPPED _ovl; }; std::vector<HANDLE> events; std::map<HANDLE, Entry> ev_entries;
则在AcceptEx后的向map容器添加value就要改为
1 2 3 4 5 6 7 8 9 10 11 12 13 14 15 16 17 18 19 20 21 22 23 24 25 26 { OVERLAPPED ovl; ovl.hEvent = ::WSACreateEvent (); bool res = AcceptEx ( listen_sock, work_sock, address_buf, 0 , sizeof (sockaddr_in) + 16 , sizeof (sockaddr_in) + 16 , &length_received, &ovl); if (!res) { if (ERROR_IO_PENDING != ::WSAGetLastError ()) { return 1 ; } } events.emplace_back (ovl.hEvent); ev_entries[ovl.hEvent] = { EventType::ET_ACCEPT, listen_sock, work_sock, address_buf, ovl }; }
这里的程序有错误,会导致后续的WSAGetOverlappedResult错误。见ovl的引用错误
前期工作准备好了,后面还是while循环中进行WSAWaitForMultipleEvents。通过其返回值,找到events下标,找到event。然后通过map查询ev_entries之前记录的对应event的listen_sock等信息。
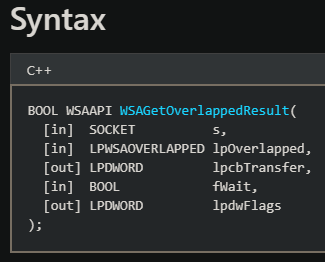
WSAGetOverlappedResult function (winsock2.h)
参数1,填入event对应的socket
参数2,填入event对应的lpOverlapped。这个已经在AcceptEx之前就创建好了的,AcceptEx用过。见:最后一个参数:如何与Event结合
WSAWaitForMultipleEvents找到event后,就需要调用WSAGetOverlappedResult看是否成功。成功才能进行下一步操作。
1 2 3 4 5 6 7 8 9 10 11 12 13 14 15 16 17 18 19 20 21 22 23 24 25 26 27 28 29 30 while (true ){ auto res = ::WSAWaitForMultipleEvents ( events.size (), events.data (), false , WSA_INFINITE, false ); if (int n = res - WSA_WAIT_EVENT_0; n < events.size ()) { auto event = events[n]; auto [event_type, listen_sock, work_sock, buf, ovl] = ev_entries[event]; DWORD bytes_received{ 0 }; DWORD flags{ 0 }; if (!::WSAGetOverlappedResult ( listen_sock, &ovl, &bytes_received, false , &flags)) { err = ::WSAGetLastError (); continue ; }
我们后面发现,WSAGetOverlappedResult(listen_sock, &ovl, ...)会产生错误。ovl的错误使用相关。因为这里产生了ovl复制,而后续使用的是map容器中value的_ovl,因此,应该传实际的map容器中_ovl的地址。
调用 AcceptEx 后,异步操作的完成会关联到你传入的 OVERLAPPED 结构(即 &ovl)。但是在主循环中,你使用 WSAGetOverlappedResult 获取结果时,使用的是 ev_entries[ovl.hEvent]._ovl 中的 OVERLAPPED 结构。这个不一致会导致 WSAGetOverlappedResult 在一个不同的 OVERLAPPED 结构上操作,从而引发错误。
传入的 OVERLAPPED 结构的作用 :OVERLAPPED 结构用于存储异步操作的状态。它不会立即在 AcceptEx 调用时被修改,但当操作完成时,Windows 会在 OVERLAPPED 结构中写入操作的完成状态。
应该调整为以下顺序:并且要注意AcceptEx最后一个参数应该针对的是&ev_entries[ovl.hEvent]._ovl。
1 2 3 4 5 6 7 8 9 10 11 12 13 14 15 16 17 18 19 20 21 22 23 24 { OVERLAPPED ovl; ovl.hEvent = ::WSACreateEvent (); events.emplace_back (ovl.hEvent); ev_entries[ovl.hEvent] = { EventType::ET_ACCEPT, listen_sock, work_sock, address_buf, ovl }; bool res = AcceptEx ( listen_sock, work_sock, address_buf, 0 , sizeof (sockaddr_in) + 16 , sizeof (sockaddr_in) + 16 , &length_received, &ev_entries[ovl.hEvent]._ovl); if (!res) { if (ERROR_IO_PENDING != ::WSAGetLastError ()) { return 1 ; } } }
1 2 3 4 5 6 7 8 9 10 11 12 13 14 15 16 17 18 19 20 21 22 23 24 25 26 27 28 29 30 31 32 33 34 35 36 37 38 39 40 41 42 43 44 45 46 47 48 49 50 51 52 53 54 55 56 57 58 59 60 61 62 63 64 65 66 67 68 69 70 71 72 73 74 75 76 77 78 79 80 81 82 83 while (true ) { if (...) { if (event_type == EventType::ET_ACCEPT) { sockaddr_in client_addr = *reinterpret_cast <sockaddr_in const *>(buf + sizeof (sockaddr_in) + 16 ); if (INVALID_SOCKET == work_sock) { err = ::WSAGetLastError (); continue ; } wchar_t addr_str[46 ] = L"" ; InetNtopW (AF_INET, reinterpret_cast <void *>(&client_addr.sin_addr), addr_str, 46 ); std::wstring info = std::format(L"client address: {}, port: {}" , addr_str, ntohs (client_addr.sin_port)); std::wcout << info << std::endl; std::wstring message{ L"Welcome to server!" }; ::send ( work_sock, reinterpret_cast <const char *>(message.c_str ()), sizeof (wchar_t ) * message.size (), 0 ); ::WSAEventSelect (listen_sock, event, 0 ); auto it = std::ranges::remove_if (events, [event](auto && v) -> bool { return v == event; }); events.erase (it.begin (), it.end ()); ev_entries.erase (event); auto read_event = ::WSACreateEvent (); if (SOCKET_ERROR == ::WSAEventSelect (work_sock, read_event, FD_READ)) { err = ::WSAGetLastError (); continue ; } events.emplace_back (read_event); ev_entries[read_event] = { EventType::ET_READ, listen_sock, work_sock, address_buf, ovl }; } else if (event_type == EventType::ET_READ) { wchar_t buf[100 ] = { 0 }; int bytes_received = ::recv (work_sock, reinterpret_cast <char *>(buf), sizeof (wchar_t ) * sizeof (buf), 0 ); if (bytes_received > 0 ) { std::wcout << buf << std::endl; } else { err = ::WSAGetLastError (); } ::WSAEventSelect (work_sock, event, 0 ); auto it = std::ranges::remove_if (events, [event](auto && v) -> bool { return v == event; }); events.erase (it.begin (), it.end ()); ev_entries.erase (event); ::closesocket (work_sock); work_sock = INVALID_SOCKET; } } } ::closesocket (listen_sock); listen_sock = INVALID_SOCKET; ::WSACleanup (); return 0 ; }
非阻塞模型、异步IO模型。异步指帮助你传数据。除上面外的特殊点在于,它内部还建立了线程池,让读写数据更加快速。
Empty项目,取名IOCPModel。iocp.cpp。
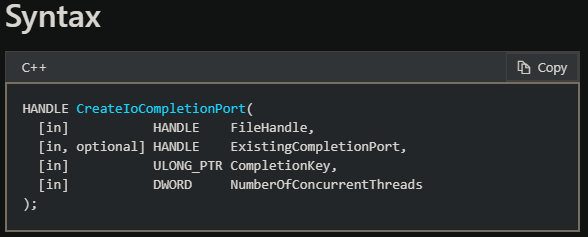
参数1,需要给它一个打开了的文件Handle,或者INVALID_HANDLE_VALUE。在我们想要预创建一个CP(Completion Port)时,可以先给出INVALID_HANDLE_VALUE,可以看作是空的,随后再补上即可。如果给出INVALID_HANDLE_VALUE,那么参数2必须给nullptr。
参数2,填一个创建好了的iocp的HANDLE;如果原先没有有效的IOCP,则可以填nullptr。
参数3,Completion Key,中文叫作完成键。每个句柄都对应一个用户定义的完成键(实际上就是每个socket给一个名称),用户定义的完成键实际上就是用户自定义的结构体,内容包含你需要的东西。可以先填0。
参数4,NumberOfConcurrentThreads,指示需要开辟多少线程。如果此参数为0,则系统允许并发线程数量与系统中的处理器数量一样多。
返回值
如果ExistingCompletionPort参数为NULL,则返回值是新句柄。
如果ExistingCompletionPort参数是有效的 IOCP 句柄,则返回值是同一句柄。
如果FileHandle参数是有效句柄,则该文件句柄现在与返回的 IOCP 关联。
如果失败,返回值为NULL。要获取扩展错误信息,调用GetLastError函数(不带WSA前缀)。
在程序结束之前,需要CloseHandle(iocp); iocp = nullptr;。
1 2 3 4 5 6 7 8 9 10 HANDLE iocp{ nullptr }; int main () iocp = ::CreateIoCompletionPort (INVALID_HANDLE_VALUE, nullptr , 0 , 0 ); ::CloseHandle (iocp); iocp = nullptr ; }
iocp需要配合线程才能进行工作,那么就需要指定一个线程函数。
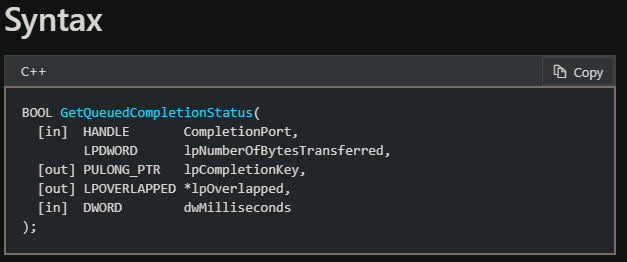
参数1,填上面已经创建好的iocp,每个iocp都有一个等待队列,这个参数指示了线程从哪个等待队列中等待。
参数2,lpNumberOfBytesTransferred,意为:有多少个数据传递了?
参数3,lpCompletionKey,完成键的指针类型。本参数是out类,是2级指针。是函数要回写的,因此需要填CompletionKey的2级指针。而lpCompletionKey原本是1级指针,在此基础上参数类型给出了PULONG_PTR,这又是一个一级指针类型,因此整体就表示2级指针。
参数4,lpOverlapped,本参数也是out类,也是2级指针,但与上面的表示方法不同,在LPOVERLAPPED是1级指针的基础上,又加了个*后缀,因此整体表示2级指针。
参数5,dwMilliseconds,等待多少秒。可以填INFINITE。
返回值:成功则返回非0,否则返回0。
1 2 3 4 5 6 7 8 9 10 11 12 13 14 void worker (void ) DWORD bytes_transferred{ 0 }; ULONG_PTR completion_key; LPOVERLAPPED povl{ nullptr }; while (true ) { bool succeed = ::GetQueuedCompletionStatus (iocp, &bytes_transferred, &completion_key, &povl, INFINITE); if (!succeed) { continue ; } } }
这里为什么要设计成一定要多出一个socket的位置呢?因为我们发现在每次最后想要发出下一个AcceptEx时,需要再次填入listen_sock。如果我们只有work_sock,则会很麻烦。
1 2 3 4 5 6 7 8 9 10 11 12 13 14 enum class EventType { ET_ACCEPT = 0 , ET_READ }; class Entry { public : EventType _event_type; SOCKET _listen_sock; SOCKET _work_sock; char * _buf{ nullptr }; WSAOVERLAPPED _ovl; };
我们需要在AcceptEx之前创建完成键
1 2 3 4 5 6 7 8 9 10 11 12 13 14 15 16 17 18 19 20 21 22 23 24 25 26 27 28 29 30 SOCKET work_sock = ::WSASocket (AF_INET, SOCK_STREAM, IPPROTO_TCP, nullptr , 0 , WSA_FLAG_OVERLAPPED); char * address_buf = new char [sizeof (sockaddr_in) * 2 + 32 ]; DWORD length_received{ 0 }; OVERLAPPED ovl; ovl.hEvent = ::WSACreateEvent (); Entry* entry = new Entry{ EventType::ET_ACCEPT, listen_sock, work_sock, address_buf, ovl }; bool res = AcceptEx ( listen_sock, work_sock, address_buf, 0 , sizeof (sockaddr_in) + 16 , sizeof (sockaddr_in) + 16 , &length_received, &entry->_ovl); if (!res) { if (ERROR_IO_PENDING != ::WSAGetLastError ()) { return 1 ; } }
随后,创建IOCP
参数1填写listen_sock,参数2填写一开始创建的空的IOCP,参数3填写刚才创建好的完成键,参数4填0。reinterpret_cast转换为对应的类型。
1 2 3 4 5 6 7 8 9 10 11 auto old_iocp = ::CreateIoCompletionPort ( reinterpret_cast <HANDLE>(listen_sock), iocp, reinterpret_cast <ULONG_PTR>(entry), 0 ); if (nullptr == old_iocp){ err = ::GetLastError (); }
GetQueuedCompletionStatus函数中第3个参数,要与我们自定义的Entry类型结合起来。
1 2 3 4 5 6 7 8 9 10 11 12 13 14 15 16 17 18 19 20 21 22 23 24 25 26 void worker (void ) DWORD bytes_transferred{ 0 }; Entry* entry{ nullptr }; LPOVERLAPPED povl{ nullptr }; while (true ) { bool succeed = ::GetQueuedCompletionStatus ( iocp, &bytes_transferred, reinterpret_cast <PULONG_PTR>(entry), &povl, INFINITE); if (!succeed) { continue ; } if (entry->_event_type == ...) { } } }
然后,就可以在每次循环时判断entry中携带的EventType信息,从而做分支处理。work_sock是来自entry中的。client_addr原先是accept函数在连接时填充给服务端的,而现在是来自buf中的内容。
1 2 3 4 5 6 7 8 9 10 11 12 13 14 15 16 17 18 19 20 21 if (entry->_event_type == EventType::ET_ACCEPT) { SOCKET work_sock = entry->_work_sock; if (INVALID_SOCKET == work_sock) { int err = ::WSAGetLastError (); continue ; } sockaddr_in client_addr = *reinterpret_cast <sockaddr_in const *>(entry->_buf + sizeof (sockaddr_in) + 16 ); wchar_t addr_str[46 ] = L"" ; InetNtopW (AF_INET, reinterpret_cast <void *>(&client_addr.sin_addr), addr_str, 46 ); std::wstring info = std::format(L"client address: {}, port: {}" , addr_str, ntohs (client_addr.sin_port)); std::wcout << info << std::endl; }
我们可以通过WSASend异步地向work_sock对应的client发送消息。
1 2 3 4 5 6 7 8 9 10 WSABUF wsa_buf; wsa_buf.buf = new char [100 ]; wcscpy_s (reinterpret_cast <wchar_t *>(wsa_buf.buf), 50 , L"Welcome to server!" );::WSASend (work_sock, &wsa_buf, 1 , &bytes_transferred, 0 , nullptr , nullptr );
向往常一样,如果我们想要测试(1)打印客户端地址;(2)向客户端发送信息;(3)接收客户端信息。现在就差接收了。
与WSASend对应的动作是WSARecv。也是异步的,所以不能盲目地调用,而是等对方发送消息时,或者出现可读事件时,再接收。
但是不知道对方什么时候发送消息,因此,我们需要创建新的完成键,在完成键中指示EventType为ET_READ。
然后,像IOCP之前的模式一样,把对应的work_sock和这个新的Entry投入到完成端口。GetQueuedCompletionStatus,成功则说明有了事件,此时再去读取,就行了。
读取完了之后,我们想要测试的东西就结束了,这时记得closeHandle,清除这个完成键。
目前服务端能接受一个客户端的连接请求,并且可以收发消息,但是后续的第二个客户端不行。
可以在处理完accept事件后,WSASocket创建新的空的work_sock赋给entry,entry的其他参数可以复用之前的。随后继续AcceptEx,但要注意,倒数第2个参数需要调整为&bytes_transferred。
AcceptEx完成之后,就可以再次投入IOCP了。
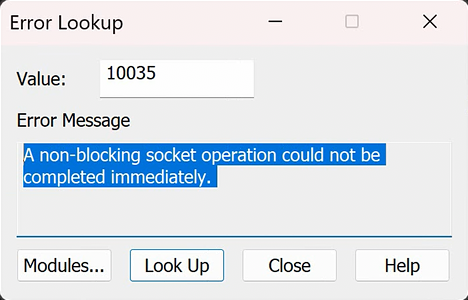
但是在尝试的过程中,我们发现,CreateIoCompletionPort的第1个参数不可以是entry->_listen_sock,这会导致返回值为nullptr,即错误,错误码是87,error lookup后查询到原因是“无效的参数”。CreateIoCompletionPort function (ioapiset.h) - Win32 apps | Microsoft Learn
A handle can be associated with only one I/O completion port, and after the association is made, the handle remains associated with that I/O completion port until it is closed.
因此,不能在同一个socket对应的HANDLE上重复CreateIOCP。
CreateIoCompletionPort的第一个参数改为(reinterpret_cast<HANDLE>(entry->_work_sock)之后就正常工作了。entry->_listen_sock是错以为完成端口每一次工作后会把HANDLE退出。(比如这次的HANDLE,是由于主线程第一次CreateIoCompletionPort投入的listen_sock引起的)。实际上完成端口的每一次工作完成后,不会把HANDLE退出,因此无需再次对上面的listen_sock对应的HANDLE进行CreateIoCompletionPort。entry->_work_sock对应的HANDLE进行CreateIoCompletionPort,这才是正确的逻辑。CloseHandle(iocp);的时候。
1 2 3 4 5 6 7 8 9 10 11 12 13 14 15 16 17 18 19 20 21 22 23 24 25 26 27 28 29 entry->_work_sock = ::WSASocket (AF_INET, SOCK_STREAM, IPPROTO_TCP, nullptr , 0 , WSA_FLAG_OVERLAPPED); bool res = AcceptEx ( entry->_listen_sock, entry->_work_sock, entry->_buf, 0 , sizeof (sockaddr_in) + 16 , sizeof (sockaddr_in) + 16 , &bytes_transferred, &entry->_ovl); auto old_iocp = ::CreateIoCompletionPort ( reinterpret_cast <HANDLE>(entry->_work_sock), iocp, reinterpret_cast <ULONG_PTR>(entry), 0 ); if (nullptr == old_iocp) { int err = ::GetLastError (); break ; }
我们设计的EventType只能指示简单的一种事件的socket。有的socket既有可读事件又有可写事件,此时,就需要依赖Entry中的_ovl信息了,它是overlappedIO信息,其中有hEvent变量。_ovl是AcceptEx函数填入的。
IOCP看起来复杂,其实无非就几个步骤:
创建完成键,需要填充listen_sock,work_sock,ovl等变量
创建IOCP,需要上面创建好的完成键
子线程从IOCP队列获取任务。分析entry内容。
子线程再次按需创建新的IOCP,以便让任务队列循环运转。
