Windows_多线程

进程和线程的关系

  1. 进程是程序的运行实例。包含全局变量。
  2. 一个进程至少包含一个线程
  3. 程序运行的最小单位是函数,线程则是函数的运行实例。
  4. 线程是操作系统的术语,而对于处理器来说线程是任务,每个逻辑处理器(或是处理器核心)都可以对应一个线程,并且可以在一个处理器上同时运行不同进程的线程。
  5. 线程中包含线程栈。

卖票程序

1
2
3
4
5
6
7
8
9
10
11
12
13
#include <iostream>
constinit int tickets = 100;
int main()
{
while (true)
{
std::wcout << L"Station main: " << tickets-- << std::endl;
if (tickets == 0)
{
break;
}
}
}

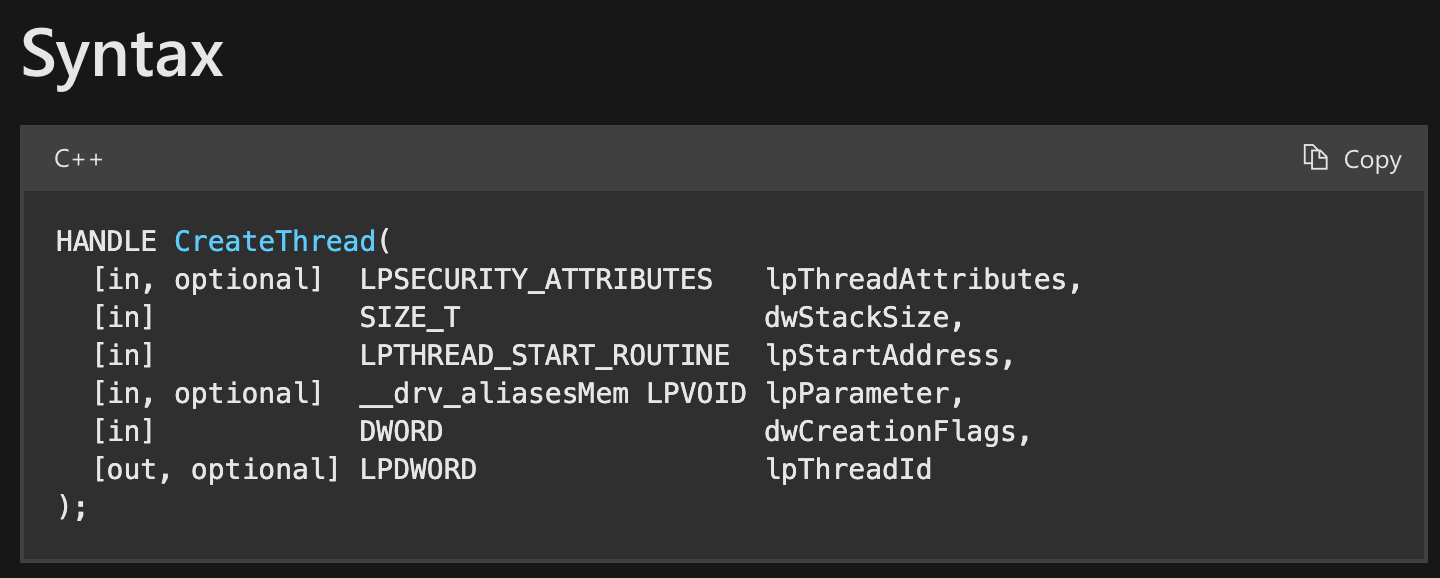
CreateThread创建线程

官方文档:CreateThread function (processthreadsapi.h) - Win32 apps | Microsoft Learn

通常引入<Windows.h>即可使用。

  1. 可选,LP即long pointer,看作pointer就行。Security Attributes意为安全描述符。
    1. 用于ACLs,Access Control Lists。微软常用的手段,哪些东西可以访问,有什么权限等等。可以填NULL得到默认的安全描述符。
  2. 线程栈大小,填 0 意为默认值,Windows下是1M,Linux是4M。
  3. 线程函数的地址,告知线程具体从哪里执行。需要遵循函数签名。ThreadProc callback function (Windows) | Microsoft Learn
    1. DWORD WINAPI ThreadProc(_In_ LPVOID lpParameter);
      1. 以上是线程函数的签名形式。返回值为0代表线程函数执行成功。
    2. LPVOID指的是void *
    3. _In_是一个 SAL(Source Annotation Language)宏, 用于注释 Windows API 函数参数。它提供有关函数参数的额外信息,以帮助编译器进行静态分析和代码检查。我们可以省略。
    4. WINAPI指__stdcall
    5. 因此可以简化为:DWORD WINAPI ThreadProc(void * lpParameter);
    6. C++中传入函数地址时,需要在函数名字之前加一个&取地址。
  4. 可选,函数的参数
  5. 线程的控制符。
    1. 0表示创建后立即执行
    2. CREATE_SUSPENDED表示创建后挂起,直到调用ResumeThread
  6. 可选,输出值,给一个指针可以获得线程ID。此线程ID与Handle不同。可填NULL。
  7. 返回值:如果创建成功,返回此线程的句柄。

创建完线程并执行后,需要关闭Handle,但这不意味着关闭线程,只不过是说此句柄不再绑定这个线程,不对线程进行管理了,那么线程运行结束之后就会自行停止。

1
2
3
4
5
6
7
8
9
10
11
12
13
14
15
16
17
18
19
20
21
22
23
24
25
26
27
28
29
30
31
32
33
34
35
36
37
38
39
40
#include <Windows.h>
#include <iostream>
#include <format>
#include <print>
constinit int tickets = 10;
DWORD WINAPI ThreadProc(void* lpParameter);
int main()
{
// start a new thread
HANDLE hThread = ::CreateThread(nullptr, 0, &ThreadProc, nullptr, 0, nullptr);
if (hThread) ::CloseHandle(hThread);
hThread = nullptr;

while (true)
{
if (tickets > 0)
{
std::wcout << L"Station main: " << tickets-- << std::endl;
}
else
{
break;
}
}
}
DWORD WINAPI ThreadProc(void* parameter)
{
while (true)
{
if (tickets > 0)
{
std::wcout << L"Station 1: " << tickets-- << std::endl;
}
else
{
break;
}
}
return 0;
}

可能在输出结果中看到两个线程抢占式的输出,导致内容杂乱。

1
2
3
4
5
6
7
8
9
10
11
12
Station main: 10Station 1: 9

Station main: 8
Station main: 7
Station main: 6
Station 1: 5
Station 1: 4
Station 1: 3
Station 1: 2
Station main: 1
Station 1: 0

以上输出有两个问题:

  1. 还未换行时,线程被抢占。导致换行延后。多行内容在一行显示
  2. 子线程把0号票卖掉了,这是错误的。

关于输出问题,可以用C++20<format>std::format或者C++23<print>std::print解决。

1
std::wcout << std::format(L"Station main: {}\n", tickets--);

1
std::println("Station main: {}", tickets--);

Sleep把时间片放大,观察错误

通过sleep把时间片放大,可以让多线程中隐患的几率增大。

Windows下的Sleep定义于Windows.h,参数是毫秒。

1
2
3
4
5
6
7
8
9
10
11
12
13
14
15
16
17
18
19
20
21
22
23
24
25
26
27
28
29
30
31
32
33
34
35
36
37
38
39
40
41
42
43
44
45
#include <Windows.h>
#include <iostream>
#include <format>
#include <print>
constinit int tickets = 10;
DWORD WINAPI ThreadProc(void* lpParameter);
int main()
{
// start a new thread
HANDLE hThread = ::CreateThread(nullptr, 0, &ThreadProc, nullptr, 0, nullptr);
if (hThread) ::CloseHandle(hThread);
hThread = nullptr;

while (true)
{
if (tickets > 0)
{
::Sleep(5);
std::println("Station main: {}", tickets--);
}
else
{
break;
}
}
::Sleep(500);
std::println("Finally, tickets remain: {}", tickets);
return 0;
}
DWORD WINAPI ThreadProc(void* parameter)
{
while (true)
{
if (tickets > 0)
{
::Sleep(5);
std::println("Station 1: {}", tickets--);
}
else
{
break;
}
}
return 0;
}

最后可能输出的情况:main线程把0号票卖了,最后导致票余量为-1。

1
2
3
4
5
6
7
8
9
10
11
12
13
14
Station main: 9
Station 1: 10
Station 1: 8
Station main: 7
Station main: 6
Station 1: 6
Station main: 4
Station 1: 5
Station main: 3
Station 1: 2
Station 1: 1
Station main: 0
Finally, tickets remain: -1

可能的情况:main线程判断tickets为1后准备卖票,睡了5ms期间被1线程卖掉了最后一张票,之后main线程唤醒后是不知道的,依旧减了票量到-1。

我们发现,如果使用的是std::println,0号票卖掉的概率大大下降。大多数情况剩余票数为0(正确行为)。这可能是因为std::println/控制台输出内部通常有锁,调用很“重”,会让线程轮换得更慢,进一步降低了极端交错(比如刚好重读为 0 再减)的概率。但这样对 tickets 的访问并不会变安全。
总结:控制台输出里自带锁,反而会“串行化”一部分时间,不利于制造极端交错。

CreateMutex创建互斥量

CreateMutexW function (synchapi.h) - Win32 apps | Microsoft Learn

通常引入<Windows.h>即可使用。

  1. 可选,安全描述符,可填NULL获得默认的。
  2. 是否起始就占有互斥量:此时的线程是不是立马持有互斥量而其他线程无法访问。
  3. 可选,名字。
  4. 返回值是句柄。

在此例我们要给这个互斥量一个全局可访问的句柄。

WaitForSingleObject - 加锁

在临界区之前需要WaitForSingleObject等待互斥量的信号。相当于加锁
WaitForSingleObject function (synchapi.h) - Win32 apps | Microsoft Learn
通常引入<Windows.h>即可使用。

  1. 指明等待的对象的句柄
  2. 等待的时间
    1. 可填非0的值
    2. 如果填0,而没有信号,则会立即返回,一直重复试探、空转。
    3. 可以填INFINITE,无限期等下去。

ReleaseMutex - 释放互斥量

临界区后需要ReleaseMutex(hMutex)释放互斥量。而且要注意,在if语句的每个情况下都需要写释放锁语句。

卖票代码

1
2
3
4
5
6
7
8
9
10
11
12
13
14
15
16
17
18
19
20
21
22
23
24
25
26
27
28
29
30
31
32
33
34
35
36
37
38
39
40
41
42
43
44
45
46
47
48
49
50
51
52
53
54
#include <Windows.h>
#include <iostream>
#include <print>
constinit int tickets = 10;
constinit HANDLE hMutex = nullptr;
DWORD WINAPI ThreadProc(void* lpParameter);
int main()
{
hMutex = ::CreateMutex(nullptr, false, nullptr);
// start a new thread
HANDLE hThread = ::CreateThread(nullptr, 0, &ThreadProc, nullptr, 0, nullptr);
if (hThread) ::CloseHandle(hThread);
hThread = nullptr;

while (true)
{
::WaitForSingleObject(hMutex, INFINITE);
if (tickets > 0)
{
::Sleep(5);
std::println("Station main: {}", tickets--);
::ReleaseMutex(hMutex);
}
else
{
::ReleaseMutex(hMutex);
break;
}
}
::Sleep(500);
::CloseHandle(hMutex);
hMutex = nullptr;
std::println("Finally, tickets remain: {}", tickets);
return 0;
}
DWORD WINAPI ThreadProc(void* parameter)
{
while (true)
{
::WaitForSingleObject(hMutex, INFINITE);
if (tickets > 0)
{
::Sleep(5);
std::println("Station 1: {}", tickets--);
::ReleaseMutex(hMutex);
}
else
{
::ReleaseMutex(hMutex);
break;
}
}
return 0;
}

结果:

1
2
3
4
5
6
7
8
9
10
11
12
Station main: 10
Station 1: 9
Station main: 8
Station 1: 7
Station main: 6
Station 1: 5
Station main: 4
Station 1: 3
Station main: 2
Station 1: 1
Finally, tickets remain: 0

不会出现卖0号票的情况。

使用标准线程库创建2个子线程卖票

1
2
3
4
5
6
7
8
9
10
11
12
13
14
15
16
17
18
19
20
21
22
23
24
25
26
27
28
29
30
31
32
33
34
35
36
37
38
39
40
#include <Windows.h>
#include <iostream>
#include <print>
#include <thread>
constinit int tickets = 10;
constinit HANDLE hMutex = nullptr;
void seller(std::string const& name);
int main()
{
hMutex = ::CreateMutex(nullptr, false, nullptr);
// start a new thread
std::jthread th1(seller, "seller 1:");
std::jthread th2(seller, "seller 2:");
//::Sleep(500); // 不用Sleep了,而是join
th1.join();
th2.join();

::CloseHandle(hMutex);
hMutex = nullptr;
std::println("Finally, tickets remain: {}", tickets);
return 0;
}
void seller(std::string const& name)
{
while (true)
{
::WaitForSingleObject(hMutex, INFINITE);
if (tickets > 0)
{
::Sleep(5);
std::println("{} {}", name, tickets--);
::ReleaseMutex(hMutex);
}
else
{
::ReleaseMutex(hMutex);
break;
}
}
}

由于我们在子线程结束后还有CloseHandle、输出最后票数的操作,使用需要手动控制th.join()的位置。

1
2
3
th1.join();
th2.join();
//::Sleep(1000); // 不用Sleep了

或者也可以detach,但是主线程要在末尾主动Sleep一段时间。

1
2
3
th1.detach();
th2.detach();
::Sleep(1000);

结果:

1
2
3
4
5
6
7
8
9
10
11
seller 1: 10
seller 2: 9
seller 1: 8
seller 2: 7
seller 1: 6
seller 2: 5
seller 1: 4
seller 2: 3
seller 1: 2
seller 2: 1
Finally, tickets remain: 0

命名锁

比如要想做应用程序的单例模式。
可以用锁和内核对象进行控制。
为什么要用名字呢?
因为每个线程创建完之后内核返回的句柄值时随机的,线程只知道自己的,而不知道其他人的句柄。但当程序员主动在创建线程时给了名字后,系统就有所感知,你之前已经创建过这个东西,就会把之前的句柄返回给你,就可以访问相同的对象了。

1
2
3
4
5
6
7
8
9
10
11
12
13
14
15
16
17
18
19
20
21
22
23
24
25
constinit HANDLE hMutex = nullptr;
constinit HANDLE hSingletonMx = nullptr;

int main()
{
// 起始 主线程 拥有锁
hSingletonMx = ::CreateMutex(nullptr, false, L"AppSingleton");
if (::GetLastError() == ERROR_ALREADY_EXISTS)
{
::CloseHandle(hSingletonMx);
return 0; // break point
}
hMutex = ::CreateMutex(nullptr, false, nullptr);
::ReleaseMutex(hMutex);

HANDLE hThread = ::CreateThread(nullptr, 0, &ThreadProc, nullptr, 0, nullptr);
::CloseHandle(hThread);
hThread = ::CreateThread(nullptr, 0, &ThreadProc2, nullptr, 0, nullptr);
::CloseHandle(hThread);
hThread = nullptr;

::Sleep(10000);
::CloseHandle(hSingletonMx);
return 0;
}

VS下多线程调试

  1. 下断点。
  2. 先运行一个程序。
  3. 在Sleep 10s结束之前。右击项目名,Debug,Start New Instance。
  4. 会发现,第二个程序会直接到达closeHandle(hSingletonMx)
  5. 这就是跨应用程序的singleton

CreateEvent创建事件(信号、条件变量) - Windows下的独特锁

事件提供了比Mutex更多的功能。
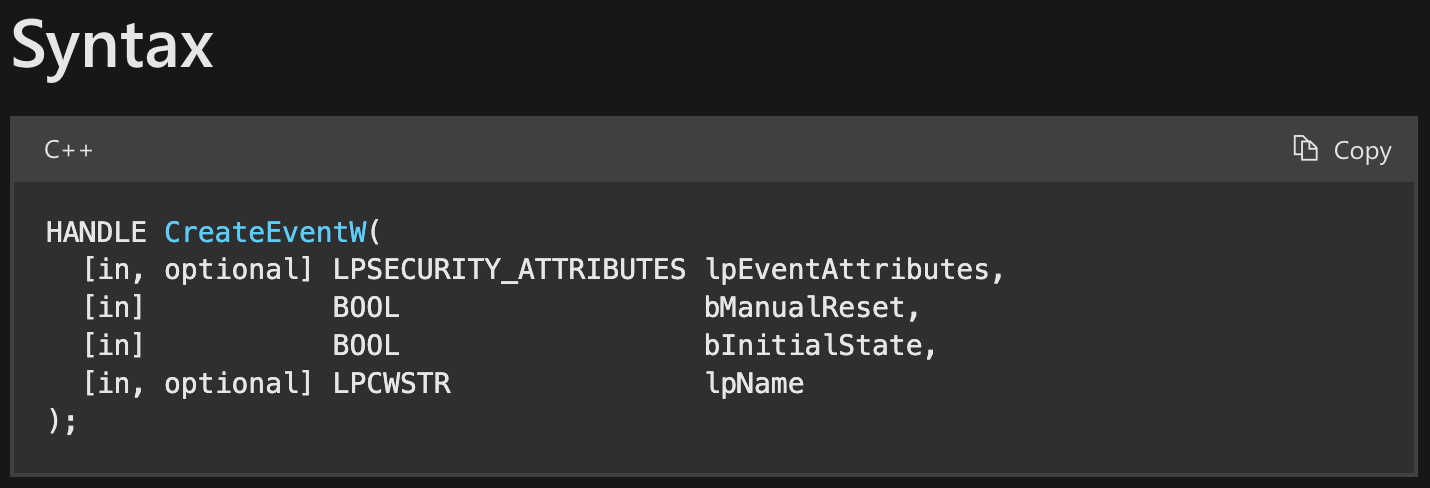
CreateEvent创建。
CreateEventW function (synchapi.h) - Win32 apps | Microsoft Learn

  1. 可选,安全描述符,填NULL表示获取默认描述符。
  2. 是否手动重置,意思是如果是手动重置则需要在WaitForSingleObject之后ResetEvent(hEvent)手动上锁,在此期间可能会被其他人抢占该信号。如果是自动重置则是Wait后自动上锁。
  3. 初始状态,true为有信号(signaled),false为无信号(nonsignaled)。有信号意为没有上锁,无信号时需要自己把锁打开。
  4. 可选,命名或匿名。

SetEvent:释放信号

对于Event来说,退出临界区的方法为SetEvent(hEvent)

卖票代码修改

使用Event时需要做以下修改:

  1. main函数中CreateEvent
  2. main函数最后CloseHandle参数改为hEvent
  3. 线程函数中
    1. WaitForSingleObject参数改为hEvent
    2. 退出临界区的开锁对于Event来说方法为SetEvent(hEvent)

以下,创建2个子线程。

1
2
3
4
5
6
7
8
9
10
11
12
13
14
15
16
17
18
19
20
21
22
23
24
25
26
27
28
29
30
31
32
33
34
constinit HANDLE hEvent = nullptr;
int main()
{
hEvent = CreateEvent(nullptr, false, true, nullptr);

HANDLE hThread = ::CreateThread(nullptr, 0, &ThreadProc, nullptr, 0, nullptr);
::CloseHandle(hThread);

hThread = ::CreateThread(nullptr, 0, &ThreadProc2, nullptr, 0, nullptr);
::CloseHandle(hThread);
hThread = nullptr;

::Sleep(10000);
::CloseHandle(hEvent);
return 0;
}
DWORD WINAPI ThreadProc(void* parameter)
{
while (true)
{
::WaitForSingleObject(hEvent, INFINITE);
if (tickets > 0)
{
::Sleep(5); // 5ms
std::wcout << L"Station #main: " << tickets-- << std::endl;
::SetEvent(hEvent);
}
else
{
::SetEvent(hEvent);
break;
}
}
}

不同

  1. Mutex与拥有者绑定,只能听从拥有者支配。
  2. Event没有绑定拥有者,任何人只要拿到它的句柄就可以支配。
  3. Event更像是一个信号的概念,给别人通知。Linux下的对标物:条件变量

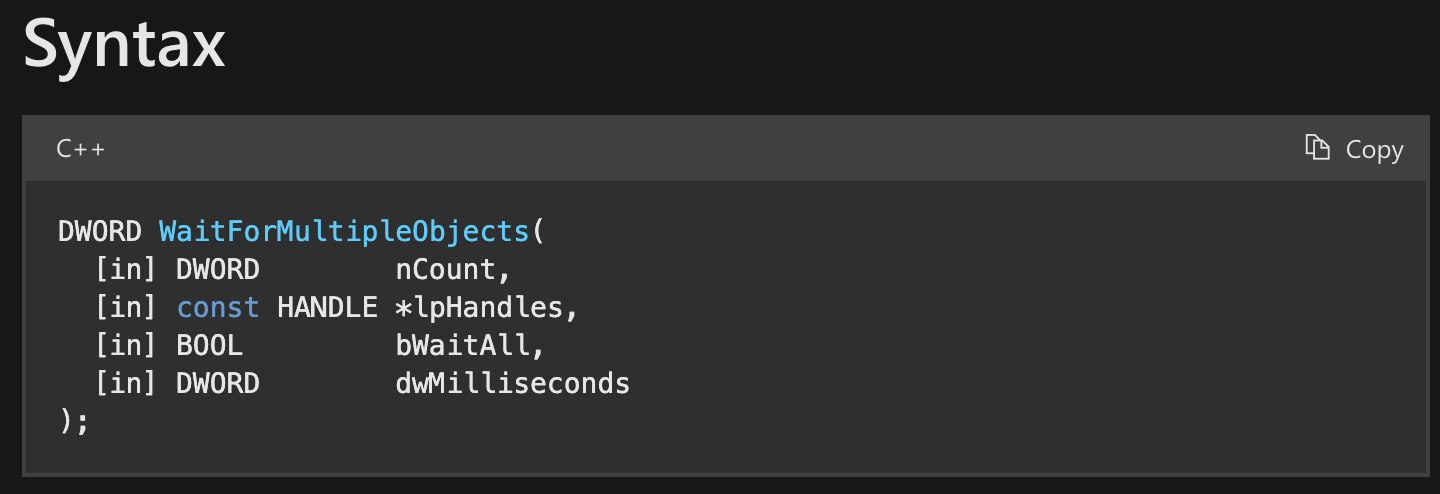
WaitForMultipleObjects

使用WaitForMultipleObjects。常常用于:当作主线程的信号接收器,当两个子线程全部发出结尾的SetEvent信号时,主线程就可以停止阻塞,继续执行,从而取代了死板的Sleep。
WaitForMultipleObjects function (synchapi.h) - Win32 apps | Microsoft Learn

  1. 事件对象的个数
  2. 事件对象句柄数组的首元素指针
  3. 是否等待所有事件对象全部到位再退出
  4. 0是空转,INFINITE是无限期,非0是最多等多久后退出。

两个子线程的完成事件信号,初始状态必须是无信号,即在创建时,CreateEvent的第三个参数为false。
两个子线程在结束时,需要SetEvent(hEventExits[0 or 1]);进行开锁。

1
2
3
4
5
6
7
8
9
10
11
12
13
14
15
16
17
18
19
20
21
22
23
24
25
26
27
28
29
30
31
32
33
34
35
36
37
38
39
40
41
42
43
44
45
46
47
48
49
50
51
52
53
54
55
56
57
58
59
60
61
62
63
64
constinit int tickets = 100;
DWORD WINAPI ThreadProc(void * lpParameter);
DWORD WINAPI ThreadProc2(void * lpParameter);

constinit HANDLE hEvent = nullptr;
constinit HANDLE hEventExits[2] = {nullptr, nullptr};
int main()
{
hEvent = CreateEvent(nullptr, false, true, nullptr);
hEventExits[0] = CreateEvent(nullptr, false, false, nullptr);
hEventExits[1] = CreateEvent(nullptr, false, false, nullptr);
HANDLE hThread = ::CreateThread(nullptr, 0, &ThreadProc, nullptr, 0, nullptr);
::CloseHandle(hThread);
hThread = ::CreateThread(nullptr, 0, &ThreadProc2, nullptr, 0, nullptr);
::CloseHandle(hThread);
hThread = nullptr;

::WaitForMultipleObjects(2, hEventExits, true, INFINITE);
::CloseHandle(hEvent);
::CloseHandle(hEventExits[0]);
::CloseHandle(hEventExits[1]);
::DeleteCriticalSection(&cs);
return 0;
}
DWORD WINAPI ThreadProc(void* parameter)
{
while (true)
{
::WaitForSingleObject(hEvent, INFINITE);
if (tickets > 0)
{
::Sleep(5); // 5ms
std::wcout << L"Station #1: " << tickets-- << std::endl;
::SetEvent(hEvent);
}
else
{
::SetEvent(hEvent);
break;
}
}
SetEvent(hEventExits[0]);
return 0;
}
DWORD WINAPI ThreadProc2(void* parameter)
{
while (true)
{
::WaitForSingleObject(hEvent, INFINITE);
if (tickets > 0)
{
::Sleep(5); // 5ms
std::wcout << L"Station #2: " << tickets-- << std::endl;
::SetEvent(hEvent);
}
else
{
::SetEvent(hEvent);
break;
}
}
SetEvent(hEventExits[1]);
return 0;
}

输出:

1
2
3
4
5
6
7
8
9
10
11
12
13
14
15
16
17
18
19
20
21
 ...
Station #1: 20
Station #2: 19
Station #1: 18
Station #2: 17
Station #1: 16
Station #2: 15
Station #1: 14
Station #2: 13
Station #1: 12
Station #2: 11
Station #1: 10
Station #2: 9
Station #1: 8
Station #2: 7
Station #1: 6
Station #2: 5
Station #1: 4
Station #2: 3
Station #1: 2
Station #2: 1

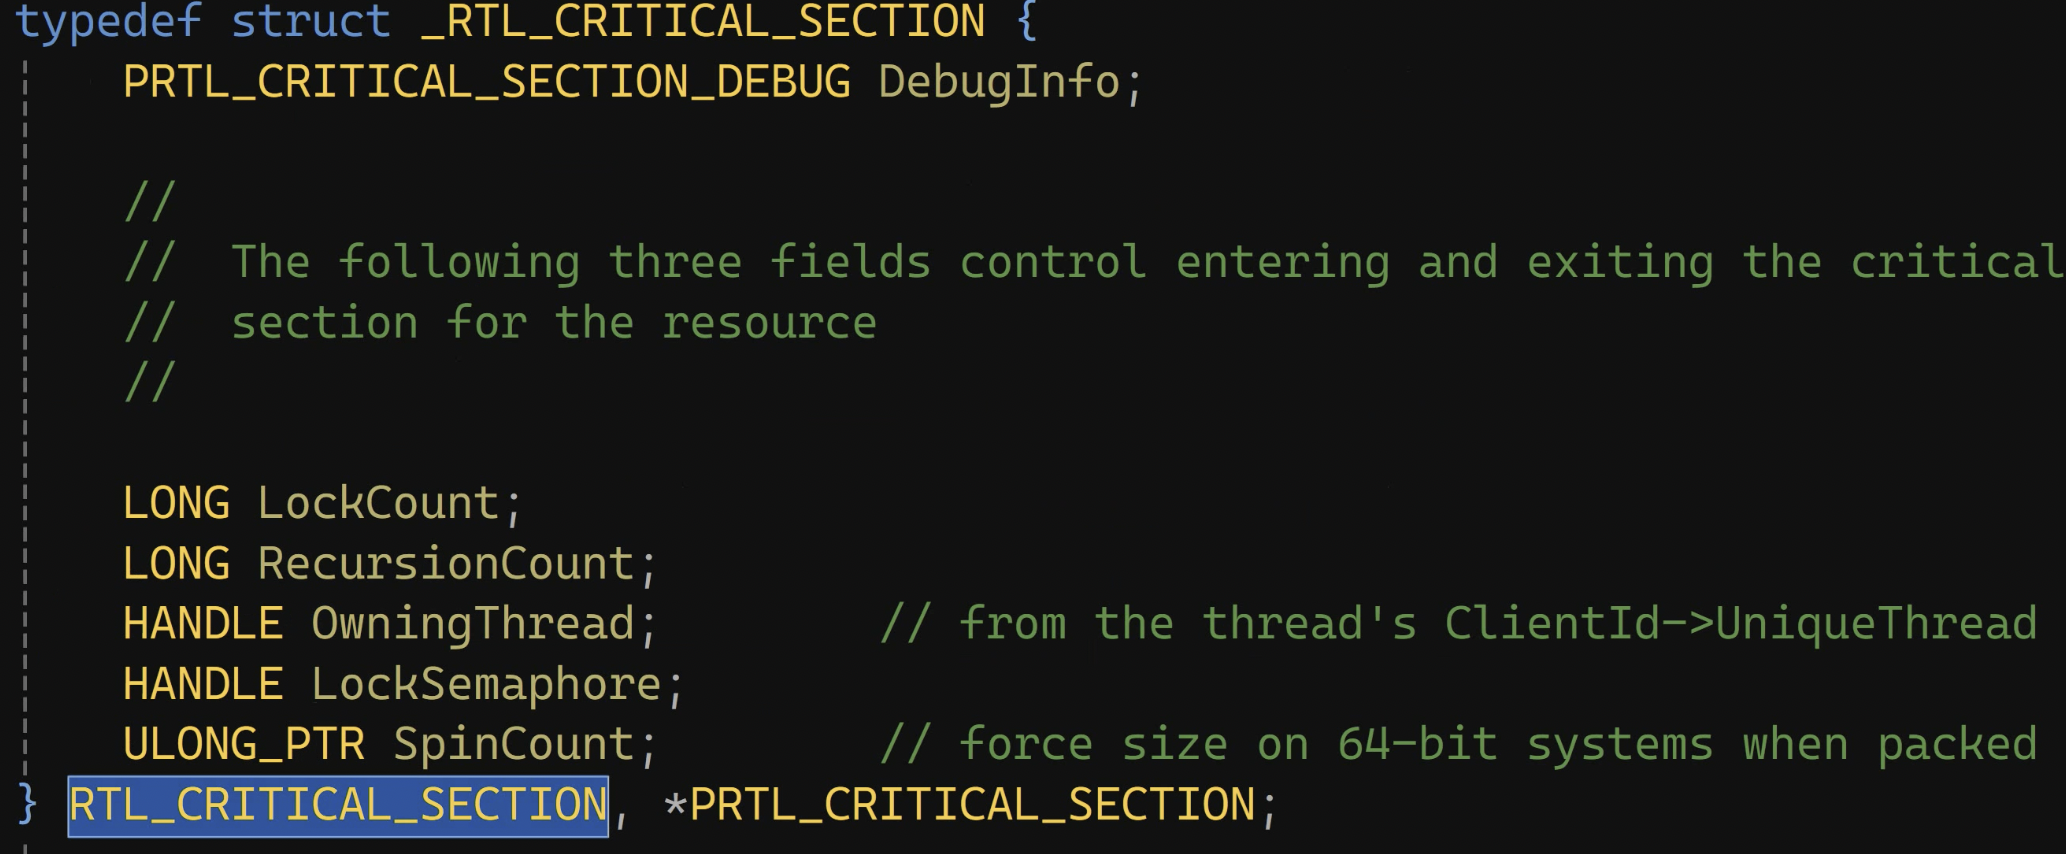
Windows临界区


  1. 不是Windows内核对象,只是C语言下用户态的结构体。
  2. CRITICAL_SECTION声明、定义。
  3. InitializeCriticalSection初始化
  4. 用临界区就不用Mutex或Event了
  5. 保护临界区用EnterCriticalSection
  6. 离开临界区用LeaveCriticalSection
  7. 进程的最后要销毁,DeleteCriticalSection
1
2
3
4
5
6
7
8
9
10
11
12
13
14
15
16
17
18
19
20
21
22
23
24
25
26
27
28
29
30
31
32
33
34
35
36
37
38
39
40
41
42
43
44
45
46
47
48
49
50
51
52
53
54
55
56
57
58
59
60
61
62
63
64
65
66
constinit int tickets = 100;
DWORD WINAPI ThreadProc(void * lpParameter);
DWORD WINAPI ThreadProc2(void * lpParameter);

constinit HANDLE hEventExits[2] = {nullptr, nullptr};

CRITICAL_SECTION cs;
int main()
{
hEventExits[0] = CreateEvent(nullptr, false, false, nullptr);
hEventExits[1] = CreateEvent(nullptr, false, false, nullptr);

::InitializeCriticalSection(&cs);

HANDLE hThread = ::CreateThread(nullptr, 0, &ThreadProc, nullptr, 0, nullptr);
::CloseHandle(hThread);
hThread = ::CreateThread(nullptr, 0, &ThreadProc2, nullptr, 0, nullptr);
::CloseHandle(hThread);
hThread = nullptr;

::WaitForMultipleObjects(2, hEventExits, true, INFINITE);
::CloseHandle(hEventExits[0]);
::CloseHandle(hEventExits[1]);
::DeleteCriticalSection(&cs);
return 0;
}
DWORD WINAPI ThreadProc(void* parameter)
{
while (true)
{
::EnterCriticalSection(&cs);
if (tickets > 0)
{
// ::Sleep(5); // 5ms
std::wcout << L"Station #1: " << tickets-- << std::endl;
::LeaveCriticalSection(&cs);
}
else
{
::LeaveCriticalSection(&cs);
break;
}
}
SetEvent(hEventExits[0]);
return 0;
}
DWORD WINAPI ThreadProc2(void* parameter)
{
while (true)
{
::EnterCriticalSection(&cs);
if (tickets > 0)
{
// ::Sleep(5); // 5ms
std::wcout << L"Station #2: " << tickets-- << std::endl;
::LeaveCriticalSection(&cs);
}
else
{
::LeaveCriticalSection(&cs);
break;
}
}
SetEvent(hEventExits[1]);
return 0;
}

输出

1
2
3
4
5
6
7
8
9
10
11
12
13
14
15
16
17
18
19
20
21
22
23
24
25
26
27
28
29
30
31
32
33
34
35
36
37
38
39
40
Station #1: 1000
Station #1: 999
...
Station #1: ...
...
Station #1: 704
Station #1: 703
Station #1: 702
Station #2: 701
Station #2: 700
...
Station #2: ...
...
Station #2: 260
Station #2: 259
Station #2: 258
Station #1: 257
Station #1: 256
...
Station #1: ...
...
Station #1: 229
Station #1: 228
Station #1: 227
Station #2: 226
Station #2: 225
...
Station #2: ...
...
Station #2: 213
Station #2: 212
Station #1: 211
Station #1: 210
...
Station #1: ...
...
Station #1: 4
Station #1: 3
Station #1: 2
Station #1: 1

特点总结

  1. 在用户态下,速度比内核态的Event、Mutex快
  2. 也能实现同步保护,但是调配度没有那么细致,某一线程一直独占临界区的概率较大。

死锁

  1. 加一个临界区对象
  2. 线程1先进入临界区1再进入临界区2,退出时先退出2再退出1
  3. 线程2先进入临界区2再进入临界区1,退出时先退出1再退出2
1
2
3
4
5
6
7
8
9
10
11
12
13
14
15
16
17
18
19
20
21
22
23
24
25
26
27
28
29
30
31
32
33
34
35
36
37
38
39
40
41
42
43
44
45
46
47
48
49
50
51
52
53
54
55
56
57
58
59
60
61
62
63
64
65
66
67
68
69
CRITICAL_SECTION cs;
CRITICAL_SECTION cs2;
int main()
{
hEventExits[0] = CreateEvent(nullptr, false, false, nullptr);
hEventExits[1] = CreateEvent(nullptr, false, false, nullptr);

::InitializeCriticalSection(&cs);
::InitializeCriticalSection(&cs2);

HANDLE hThread = ::CreateThread(nullptr, 0, &ThreadProc, nullptr, 0, nullptr);
::CloseHandle(hThread);
hThread = ::CreateThread(nullptr, 0, &ThreadProc2, nullptr, 0, nullptr);
::CloseHandle(hThread);
hThread = nullptr;

::WaitForMultipleObjects(2, hEventExits, true, INFINITE);
::CloseHandle(hEventExits[0]);
::CloseHandle(hEventExits[1]);
::DeleteCriticalSection(&cs);
::DeleteCriticalSection(&cs2);
return 0;
}
DWORD WINAPI ThreadProc(void* parameter)
{
while (true)
{
::EnterCriticalSection(&cs);
::EnterCriticalSection(&cs2);
if (tickets > 0)
{
::Sleep(5); // 5ms
std::wcout << L"Station #1: " << tickets-- << std::endl;
::LeaveCriticalSection(&cs2);
::LeaveCriticalSection(&cs);
}
else
{
::LeaveCriticalSection(&cs2);
::LeaveCriticalSection(&cs);
break;
}
}
SetEvent(hEventExits[0]);
return 0;
}
DWORD WINAPI ThreadProc2(void* parameter)
{
while (true)
{
::EnterCriticalSection(&cs2);
::EnterCriticalSection(&cs);
if (tickets > 0)
{
::Sleep(5); // 5ms
std::wcout << L"Station #1: " << tickets-- << std::endl;
::LeaveCriticalSection(&cs);
::LeaveCriticalSection(&cs2);
}
else
{
::LeaveCriticalSection(&cs);
::LeaveCriticalSection(&cs2);
break;
}
}
SetEvent(hEventExits[0]);
return 0;
}

输出

1
2
3
4
5
6
7
8
9
10
11
12
13
14
15
16
17
18
19
20
21
22
23
24
25
26
27
28
29
30
31
32
33
34
35
36
37
38
39
40
41
42
43
44
45
46
47
48
49
50
51
52
53
54
55
56
57
58
Station #1: 1000
Station #1: 999
Station #1: 998
Station #1: 997
Station #1: 996
Station #1: 995
Station #1: 994
Station #1: 993
Station #1: 992
Station #1: 991
Station #1: 990
Station #1: 989
Station #1: 988
Station #1: 987
Station #1: 986
Station #1: 985
Station #1: 984
Station #1: 983
Station #1: 982
Station #1: 981
Station #1: 980
Station #1: 979
Station #1: 978
Station #1: 977
Station #1: 976
Station #1: 975
Station #1: 974
Station #1: 973
Station #1: 972
Station #1: 971
Station #1: 970
Station #1: 969
Station #1: 968
Station #1: 967
Station #1: 966
Station #1: 965
Station #1: 964
Station #1: 963
Station #1: 962
Station #1: 961
Station #1: 960
Station #1: 959
Station #1: 958
Station #1: 957
Station #1: 956
Station #1: 955
Station #1: 954
Station #1: 953
Station #1: 952
Station #1: 951
Station #1: 950
Station #1: 949
Station #1: 948
Station #1: 947
Station #1: 946
Station #1: 945
Station #1: 944
| ---> block

这种情况是因为双方各自都需要两种锁,但是各自只持有一种锁,都在等待另一种锁释放。

多线程UI

VS新建项目,Windows Desktop Wizard,下一步,改名为Multi-Threading-WithUI,Create。弹出Windows Desktop Project,Application Type选择Desktop Application (.exe),Additional options选择Empty project,OK。
手写创建控件。手册查阅:
Progress Bar - Win32 apps | Microsoft Learn
About Progress Bar Controls - Win32 apps | Microsoft Learn

可以通过使用CreateWindowEx函数并指定PROGRESS_CLASS窗口类(定义于CommCtrl.h)来创建进度条。这个窗口类是公共控件DLL被加载后注册的。
即需要在ShowWindow显示主窗口后再CreateWindowEx创建一个子窗口。参数如下:

  1. dwExStyle为叠放式
  2. 类名为PROGRESS_CLASS
  3. 窗口对象名字
  4. dwStyle为子窗口WS_CHILDWINDOW
  5. X、Y,宽度、高度
  6. 父窗口hWndParent
  7. hMenu
  8. hInstance
  9. lpParam

Windows遵循“一切皆窗口”原则,进度条也是一个窗口,因此需要通过创建子窗口来创建进度条。

在WndProcedure的case WM_CREATE中创建。
自定义消息,创建进度条完成:

1
#define CONTROL_FIN WM_USER + 1

case CONTROL_FIN中,可以发送进度条的消息:

  1. PBM_SETRANGE message用于设置进度条的最小值和最大值,并重绘进度条以反映新的范围。
  2. PBM_SETPOS message用于设置进度条的当前位置并重绘进度条以反映新位置。
1
2
3
4
5
6
7
8
9
10
11
12
13
14
15
16
17
18
19
20
21
22
23
24
25
26
27
28
29
30
31
32
33
34
35
36
37
38
39
40
41
42
43
44
45
46
47
48
49
50
51
52
53
54
55
56
57
58
59
60
61
62
63
64
65
66
67
68
69
70
71
72
73
74
75
76
77
78
79
80
81
82
83
84
85
86
87
88
89
90
91
92
HWND hProgressBar = nullptr;
int __stdcall wWinMain(HINSTANCE hInstance, HINSTANCE hPreInstance, wchar_t* lpCmdLine, int )
{
// wcex ...
if (!RegisterClassEx(&wcex))
{
return -1;
}
HWND hWnd = NULL;
hWnd = CreateWindowEx(WS_EX_OVERLAPPEDWINDOW, szAppName, L"App", WS_OVERLAPPEDWINDOW, CW_USEDEFAULT, 0, CW_USEDEFAULT, 0, NULL, NULL, hIntance, NULL);
ShowWindow(hWnd, iCmdShow);
UpdateWindow(hWnd);

// 创建控件:
hProgressBar = CreateWindowEx(WS_EX_OVERLAPPEDWINDOW, PROGRESS_CLASS, L"Bar",
WS_CHILDWINDOW, 100, 100, 200, 20,
hWnd, nullptr, hInstance, nullptr);
::PostMessage(hWnd, CONTROL_FIN, 0, 0);
ShowWindow(hProgressBar, iCmdShow);
UpdateWindow(hProgressBar);

MSG msg;
while (GetMessage(&msg, NULL, 0, 0))
{
TranslateMessage(&msg);
DispatchMessage(&msg);
}
return msg.wParam;
}
LRESULT CALLBACK WndProcedure(HWND hWnd, UINT message, WPARAM wParam, LPARAM lParam)
{
HDC hDC = NULL;
PAINTSTRUCT ps;
switch (message)
{
case WM_CREATE:
{
return 0;
}
case CONTROL_FIN: // 自定义消息:创建进度条完成
{
// 用于设置进度条的最小值和最大值,并重绘进度条以反映新的范围
::PostMessage(hProgressBar, PBM_SETRANGE, 0, MAKELPARAM(0, 100));
// 用于设置进度条的当前位置并重绘进度条以反映新位置。
::PostMessage(hProgressBar, PBM_SETPOS, 50, 0);
return 0;
}
case WM_PAINT:
{
hDC = BeginPaint(hWnd, &ps);
EndPaint(hWnd, &ps);
return 0;
}
case WM_DESTROY:
{
PostQuitMessage(0);
return 0;
}
}
return DefWindowProc(hWnd, message, wParam, lParam);
}
int __stdcall DlgProcedure(HWND hDlg, UINT message, WPARAM wParam, LPARAM lParam)
{
switch (message)
{
case WM_INITDIALOG:
{
return false;
}
case WM_CLOSE:
{
EndDialog(hDlg, 0);
return true;
}
case WM_COMMAND:
{
switch (LOWORD(wParam))
{
case IDCANCEL:
{
return true;
}
case IDOK:
{
return true;
}
}
return false;
}
}
return false;
}

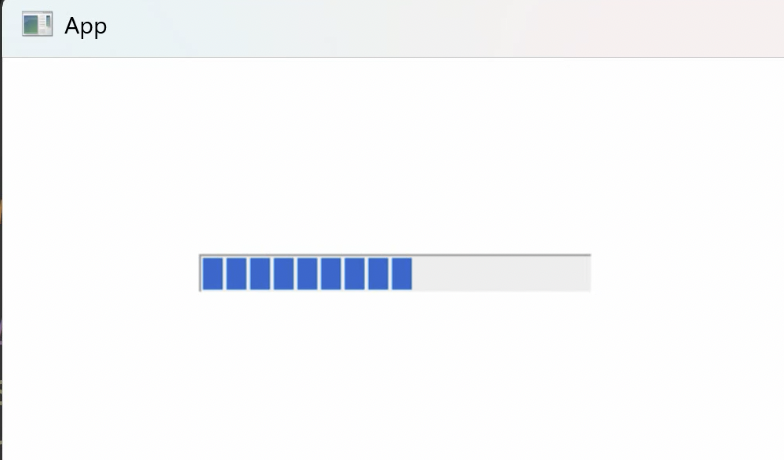
以上UI程序的效果:

一个主窗口,包含一个进度条,50%。

单线程消息循环实现进度条动画

  1. 想要通过按某个键,触发、通知进度条上涨至100%。
  2. 并能同时显示多个进度条,每个进度条按不同速度走。
  3. 同一时刻要让最多两个进度条能动。

PBM_STEPIT message用于将进度条的当前位置向前推进步长增量,并重绘进度条以反映新位置。应用程序通过发送PBM_SETSTEP消息来设置步长增量。

1
2
3
4
5
6
7
8
9
10
11
12
13
14
15
16
17
18
19
20
21
22
case CONTROL_FIN: // 自定义消息:创建进度条完成
{
// 用于设置进度条的最小值和最大值,并重绘进度条以反映新的范围
::PostMessage(hProgressBar, PBM_SETRANGE, 0, MAKELPARAM(0, 100));
// 用于设置进度条的当前位置并重绘进度条以反映新位置。
::PostMessage(hProgressBar, PBM_SETPOS, 0, 0);
// 设置步长,每次走1
::PostMessage(hProgressBar, PBM_SETPOS, 1, 0);
return 0;
}
case WM_KEYDOWN:
{
if (wParam == 'A')
{
for (int i = 0; i < 100; ++i)
{
::PostMessage(hProgressBar, PBM_STEPIT, 0, 0);
std::this_thread::sleep_for(100ms);
}
}
return 0
}

以上程序的问题是,一直没有进度条的动画,必须得等for循环完毕,进度条才能动,但是是一下子到头。
因为:
我们现在是PostMessage发送进度条消息,导致其他消息不能同时处理。
因此要用SendMessage,不进消息队列,直接操作控件,控件就可以立即响应了。
但是仍然存在问题:进度条结束前不能移动主窗口(移动主窗口是发送MOVE消息)。
UI消息驱动工作的原理是什么?
wWinMain函数中有一个消息循环。

我们需要在case WM_KEYDOWN中也加入这样一个消息循环。

但是,GetMessage是以阻塞方式获取消息的,需要切换为PeekMessage。PeekMessageW function (winuser.h) - Win32 apps | Microsoft Learn

1
2
3
4
5
6
7
8
9
10
11
12
13
14
15
16
17
18
19
case WM_KEYDOWN:
{
if (wParam == 'A')
{
for (int i = 0; i < 100; ++i)
{
::SendMessage(hProgressBar, PBM_STEPIT, 0, 0);
std::this_thread::sleep_for(100ms);

MSG msg;
while (::PeekMessage(&msg, NULL, 0, 0, PM_REMOVE))
{
TranslateMessage(&msg);
DispatchMessage(&msg);
}
}
}
return 0;
}

多线程消息处理

按下S键后,创建一个子线程,在子线程中进行发送消息。
子线程发送消息时,就没必要使用SendMessage了,使用PostMessage就可以,PostMessage是往主线程中的消息队列里投放消息。
但是要注意,由于创建的是jthread线程,最后会自动join,导致主线程会等待其操作完毕,那么主窗口就不能处理其他消息,因此子线程需要detach。

1
2
3
4
5
6
7
8
9
10
11
12
13
14
15
16
17
18
19
20
21
22
23
24
25
case WM_KEYDOWN:
{
if (wParam == 'A')
{
// ...
}
else if (wParam == 'S')
{
std::jthread t([]() -> void
{
for (int i = 0; i < 100; ++i)
{
::PostMessage(hProgressBar, PBM_STEPIT, 0, 0);
std::this_thread::sleep_for(100ms);
}
});
t.detach();
}
else if (wParam == 'F')
{

}
return 0;

}

通过条件变量控制子线程

我们把原本按下S键的内容直接让其在case CONTROL_FIN中完成,意味着创建进度条完成后,并且设置好进度条的属性后,立即创建子线程,但是要用条件变量控制:

用Event控制

  1. 在全局定义一个h_start_event
  2. case CONTROL_FIN中CreateEvent与h_start_event绑定
  3. 在jthread t函数体中,WaitForSingleObject等待h_start_event
  4. case WM_KEYDOWN的F键中,SetEvent
1
2
3
4
5
6
7
8
9
10
11
12
13
14
15
16
17
18
19
20
21
22
23
24
25
26
27
28
29
30
31
32
33
34
35
36
37
38
39
40
41
42
43
44
45
46
47
HANDLE h_start_event{ nullptr };

LRESULT CALLBACK WndProcedure(HWND hWnd, UINT message, WPARAM wParam, LPARAM lParam)
{
HDC hDC = NULL;
PAINTSTRUCT ps;
switch (message)
{
case WM_CREATE:
{
return 0;
}
case CONTROL_FIN: // 自定义消息:创建进度条完成
{
h_start_event = ::CreateEvent(nullptr, false, false, nullptr);
// 用于设置进度条的最小值和最大值,并重绘进度条以反映新的范围
::PostMessage(hProgressBar, PBM_SETRANGE, 0, MAKELPARAM(0, 100));
// 用于设置进度条的当前位置并重绘进度条以反映新位置。
::PostMessage(hProgressBar, PBM_SETPOS, 0, 0);
// 设置步长,每次走1
::PostMessage(hProgressBar, PBM_SETPOS, 1, 0);

std::jthread t([]() -> void
{
::WaitForSingleObject(h_start_event, INFINITE);

for (int i = 0; i < 100; ++i)
{
::PostMessage(hProgressBar, PBM_STEPIT, 0, 0);
std::this_thread::sleep_for(100ms);
}
});
t.detach();
return 0;
}
case WM_KEYDOWN:
{
// ...
else if (wParam == 'F')
{
::SetEvent(h_start_event);
}
return 0;
}
// ...

}

跨平台条件变量控制

  1. 在全局定义一个std::mutex start_mxstd::condition_variable start_cv
  2. 在jthread t函数体中,定义unique_lock lck{start_mx}获取锁,之后start_cv.wait(lck)
  3. case WM_KEYDOWN的F键中,start_cv.notify_one()
1
2
3
4
5
6
7
8
9
10
11
12
13
14
15
16
17
18
19
20
21
22
23
24
25
26
27
28
29
30
31
32
33
34
35
36
37
38
39
40
41
42
43
44
45
46
47
48
std::mutex start_mx;
std::condition_variable start_cv;

LRESULT CALLBACK WndProcedure(HWND hWnd, UINT message, WPARAM wParam, LPARAM lParam)
{
HDC hDC = NULL;
PAINTSTRUCT ps;
switch (message)
{
case WM_CREATE:
{
return 0;
}
case CONTROL_FIN: // 自定义消息:创建进度条完成
{
// 用于设置进度条的最小值和最大值,并重绘进度条以反映新的范围
::PostMessage(hProgressBar, PBM_SETRANGE, 0, MAKELPARAM(0, 100));
// 用于设置进度条的当前位置并重绘进度条以反映新位置。
::PostMessage(hProgressBar, PBM_SETPOS, 0, 0);
// 设置步长,每次走1
::PostMessage(hProgressBar, PBM_SETPOS, 1, 0);

std::jthread t([]() -> void
{
std::unique_lock lck{ start_mx };
start_cv.wait(lck);

for (int i = 0; i < 100; ++i)
{
::PostMessage(hProgressBar, PBM_STEPIT, 0, 0);
std::this_thread::sleep_for(100ms);
}
});
t.detach();
return 0;
}
case WM_KEYDOWN:
{
// ...
else if (wParam == 'F')
{
start_cv.notify_one();
}
return 0;
}
// ...

}

多个进度条

  1. 全局定义3个hProgressBar
  2. 在wWinMain中CreateWindowEx创建这3个进度条,可以赋予不同初始属性。并且要三个全部show、Update
  3. case CONTROL_FIN中PostMessage配置每个ProgressBar的属性。
1
2
3
4
5
6
7
8
9
10
11
12
13
14
15
16
17
18
19
20
21
22
23
24
25
26
27
28
29
30
31
32
33
34
35
36
37
38
39
40
41
HWND hProgressBar{ nullptr }, hProgressBar2{ nullptr }, hProgress3{ nullptr };
int __stdcall wWinMain(HINSTANCE hInstance, HINSTANCE hPreInstance, wchar_t* lpCmdLine, )
{
// ..,
hProgressBar = CreateWindowEx(WS_EX_OVERLAPPEDWINDOW, PROGRESS_CLASS, L"Bar",
WS_CHILDWINDOW, 100, 100, 300, 20,
hWnd, nullptr, hInstance, nullptr);
hProgressBar2 = CreateWindowEx(WS_EX_OVERLAPPEDWINDOW, PROGRESS_CLASS, L"Bar2",
WS_CHILDWINDOW, 100, 150, 300, 20,
hWnd, nullptr, hInstance, nullptr);
hProgressBar3 = CreateWindowEx(WS_EX_OVERLAPPEDWINDOW, PROGRESS_CLASS, L"Bar3",
WS_CHILDWINDOW, 100, 200, 300, 20,
hWnd, nullptr, hInstance, nullptr);
::PostMessage(hWnd, CONTROL_FIN, 0, 0);

ShowWindow(hProgressBar, iCmdShow);
ShowWindow(hProgressBar2, iCmdShow);
ShowWindow(hProgressBar3, iCmdShow);
UpdateWindow(hProgressBar);
UpdateWindow(hProgressBar2);
UpdateWindow(hProgressBar3);
// ...
}
// ...
{
case CONTROL_FIN:
{
::PostMessage(hProgressBar, PBM_SETRANGE, 0, MAKELPARAM(0, 100));
::PostMessage(hProgressBar, PBM_SETPOS, 0, 0);
::PostMessage(hProgressBar, PBM_SETSTEP, 1, 0);

::PostMessage(hProgressBar2, PBM_SETRANGE, 0, MAKELPARAM(0, 100));
::PostMessage(hProgressBar2, PBM_SETPOS, 34, 0);
::PostMessage(hProgressBar2, PBM_SETSTEP, 1, 0);

::PostMessage(hProgressBar3, PBM_SETRANGE, 0, MAKELPARAM(0, 100));
::PostMessage(hProgressBar3, PBM_SETPOS, 67, 0);
::PostMessage(hProgressBar3, PBM_SETSTEP, 1, 0);
// ...
}
}

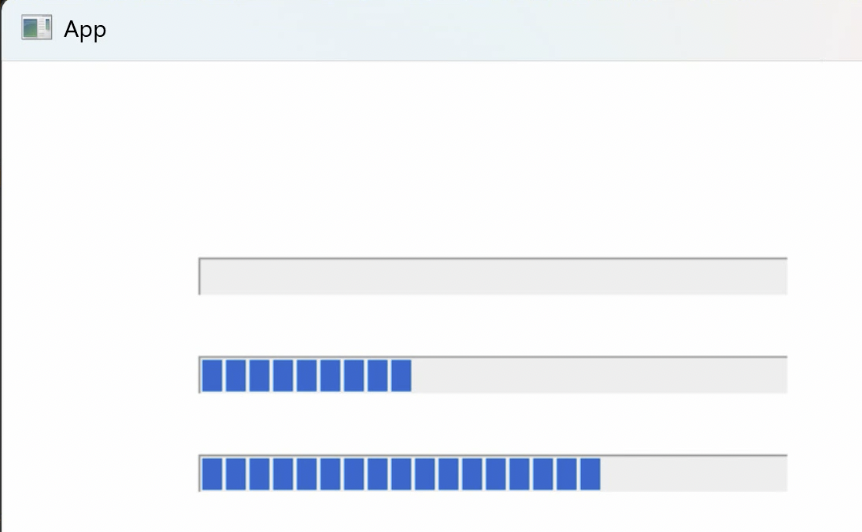
效果如下:

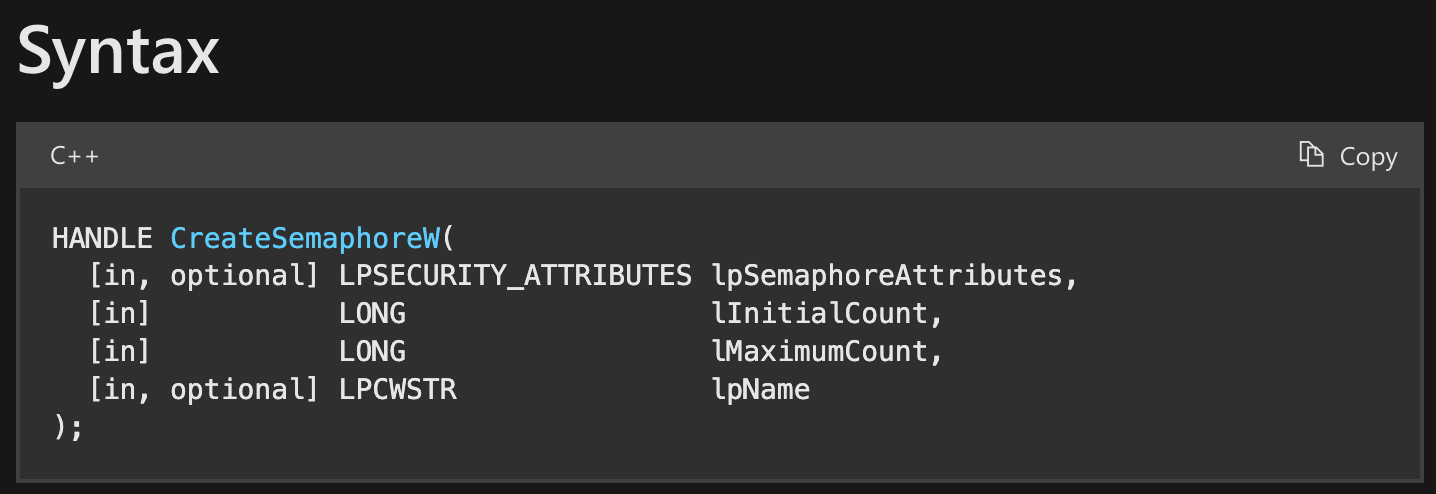
Windows信号量

CreateSemaphore创建信号量

创建的API为CreateSemaphore

  1. 可选,安全描述符,如果是NULL则获得默认的安全描述符。如果是NULL则该句柄不能被子进程继承。
  2. 信号量的初始值。必须大于等于0。
  3. 信号量的最大值。必须大于0。
  4. 可选,信号量内核对象的名字。如果是NULL则没有名称。

WaitForSingleObject信号量减

1
::WaitForSingleObject(h_semaphore, INFINITE);

ReleaseSemaphore信号量加

  1. 信号量对象的句柄
  2. 要增加的量,必须大于0。但是如果该值大于信号量的最大值,则无效,不做更改,返回FALSE。
  3. 一个指针,用于接收信号量先前的数值,可以为NULL。

示例:多个进度条同时动画

  1. 以下程序的效果是,按下F键后,同时可以有两个条进行加载,两个条中如果有一个加载完后,第三个条开始加载。
  2. 三个线程需要有条件变量来等待F键按下,而条件变量需要锁,而后wait。
  3. case F需要给他们notify_all
  4. wait成功后进行获取信号量,信号量初始值、最大值为2。
  5. 但是要求要有两个同时加载,所以某一个线程不能一直拿着一把锁,因此需要wait成功后unlock。
  6. 结束for循环后释放信号量,即加1。

在上一节《多个进度条》的基础上,需要做的是:

  1. case CONTROL_FIN中创建3个线程,对应3个进度条。
  2. case CONTROL_FIN中创建信号量h_semaphore
  3. 每个线程需要wait按下F键的通知,所以需要先获取锁。
  4. wait成功后需要unlock。
  5. 获取信号量。
  6. for循环结束后,释放信号量。
  7. 3个jthread线程在最后detach。
1
2
3
4
5
6
7
8
9
10
11
12
13
14
15
16
17
18
19
20
21
22
23
24
25
26
27
28
29
30
31
32
33
34
35
36
37
38
39
40
41
42
43
44
45
46
47
48
49
50
51
52
53
54
55
56
57
58
{
case CONTROL_FIN:
{
h_semaphore = ::CreateSemaphore(nullptr, 2, 2, nullptr);
std::jthread t([]() -> void
{
std::unique_lock lck{ start_mx };
start_cv.wait(lck);
lck.unlock();
::WaitForSingleObject(h_semaphore, INFINITE);
for (int i = 0; i < 33; ++i)
{
::PostMessage(hProgress, PBM_SETPIT, 0, 0);
std::this_thread::sleep_for(100ms);
}
::ReleaseSemaphore(h_semaphore, 1, nullptr);
});
std::jthread t2([]() -> void
{
std::unique_lock lck{ start_mx };
start_cv.wait(lck);
lck.unlock();
::WaitForSingleObject(h_semaphore, INFINITE);
for (int i = 33; i < 66; ++i)
{
::PostMessage(hProgress, PBM_SETPIT, 0, 0);
std::this_thread::sleep_for(100ms);
}
::ReleaseSemaphore(h_semaphore, 1, nullptr);
});
std::jthread t3([]() -> void
{
std::unique_lock lck{ start_mx };
start_cv.wait(lck);
lck.unlock();
::WaitForSingleObject(h_semaphore, INFINITE);
for (int i = 66; i < 100; ++i)
{
::PostMessage(hProgress, PBM_SETPIT, 0, 0);
std::this_thread::sleep_for(100ms);
}
::ReleaseSemaphore(h_semaphore, 1, nullptr);
});
t.detach();
t2.detach();
t3.detach();
}
case WM_KETDOWN:
{
// ...
else if (wParam == 'F')
{
start_cv.notify_all();
}
return 0;
}
// ...
}

Windows_基于模板设计

准备项目

用VS向导创建项目。新建一个项目,选择"Windows Desktop Wizard",取名为"TemplatedFramework"。点击创建按钮后,弹出配置窗口,Application type选择:“Desktop Application (.exe)”,Additional options中勾选"Empty project"。

配置VS项目的属性,右键项目选择Properties,左边栏选择Linker,然后选择System。右边详细条目"SubSystem"暂时下拉选择Console,后续需要窗口程序时再调整为Windows。

目前的工作是编写一个模板文件。模板不是编译单位,因此取后缀名为.hpp,如果写为.cpp后缀则无法通过默认一键编译。因此,.hpp的文件通常被理解为无需再去寻找相应的.cpp实现文件,而是在自身文件中已实现。所以基于模板开发的代码,最基础的模板代码文件是必须提供开源的。

因此,新建一个.hpp头文件,名为TWindow.hpp

1
2
3
4
5
6
7
8
9
10
11
12
// TWindow.hpp

#pragma once

namespace tfk
{
template <typename T>
class TWindow
{
// ...
};
}

TWindow类设计

和面向对象设计的Window类很相似。
之前的Window.h文件:

1
2
3
4
5
6
7
8
9
10
11
12
13
14
15
16
17
18
19
20
21
22
23
24
25
// Window.h
class Window
{
public:
friend int ::wWinMain(HINSTANCE, HINSTANCE, LPWSTR, int);
public:
Window(std::wstring const& app_name);
bool create_window(void);
void show_window(bool show = true);
int run(void);

static LRESULT CALLBACK window_procedure(
HWND wnd, UINT message, WPARAM wparam, LPARAM lparam);
protected:
virtual void pre_create(WNDCLASSEX& wcex);
virtual bool on_lbtndown(POINT& pt);
virtual bool on_lbtnup(POINT& pt);
virtual bool on_rbtndown(POINT& pt);
virtual bool on_paint(HDC dc, PAINTSTRUCT& ps);
protected:
HWND _wnd{ nullptr };
static HINSTANCE _instance;
static Window* _window;
std::wstring _app_name;
};

现在我们是模板类(没有具体类,因此不存在静态变量),而且不依赖于动态多态,因此,不会用到virtual属性和static属性。

  1. 改类名为TWindow
  2. 改成员变量_window的类型为TWindow<T>*
  3. 删去create_window函数。
    pre_create可以集成在构造函数中了。当时设计Window类将创建窗口的工作从构造函数中剥离的原因是pre_create无法在构造函数中调用,而pre_create又必须和create_window的其他动作绑定(wcex的赋初值工作),因此需要单独抽出来作为create_window。现在,没有虚函数特性了,因此,pre_create可以直接写在构造函数中。因此,也无需再剥离出create_window函数,即原先create_window函数的工作全在构造函数中铺开。
  4. 删去成员变量_app_name,因为可以直接通过参数在构造函数中赋予wcex属性。
  5. pre_create删去virtual。
  6. 四个on_...消息处理函数删去virtual。
1
2
3
4
5
6
7
8
9
10
11
12
13
14
15
16
17
18
19
20
21
22
23
24
template <typename T>
class TWindow
{
public:
friend int ::wWinMain(HINSTANCE, HINSTANCE, LPWSTR, int);
public:
TWindow(std::wstring const& app_name);
bool create_window(void);
void show_window(bool show = true);
int run(void);

static LRESULT CALLBACK window_procedure(
HWND wnd, UINT message, WPARAM wparam, LPARAM lparam);
protected:
void pre_create(WNDCLASSEX& wcex);
bool on_lbtndown(POINT& pt);
bool on_lbtnup(POINT& pt);
bool on_rbtndown(POINT& pt);
bool on_paint(HDC dc, PAINTSTRUCT& ps);
protected:
HWND _wnd{ nullptr };
static HINSTANCE _instance;
static TWindow<T>* _window;
};

TWindow类模板的函数实现

直接在TWindow.hpp文件中的类模板定义的尾部编写函数实现。

1
2
3
4
5
6
7
8
9
10
11
// TWindow.hpp
namespace tfk
{
template <typename T>
class TWindow
{
// ...
};

// 在这里写 implementation
}
1
2
3
4
5
6
7
8
9
10
11
12
13
14
15
16
17
18
19
20
21
22
23
24
25
26
27
28
29
30
31
32
33
34
35
36
37
38
39
40
41
42
43
44
45
46
47
48
49
50
51
52
53
54
55
56
57
58
59
60
61
62
63
64
65
66
67
68
69
70
71
72
73
74
75
76
77
78
79
80
81
82
83
84

// TWindow<T> implementation

// TWindow.hpp

// ...

#include <string>
#include <Windows.h>

template <typename T>
TWindow<T>::TWindow(std::wstring const& app_name)
{
_window = this;

WNDCLASSEX wcex = { 0 };
wcex.cbSize = sizeof(wcex);
wcex.style = CS_HREDRAW | CS_VREDRAW;
wcex.lpfnWndProc = &window_procedure;
wcex.cbClsExtra = 0;
wcex.cbWndExtra = 0;
wcex.hInstance = _instance;
wcex.hIcon = LoadIcon(nullptr, IDI_SHIELD);
wcex.hCursor = LoadCursor(nullptr, IDC_ARROW);
wcex.hbrBackground = (HBRUSH)(GetStockObject(LTGRAY_BRUSH));
wcex.lpszMenuName = NULL;
wcex.lpszClassName = app_name.c_str();
wcex.hIconSm = wcex.hIcon;

pre_create(wcex); // 此处有隐患:见下文CALLBACK实现

if (!::RegisterClassEx(&wcex))
return;
// 定义一个窗口对象的句柄
// HWND: 窗口类型的句柄,也叫内核对象
_wnd = ::CreateWindowEx(
WS_EX_OVERLAPPEDWINDOW,
app_name.c_str(),
L"App",
WS_OVERLAPPEDWINDOW,
CW_USEDEFAULT, 0, CW_USEDEFAULT, 0,
nullptr,
nullptr,
hInstance,
nullptr);
if (!_wnd)
{
int i = ::GetLastError();
return;
}
}

template <typename T>
void TWindow<T>::show_window(bool show)
{
if(_wnd)
{
int nShowCmd = show ? SW_NORMAL : SW_HIDE;
// 显示窗口,nShowCmd可以指定窗口以最小/最大/正常状态显示
::ShowWindow(_wnd, nShowCmd);
// 更新窗口,绘制窗口。刚显示出来可能是无效的,需要在显示后绘制。
::UpdateWindow(_wnd);
}
}

template <typename T>
int TWindow<T>::run(void)
{
MSG msg;
while (::GetMessage(&msg, nullptr, 0, 0))
{
// 翻译消息,比如输入法通过‘wo’生成‘我’
::TranslateMessage(&msg);
// 发送消息,调用刚才注册的callback窗口处理函数
::DispatchMessage(&msg);
}
return 0;
}

template <typename T>
void TWindow<T>::pre_create(WNDCLASSEX& wcex)
{
// 空操作
}

CALLBACK实现

主要分析一下类模板下的CALLBACK如何实现。
由于此模式的多态是静态多态,所以需要把_window(值为this指针)从TWindow<T>*强转为T*,赋给window变量。
把原先面向对象模式下用_window调用方法全部替换为window调用。

1
2
3
4
5
6
7
8
9
10
11
12
13
14
15
16
17
18
19
20
21
22
23
24
25
26
27
28
29
30
31
32
33
34
35
36
37
38
39
40
41
42
43
44
45
46
47
48
49
50
51
52
53
54
55
56
57
58
59
60
61
62
63
64
65
template <typename T>
LRESULT TWindow<T>::window_procedure(
HWND wnd, UINT message,
WPARAM wparam, LPARAM lparam)
{

T* window = static_cast<T*>(_window);

if(!window)
return ::DefWindowProc(wnd, message, wparam, lparam);

PAINTSTRUCT ps;

switch (message)
{
case WM_CREATE:
break;
case WM_LBUTTONDOWN:
{
// GET_X/Y_LPARAM From <windowsx.h>
int x_coord = GET_X_LPARAM(lparam);
int y_coord = GET_Y_LPARAM(lparam);
POINT pt{ x_coord, y_coord };
// true代表用户处理完毕
if (window->on_lbtndown(pt))
return 1;
}
break;
case WM_LBUTTONUP:
{
// GET_X/Y_LPARAM From <windowsx.h>
int x_coord = GET_X_LPARAM(lparam);
int y_coord = GET_Y_LPARAM(lparam);
POINT pt{ x_coord, y_coord };
// true代表用户处理完毕
if (window->on_lbtnup(pt))
return 1;
}
break;
case WM_RBUTTONDOWN:
{
int x_coord = GET_X_LPARAM(lparam);
int y_coord = GET_Y_LPARAM(lparam);
POINT pt{ x_coord, y_coord };
if (window->on_rbtndown(pt))
return 1;
}
break;
case WM_PAINT:
{
HDC dc = ::BeginPaint(wnd, &ps);
bool result = window->on_paint(dc, ps);
::EndPaint(wnd, &ps);
if (result)
return 1;
}
break;
case WM_DESTROY:
::PostQuitMessage(0);
break;
//default:
// ;
}
return ::DefWindowProc(wnd, message, wparam, lparam);
}

此时有一个隐患,由于静态多态,所以构造函数中的pre_create不能使用默认类型this调用,需要强转为T*才能成功调用用户自定义的方法。

1
2
3
4
5
6
7
8
9
10
11
template <typename T>
TWindow<T>::TWindow(std::wstring const& app_name)
{
_window = this;

// ...

static_cast<T*>(_window)->pre_create(wcex); // 此处有隐患:见下文CALLBACK实现

// ...
}

wWinMain放到哪

写到TWindow.cpp里面。

1
2
3
4
5
6
7
8
9
10
11
12
13
14
#include "TWindow.hpp"

extern int main(std::wstring const& args);

int wWinMain(
HINSTANCE hInstance,
HINSTANCE hPrevInstance,
LPWSTR lpCmdLine,
int nShowCmd)
{
// error
tfk::TWindow<?>::_instance = hInstance;
return main(lpCmdLine);
}

但是,又遇到一个模板编程中的问题:此时TWindow缺少一个模板参数。而这个类模板的具体定义却又是在main函数后完成定义的。所以这个模板参数无法填写。
因此,这里的_instance就不能作为类的属性了,而是作为类之外的全局属性。

改写:把_instance剥离类外,定义为extern。

1
2
3
4
5
6
7
8
9
10
11
// TWindow.hpp
namespace tfk
{
extern HINSTANCE gInstance;

template <typename T>
class TWindow
{
// ...
}
}

然后在TWindow.cpp里面定义它。在这个文件中也开一个tfk名字空间。

1
2
3
4
5
6
7
8
9
10
// TWindow.cpp

#include "TWindow.hpp"

namespace tfk
{
constinit HINSTANCE ginstance{ nullptr };
}

// ...

至此,就可以在wWinMain中把hInstance值赋给TWindow<T>要使用的gInstace变量了。完整、正确的TWindow.cpp内容:

1
2
3
4
5
6
7
8
9
10
11
12
13
14
15
16
17
18
#include "TWindow.hpp"

namespace tfk
{
constinit HINSTANCE ginstance{ nullptr };
}

extern int main(std::wstring const& args);

int wWinMain(
HINSTANCE hInstance,
HINSTANCE hPrevInstance,
LPWSTR lpCmdLine,
int nShowCmd)
{
tfk::gInstance = hInstance;
return main(lpCmdLine);
}

最后,改写一下TWindow构造函数中涉及到_instance的地方,替换为gInstance。还有,之前因为类外的wWinMain要用到成员变量_instance,我们设置了一个友元,现在也可以删去了。

1
2
3
4
5
6
7
8
9
// TWindow.hpp

class TWindow
{
/* public:
friend int ::wWinMain(HINSTANCE, HINSTANCE, LPWSTR, int); */

// ...
};
1
2
3
4
5
6
7
8
9
10
11
12
13
14
15
16
17
18
19
// TWindow.hpp implementaion

TWindow<T>::TWindow(std::wstring const& app_name)
{
// ...

wcex.hInstance = gInstance;

// ...

_wnd = ::CreateWindowEx(
WS_EX_OVERLAPPEDWINDOW,
app_name.c_str(),
L"App",
WS_OVERLAPPEDWINDOW,
CW_USEDEFAULT, 0, CW_USEDEFAULT, 0,
nullptr, nullptr, gInstance, nullptr);
}

_window怎么初始化

_window是静态变量。在类模版下的静态变量,在类外不能直接填参数。因此类似于gInstace的初始化写法,写在TWindow.cpp中的另一个tfk名字空间中。
先用泛化的方式写一下试试:

1
2
3
4
5
6
7
8
#include "TWindow.hpp"

namespace tfk
{
// ...

template<typename T> TWindow<T>* TWindow<T>::_window{ nullptr };
}

小小测试一下:

1
2
3
4
5
6
7
8
9
10
11
// MyTApp.h
#pragma once
#include "TWindow.hpp"
class MyTApp : public tfk::TWindow<MyTApp>
{
public:
MyTApp(std::wstring const & name) : TWindow{name}
{
//
}
};
1
2
3
4
5
6
7
8
// Source.app
#include "MyTApp.h"
int main(void)
{
MyTApp my_app;
my_app.show_window();
return my_app.run();
}

测试,以上写法编译不通过:

1
error: LNK2001: unresolved symbol "protected: static class tfk::TWindow<class MyTApp> * tfk::TWindow<class MyTApp>::_window" (?_window@?$TWindow@VMyTApp@@@tfk@@1PEAV12@EA)

链接器失败,证明类模板下静态变量的初始化不能这么写。
那么,就需要让用户在其main函数所在的文件外部进行初始化了:

1
2
3
4
5
6
7
8
9
// main.cpp
#include "MyTApp.h"

tfk::TWindow<MyTApp>* tfk::TWindow<MyTApp>::_window{ nullptr };

int main(void)
{
// ...
}

也有更简化的写法,利用宏定义:

1
2
3
#define Tinit(app)   tfk::TWindow<app>* tfk::TWindow<app>::_window{ nullptr }

Tinit(MyTApp);

可以把宏定义写在TWindow.hpp尾部:

1
2
3
4
// TWindow.hpp
//...

#define Tinit(app) tfk::TWindow<app>* tfk::TWindow<app>::_window{ nullptr }

除了把这个问题抛给用户处理,还有一个方案,即类似于gInstance的处理,就是把_window提升为模板类外的全局变量。

基于模板框架开发

1
2
3
4
5
6
7
8
9
10
11
12
13
14
15
16
// MyTApp.h
#pragma once
#include "TWindow.hpp"
class MyTApp : public tfk::TWindow<MyTApp>
{
public:
MyTApp(std::wstring const & name) : TWindow{name}
{
//
}

void pre_create(WNDCLASSEX& wcex)
{
wcex.hbrBackground = reinterpret_cast<HBRUSH>(::GetStockObject(BLACK_BRUSH));
}
};
1
2
3
4
5
6
7
8
// Source.app
#include "MyTApp.h"
int main(void)
{
MyTApp my_app;
my_app.show_window();
return my_app.run();
}

基于GeometryUI开发打字游戏

整体布局

一个大窗口包含两个子窗口,左右分布。左窗口记录实时分数Score,右窗口为游戏画面,显示一些从上方落下的圆圈字母,玩家按下看到的字母可以将其消除,当有字母接触到底部边框时,游戏结束。

项目配置

新建项目,同样选择Windows Desktop Wizard。起名Typist,Application Type选择Desktop Application,Addition options选择Empty project。
新建Source Files,main.cpp

打开Typist的Open Containing Folder,和QuickGeometryUI的Open Containing Folder。把所有相关的代码文件(.h.hpp.inl.cpp(除了测试文件))拷贝到Typist目录。

引入外部文件后,右键Header Files,Add Existing Files,选择.h.hpp.inl文件(inl表示inline);右键Source Files,Add Existing Files,选择.cpp文件。

下面新建并编写文件TypistWindow.h(建在Filter Typist Box中):
右键项目名Typist,Add,New Filter,取名为Typist Box。再在这个建好的Filter名字上右键,Add New Item,取名TypistWindow.h
该文件声明3个类:

  1. TypistFrame
  2. TypistLeftBox
  3. TypistCentralBox
    需要引入QuickGeometryUI.hpp
1
2
3
4
5
6
7
8
9
10
11
12
13
14
15
16
17
18
19
20
21
22
23
24
25
26
// TypistWindow.h

#pragma once

#include "QuickGeometryUI.hpp"
namespace typist
{
// Window Frame
class TypistFrame : public harbin::GeometryFrameBox<TypistFrame>
{
// ...
};

// Left window
// 模板参数1: ParentBox
// 模版参数2: InheritedT(当前窗口)
class TypistLeftBox : public harbin::GeometryBox<TypistFrame, TypistLeftBox>
{
// ...
};

class TypistCentralBox : public harbin::GeometryBox<TypistFrame, TypistCentralBox>
{
// ...
};
}

构造

1
2
3
4
5
6
7
8
9
10
11
12
13
14
15
16
17
18
19
20
21
22
23
24
25
// TypistWindow.h

// ...
#include <string>
#include "QuickGeometryUI.hpp"
namespace typist
{
class TypistFrame : public harbin::GeometryFrameBox<TypistFrame>
{
public:
TypistFrame(std::wstring const& name);
};

class TypistLeftBox : public harbin::GeometryBox<TypistFrame, TypistLeftBox>
{
public:
TypistLeftBox(TypistFrame * frame, std::wstring const& name);
};

class TypistCentralBox : public harbin::GeometryBox<TypistFrame, TypistCentralBox>
{
public:
TypistCentralBox(TypistFrame * frame, std::wstring const& name);
};
}

实现

TypistWindow.cpp建在Filter Typist Box中。

1
2
3
4
5
6
7
8
9
10
11
12
13
14
15
16
17
18
19
// TypistWindow.cpp
#include "TypistWindow.h"
typist::TypistFrame::TypistFrame(std::wstring const& name) :
GeometryFrameBox{ name.c_str() }
{

}

typist::TypistLeftBox::TypistLeftBox(TypistFrame* frame, std::wstring const& name) :
GeometryFrameBox{ frame, name.c_str() }
{

}

typist::TypistCentralBox::TypistCentralBox(TypistFrame* frame, std::wstring const& name) :
GeometryFrameBox{ frame, name.c_str() }
{

}

main函数

  1. 入口函数规定为GeometryMain,需要改main函数名字
  2. 定义窗口Frame,再定义中央窗口、左窗口。
  3. AddSubBox,向父窗口中添加两个子窗口。
    1. 第1个参数指定哪个作为子窗口
    2. 第2个参数指定位置布局到哪里
    3. 第3个参数是iDockModes
      1. 这个是做什么的呢?假设同时有左盒子、下盒子,这个参数就是指定谁占用左下角的位置。则参数选项中谁名字在前面谁占,如DM_LEFT_BOTTOM是左盒子占用。
      2. 我们此例没有下盒子,可以省略。
  4. show,3个盒子
  5. run,消息循环放到了frame_box中。
    main.cpp建在Source Files中。
1
2
3
4
5
6
7
8
9
10
11
12
13
14
15
16
17
18
19
20
// main.cpp

#include "TypistWindow.h"
int GeometryMain(void)
{
typist::TypistFrame frame_box{ L"frame" };
typist::TypistCentralBox central_box{ &frame_box, L"central" };
typist::TypistLeftBox left_box{ &frame_box, L"left" };

frame_box.AddSubBox(&central_box, BP_CENTRAL);
frame_box.AddSubBox(&left_box, BP_LEFT);

frame_box.ShowBox();
central_box.ShowBox();
left_box.ShowBox();

frame_box.Run();

return 0;
}

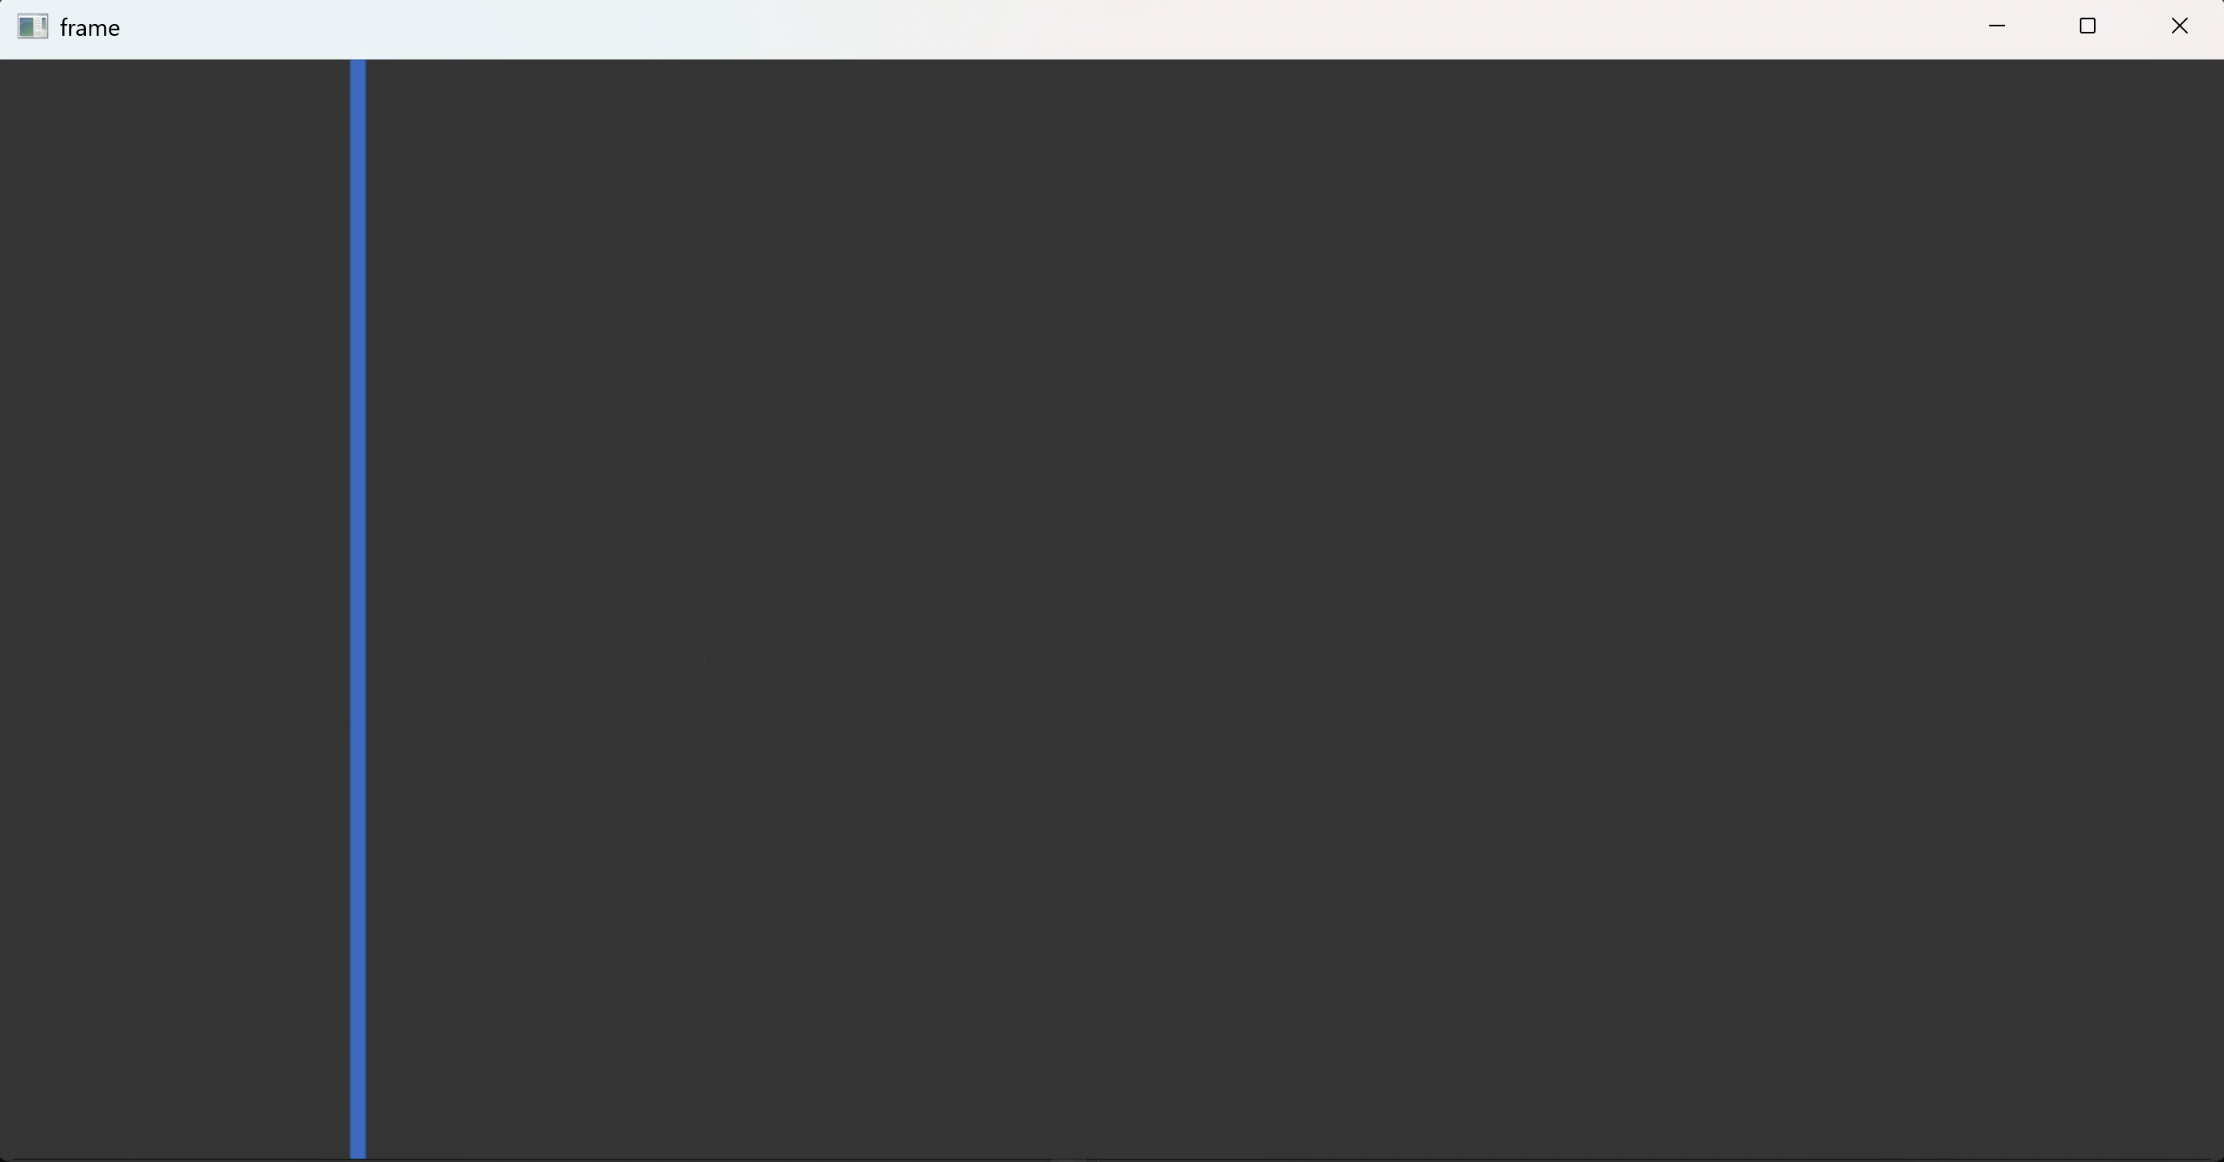
运行效果如下:

换子窗口背景颜色

可以重写template<typename ParentBox, typename InheritedT> class GeometryBox中的方法void PreCreateBox(WNDCLASSEX&)
我们更换的是CentralBox的颜色。

1
2
3
4
5
6
7
8
9
10
// TypistWindow.h

// ...

class TypistCentralBox : public harbin::GeometryBox<TypistFrame, TypistCentralBox>
{
public:
// ...
void PreCreateBox(WNDCLASSEX&);
}

实现:

1
2
3
4
5
// TypistWindow.cpp
void typist::TypistCentralBox::PreCreateBox(WNDCLASSEX& wcex)
{
wcex.hbrBackground = reinterpret_cast<HBRUSH>(::GetStockObject(WHITE_BRUSH));
}

运行效果如下:

OnPaint绘制图形

可以重写template<typename ParentBox, typename InheritedT> class GeometryBox中的方法void OnPaint(Graphics&, HDC, PAINTSTRUCT*, bool)

1
2
3
4
5
6
7
8
9
10
11
12
// TypistWindow.h
// ...
class TypistCentralBox : public harbin::GeometryBox<TypistFrame, TypistCentralBox>
{
public:
// ...
void typist::TypistCentralBox::OnPaint(
Graphics& graphics,
HDC hDC,
PAINTSTRUCT* pPS,
bool bDragRepaint = false);
}

其中Graphics指定的是绘制图形的接口,有GDI和GDI+。
因为我们在TypistWindow.h中引入了QuickGeometry.hpp,而QuickGeometry.cpp中引入了<gdiplus.h>,因此无需再次引入。

1
2
3
4
5
6
7
8
9
10
11
12
13
14
// TypistWindow.cpp
// ...
void typist::TypistCentralBox::OnPaint(
Graphics& graphics,
HDC hDC,
PAINTSTRUCT* pPS,
bool bDragRepaint /* = false */)
{
Gdiplus::Color color(200, 255, 255, 0);
Gdiplus::Pen pen(color, 3.0f);
Gdiplus::PointF pt{ 100.0f, 100.0f };
Gdiplus::PointF pt2{ 300.0f, 300.0f };
graphics.DrawLine(&pen, pt, pt2);
}

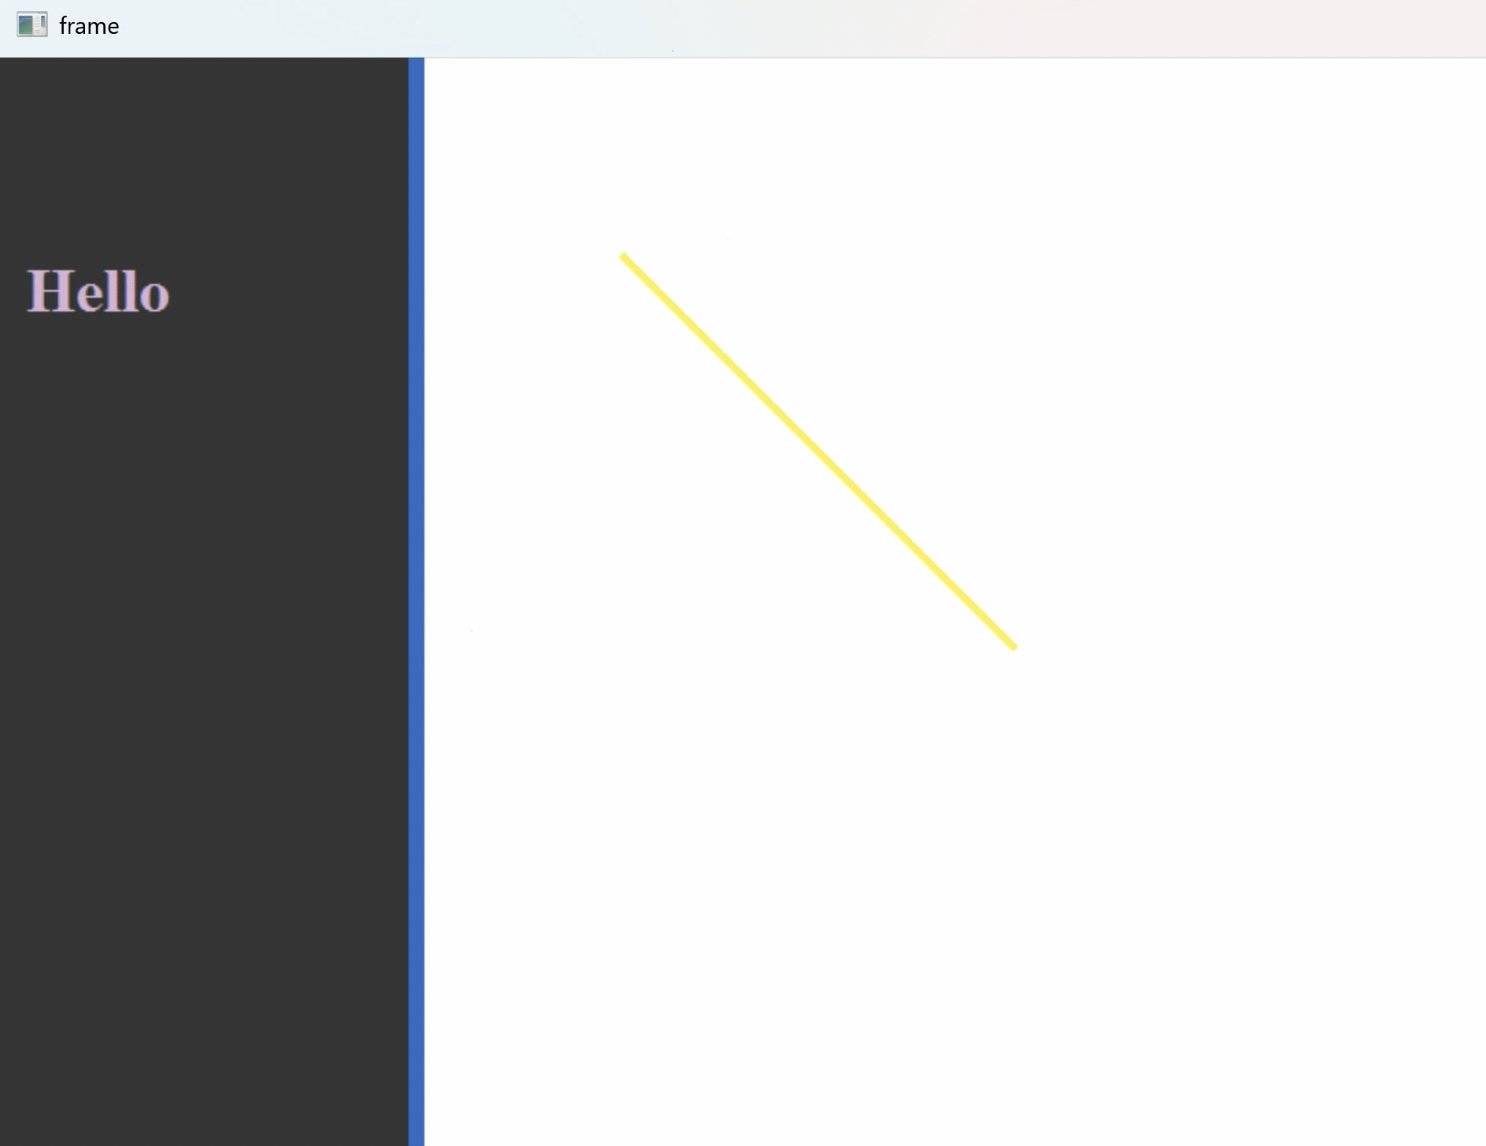
效果如下:

关于GDI

GDI(Graphics Device Interface)是Windows的子系统,意为图形设备接口,是策略模式的一种。
GDI用于在DC(Device Context)上绘画。

GDI 主要用于绘制图形和文本,以及管理显示设备(如显示器和打印机)。它提供了基本的绘图功能,包括线条、矩形、椭圆、位图、字体等。

GDI 是一个成熟但相对低级的接口,提供的图形功能比较基础,性能较高,但不支持复杂的图形效果和抗锯齿等现代图形技术。

GDI+

GDI+ 是 GDI 的增强版,他们都是Windows操作系统中的图形编程接口。GDI+提供了更现代化和丰富的图形功能,有更多高级功能和更高的抽象层次。包括矢量图形、浮点坐标、颜色渐变、复杂区域填充、透明度和抗锯齿等。它简化了许多图形编程任务,并且能更好地处理复杂的图形效果。但相对而言,性能可能不如 GDI 高。

左窗口画文字

TypistLeftBox 类重写template<typename ParentBox, typename InheritedT> class GeometryBox中的方法void OnPaint(Graphics&, HDC, PAINTSTRUCT*, bool)

1
2
3
4
5
6
7
8
9
10
11
12
// TypistWindow.h
// ...
class TypistLeftBox : public harbin::GeometryBox<TypistFrame, TypistCentralBox>
{
public:
// ...
void typist::TypistLeftBox::OnPaint(
Graphics& graphics,
HDC hDC,
PAINTSTRUCT* pPS,
bool bDragRepaint = false);
}

实现

1
2
3
4
5
6
7
8
9
10
11
12
13
14
// TypistWindow.cpp
// ...
void typist::TypistLeftBox::OnPaint(
Graphics& graphics,
HDC hDC,
PAINTSTRUCT* pPS,
bool bDragRepaint /* = false */)
{
Gdiplus::FontFamily fontFamily(L"Times New Roman");
Gdiplus::Font font(&fontFamily, 24, Gdiplus::FontStyle::FontStyleBold, Gdiplus::UnitPoint);
Gdiplus::PointF pf(10.0f, 100.0f);
Gdiplus::SolidBrush br(Color(200, 255, 200, 255));
graphics.DrawString(L"Hello", -1, &font, pt, &br);
}

效果如下:

类设计

  1. ScoreManager:积分管理
  2. SceneManager:游戏主场景管理,主要管理画面中的Character
  3. Character:屏幕上显示的一个个字符
  4. InputManager:输入管理,包括键盘输入、手柄输入、网络事件
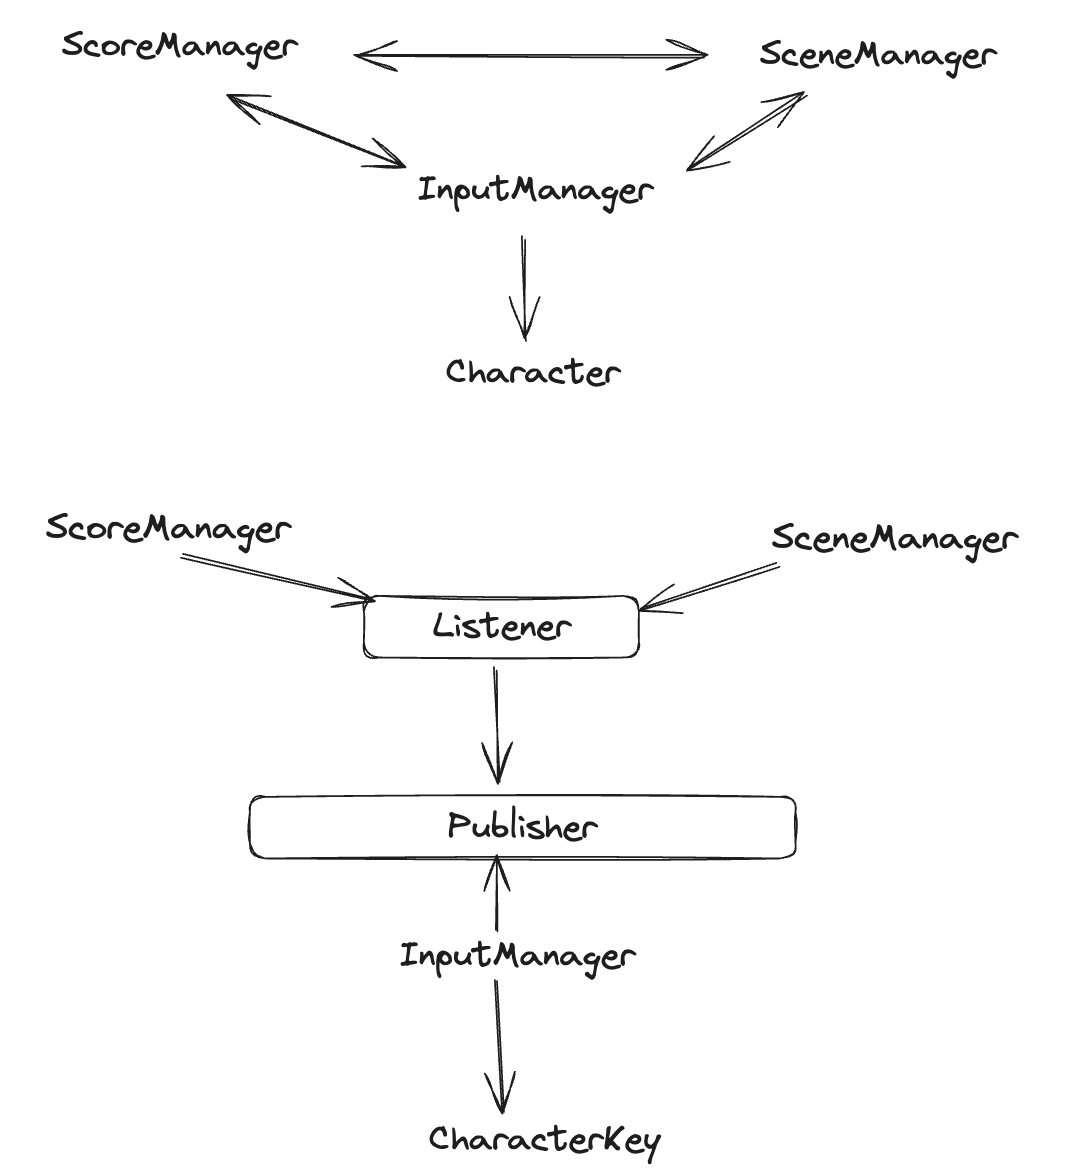
    n个Character受1个SceneManager管理,而ScoreManager、SceneManager、InputManager三者均有可能相互通信,如果直接面向具体的对象进行编程,是不符合依赖倒转原则、迪米特原则的。应该设计抽象的接口,使这三者通过接口进行联系。

总体的流程:

  1. ScoreManager、SceneManager在Publisher处订阅消息。publisher将其加入记录。
  2. InputManager是Publisher。InputManager依赖Character,管理、生成着CharacterArg。
  3. 当Windows系统监听到按键后,调用InputManager的key_down,即被触发激活,InputManager包装消息、内容(键字母)打包给对应的监听者并notify,即调用其update。
  4. 各自处理消息。

消息类型:

  1. 按下字符消息
  2. 加分消息
  3. 字符死亡消息(字符落到底线)
  4. 更新画面消息
  5. 新的字符生成消息

观察者模式

右键项目名称,Add New Filter,取名Typist Game。在此Filter下新建IListener.h等文件。

IArgument

IArgument接口类规范:每个Argument类都要实现对外实现一个publisher接口,该接口主要用于外部获取当前Argument的消息来源。

Argument 类的作用:用于IListener中update接口中参数2包装消息。

该文件还定义了消息类型,以枚举类实现。

1
2
3
4
5
6
7
8
9
10
11
12
13
14
15
16
17
18
19
20
21
// IArgument.h
// ...
namespace typist
{
class IPublisher;
class IArgument
{
public:
// 消息来源
virtual IPublisher* publisher(void) const = 0;
};

enum class TPMSG
{
Character,
IncreaseScore,
Stop,
Update,
Generate
};
}

IListener

总览

1
2
3
4
5
6
7
8
9
10
11
12
13
14
15
16
17
18
19
20
21
22
23
// IListener.h
#pragma once
namespace typist
{
// Typist Messages
enum TPMSG
{
// ...
};

// incomplete type claim
class IPublisher;

class Argument
{
// ...
};

class IListener
{
// ...
};
}

update接口

1
2
3
4
5
6
7
8
9
10
11
// IListener.h
// ...
#include <memory>
#include "IArgument.h"
class IListener
{
public:
// 响应事件
// 参数1: 事件类型 参数2: 事件所携带的内容
virtual bool update(TPMSG msg, std::shared_ptr<IArgument> arg) = 0;
};

IPublisher

在Typist Game下创建IPubilisher.h
总览:

1
2
3
4
5
6
7
8
9
10
// IPublisher.h
#pragma once

namespace typist
{
class IPublisher
{
// ...
};
}

接口

1
2
3
4
5
6
7
8
9
10
11
12
// IPublisher.h
// ...

#include "IListener.h"
class IPublisher
{
public:
// 参数1: 关注哪个消息
virtual void add_listener(TPMSG msg, std::shared_ptr<IListener> listener) = 0;
virtual void remove_listener(TPMSG msg, std::shared_ptr<IListener> listener) = 0;
virtual void notify(TPMSG msg) = 0;
};

InputManager

InputManager是一个信息发布者。所以需要引入IPublisher.h并且继承(实现接口)。

1
2
3
4
5
6
7
8
9
10
11
// InputMgr.h
#pragma once

#include "IPublisher.h"
namespace typist
{
class InputMgr : IPublisher
{
// ...
};
}

单例模式

InputMgr整个系统只需一个,应用单例模式。

1
2
3
4
5
6
7
8
9
10
11
12
13
14
15
16
17
// InputMgr.h
// ...
class InputMgr : IPublisher
{
public:
static std::shared_ptr<InputMgr> instance_ptr(void);
static InputMgr& instance(void);
static void destroy_instance(void);
private:
InputMgr();
InputMgr(InputMgr const&) = delete;
InputMgr(InputMgr&&) noexcept = delete;
~InputMgr();
static void delete_self(InputMgr* p);
private:
static std::shared_ptr<InputMgr> _input_mgr;
};

实现IPublisher接口

解决完单例的特性,来看InputMgr作为一个Publisher的本职工作:首先需要实现IPublisher的抽象方法。

1
2
3
4
5
6
7
8
9
10
11
12
13
14
// InputMgr.h
// ...
class InputMgr : IPublisher
{
public:
// ...

// implementation of IPublisher
void add_listener(TPMSG msg, std::shared_ptr<IListener> listener) override;
void remove_listener(TPMSG msg, std::shared_ptr<IListener> listener) override;
void notify(TPMSG msg) override;
private:
// ...
};


其次,一个Publisher需要提供让其他人订阅的功能,因此要提供一个容器,保存Listener的信息。
以消息为Key,对应多个Listener。

为什么需要weak_ptr
  1. 总体用map来封装,其中键用TPMSG枚举类,值用list容器装,不要使用shared_ptr而是使用weak_ptr,因为Listener的生命不能由Publisher做主,Publisher只是一个通知方。这个list容器是对内部提供的。
  2. 对外部,需要提供一个激活函数。比如外部感知到按下键盘后,外部调用key_down函数,等于通知InputMgr,然后,InputMgr就调用自己的notify通知对应的Listener。
  3. _current_key用于记录监听到key_down时的信息,之后用于notify为什么需要_current_key
1
2
3
4
5
6
7
8
9
10
11
12
13
// InputMgr.h
// ...
#include <map>
class InputMgr : IPublisher
{
public:
// ...
void key_down(unsigned int key);
private:
// ...
std::map<TPMSG, std::list<std::weak_ptr<IListener>>> _listeners;
unsigned int _current_key;
}

InputManager实现

InputMgr.cpp建在 Filter Typist Game中。

单例模式的创建、销毁的实现略。

add、remove listener

add_listener虽然参数2是强共享指针,但经过隐式转换后,到了Publisher的_listeners[msg]容器中,就成了弱指针。为什么需要weak_ptr

1
2
3
4
5
6
7
8
9
10
11
12
13
14
15
16
17
18
19
20
21
22
23
24
25
26
27
28
29
30
31
32
33
34
35
36
37
38
39
40
41
42
43
44
45
46
47
48
49
50
51
52
53
54
55
// InputMgr.cpp

#include <algorithm>. // remove_if

void typist::InputMgr::add_listener(
TPMSG msg, std::shared_ptr<IListener> listener)
{
_listeners[msg].emplace_back(listener);
}

void typist::InputMgr::remove_listener(
TPMSG msg, std::shared_ptr<IListener> listener)
{
auto it = _listeners.find(msg);
if (it != _listeners.end())
{
auto it2 = std::remove_if(
it->second.begin(),
it->second.end(),
[&listener](auto&& v) -> bool
{
return v.lock() == listener;
});

while (it2 != it->second.end())
{
it2 = it->second.erase(it2);
}
}
}
// 第2种写法:
if (it != _listeners.end())
{
auto it2 = std::remove_if(
it->second.begin(),
it->second.end(),
[&listener](auto&& v) -> bool
{
return v.lock() == listener;
});

it->second.erase(it2, it->second.end());
}
// 第3种写法:(C++20标准,用到了ranges)
if (it != _listeners.end())
{
auto it2 = std::ranges::remove_if(
it->second,
[&listener](auto&& v) -> bool
{
return v.lock() == listener;
});
// error,不行,下去得看看为啥
it->second.erase(it2, it->second.end());
}

notify实现

1
2
3
4
5
6
7
8
9
10
11
12
13
14
15
16
17
18
19
20
21
22
void typist::InputMgr::notify(TPMSG msg)
{
auto it = _listeners.find(msg);
if (it == _listeners.end())
return;

std::shared_ptr<IArgument> arg;
if (msg == TPMSG::Character)
{
// 此处的_current_key在key_down后存储到成员变量中
arg.reset(new CharacterArg{ this, _current_key });
}
std::ranges::for_each(
it->second,
[&msg, arg](auto&& v) -> void
{
if (auto&& listener = v.lock())
{
listener->update(msg, arg);
}
});
}

key_down

本方法由外部的窗口类调用。当窗口监听到键盘按下的系统消息(OnKeyDown)时,通过InputMgr的单例对象来调用key_down,具体操作是设置_current_key
然后窗口类再调用InputMgr的notify。

1
2
3
4
void typist::InputMgr::key_down(unsigned int key)
{
_current_key = key;
}

update_time

成员方法。处理Update消息。Update消息对应于:每隔2秒钟,游戏主场景中的字母要下落。

1
2
3
4
5
6
7
8
9
10
// InputMgr.h
// ...
class InputMgr : IPublisher
{
public:
// ...
void update_time(void);
private:
// ...
}

实现

1
2
3
4
void typist::InputMgr::update_time(void)
{
notify(TPMSG::Update);
}

增设notify中消息的if判断条件:

1
2
3
4
5
6
7
8
9
10
11
12
13
void typist::InputMgr::notify(TPMSG msg)
{
// ...
if (/* ... */)
{
// ...
}
else if (msg == TPMSG::Update)
{
arg.reset(new UpdateArg{ this });
}
// ...
}

generate_time

成员方法。用于处理Generate消息,对应于每隔几秒,产生新的字符的需求。

1
2
3
4
5
6
7
8
9
10
// InputMgr.h
// ...
class InputMgr : IPublisher
{
public:
// ...
void generate_time(void);
private:
// ...
}

实现

1
2
3
4
void typist::InputMgr::generate_time(void)
{
notify(TPMSG::Generate);
}

增设notify中消息的if判断条件:

1
2
3
4
5
6
7
8
9
10
11
12
13
14
void typist::InputMgr::notify(TPMSG msg)
{
// ...
if (/* ... */)
{
// ...
}
// ...
else if (msg == TPMSG::Generate)
{
arg.reset(new GenerateArg{ this });
}
// ...
}

CharacterArg

1
2
3
4
5
6
7
8
9
10
// CharacterArg.h
#pragma once
#include "IArgument.h"
namespace typist
{
class CharacterArg : public IArgument
{
// ...
};
}

自己的东西:一个publisher指针,一个key

1
2
3
4
5
6
7
8
9
10
11
12
13
14
15
16
17
18
19
20
// CharacterArg.h

// ...

class CharacterArg : public IArgument
{
public:
CharacterArg(IPublisher* publisher, unsigned int key)
: _publisher{ publisher }, _key{ key }
{

}
unsigned int key(void) const
{
return _key;
}
private:
IPublisher* _publisher;
unsigned int _key;
};

还需实现IArgument的接口:publisher,用于外部获取Arg的私有变量_publisher,即该消息的发布者。为什么?IArgument

1
2
3
4
5
6
7
8
9
10
11
12
13
14
15
// CharacterArg.h

// ...

class CharacterArg : public Argument
{
public:
// ...
IPublisher* publisher(void) const
{
return _publisher;
}
private:
// ...
};

至此,CharacterArg可以被包含在InputMgr中了

UpdateArg

对应Update消息。主要作用是生成一个当前的时间戳。

1
2
3
4
5
6
7
8
9
10
11
12
13
14
15
16
17
18
19
20
21
22
23
24
#include "IArgument.h"
namespace typist
{
class UpdateArg : public IArgument
{
public:
UpdateArg(IPublisher* publisher)
: _publisher{ publisher },
_tp{ std::chrono::high_resolution_clock::now() }
{
}
virtual IPublisher* publisher(void) const
{
return _publisher;
}
std::chrono::time_point<std::chrono::high_resolution_clock> time(void) const
{
return _tp;
}
private:
IPublisher* _publisher;
std::chrono::time_point<std::chrono::high_resolution_clock> _tp;
};
}

Modern Cpp表达时间的方式

<chrono>库提供。
主要有3个概念:

  1. Durations(持续时间):时间段
  2. Time points(时间点):时刻,两个时刻相减是时间段
  3. Clocks(时钟):用于把时间点和物理意义上的时间相关联的框架。提供了3个时钟,可以将当前时间表示为time_point
    1. system_clock(以系统的时间为准,但是如果系统时钟被改了会导致程序错乱)
    2. steady_clock(以程序自身的时间为准,不易混乱)
    3. high_resolution_clock(推荐用)

GenerateArg

对应 Generate 消息。主要作用是生成一个当前的时间戳。

1
2
3
4
5
6
7
8
9
10
11
12
13
14
15
16
17
18
#include "IArgument.h"
namespace typist
{
class GenerateArg : public IArgument
{
public:
GenerateArg(IPublisher* publisher)
: _publisher{ publisher }
{
}
virtual IPublisher* publisher(void) const
{
return _publisher;
}
private:
IPublisher* _publisher;
};
}

Character 类、ChPoint 类

Character做字符的渲染工作。
ChPoint是字符的坐标的封装。

1
2
3
4
5
6
7
8
9
10
11
12
13
14
15
16
17
// Character.h
#include <gdiplus.h>
namespace typist
{
class ChPoint
class Character
{
public:
Character(wchar_t ch, int x, int y);
ChPoint xy(void) const;
void xy(ChPoint pt);
void render(Gdiplus::Graphics& graphics) const;
private:
wchar_t _ch;
int _x, _y; // pos
};
}

实现

1
2
3
4
5
6
7
8
9
10
11
12
13
14
// Character.cpp
typist::Character::Character(wchar_t ch, int x, int y)
: _x{ x }, _y{ y }, _ch{ ch }
{
}
typist::ChPoint typist::Character::xy(void) const
{
return { _x, _y };
}
void typist::Character::xy(ChPoint pt)
{
_x = pt._x;
_y = pt._y;
}

渲染实现:
DrawString参数:

  1. 内容
  2. 画多少内容(-1代表一直画到字符串的\0
  3. 字体的指针
  4. 坐标
  5. 画刷的指针
1
2
3
4
5
6
7
8
void typist::Character::render(Gdiplus::Graphics& graphics) const
{
Gdiplus::FontFamily fontFamily(L"Times New Roman");
Gdiplus::Font font(&fontFamily, 18, Gdiplus::FontStyle::FontStyleBold, Gdiplus::UnitPoint);
Gdiplus::PointF pf(static_cast<float>(_x), static_cast<float>(_y));
Gdiplus::SolidBrush br(Color(200, 55, 100, 255));
graphics.DrawString(&_ch, 1, &font, pt, &br);
}

SceneManager 场景类

场景管理类用于重绘窗口、相应事件、画图形。

SceneMgr.h建在Filter Typist Game中。

1
2
3
4
5
6
7
8
9
10
11
12
13
14
15
16
17
18
19
20
21
22
23
24
#include<gdiplus.h>
#include "IListener.h"
namespace typist
{
class Character;
class UpdateArg;
class GenerateArg;
class SceneMgr : public IListener
{
public:
SceneMgr();
~SceneMgr();
void render(Graphics& graphics) const;
// implementation for IListener
bool update(TPMSG msg, std::shared_ptr<IArgument> arg) override;

private:
void on_update(std::shared_ptr<UpdateArg> arg);
void on_generate(std::shared_ptr<UpdateArg> arg);

private:
std::list<std::shared_ptr<Character>> _chs;
};
}

实现
SceneMgr.cpp建在Filter Typist Game中。

1
2
3
4
5
6
7
8
9
10
11
12
13
14
15
16
17
18
19
20
21
22
23
24
25
26
27
28
29
30
31
32
33
34
35
36
37
38
39
40
41
42
43
44
45
46
47
48
49
50
51
#include "SceneMgr.h"
#include "Character.h"
#include "UpdateArg.h"
#include "GenerateArg.h"
#include <algorithm>
#include <ranges>
typist::SceneMgr::SceneMgr()
{
srand(time(NULL));
}
typist::SceneMgr::~SceneMgr()
{
}
void typist::SceneMgr::render(Graphics& graphics) const
{
std::ranges::for_each(_chs, [&graphics](auto&& ch) -> void
{
ch->render(graphics);
});
}

bool ypist::SceneMgr::update(TPMSG msg, std::shared_ptr<IArgument> arg)
{
if (msg == TPMSG::Update)
{
on_update(std::dynamic_pointer_cast<UpdateArg>(arg));
return true;
}
else if (msg == TPMSG::Generate)
{
on_generate(std::dynamic_pointer_cast<GenerateArg>(arg));
}
return false;
}
// private内部调用的方法可以写为inline的
inline void typist::SceneMgr::on_update(std::shared_ptr<UpdateArg> arg)
{
std::ranges::for_each(_chs, [](auto&& ch) -> void
{
// structured binding
auto && [x, y] = ch->xy();
ch->xy({ x, y + 5 });
});
}
// 使用到随机数,随机种子在构造函数中初始化。
inline void typist::SceneMgr::on_generate(std::shared_ptr<UpdateArg> arg)
{
_chs.emplace_back(
std::shared_ptr<Character>(
new Character('A' + rand() % 26, rand() % 500, -20)));
}

技术点

  1. private内部调用的方法可以写为inline的
  2. 一般用dynamic_cast转换多态指针。但是如果涉及到了智能指针,如上述代码中的update方法中shared_ptr<IArgument> arg,则我们的目的是转换智能指针包含的内容。此时有对应的std::dynamic_pointer_cast<T>。模板参数填写要转换的子类型。
1
std::dynamic_pointer_cast<UpdateArg>(arg)
  1. 结构化绑定:能把key和value分开提取:叫做结构化绑定(structured binding)Cpp_STL_关联容器

TypistWindow编写

对SceneMgr的处理

1
2
3
4
5
6
7
8
9
10
11
12
13
14
15
16
17
18
19
// TypistWindow.h

#include <memory>
#include <string>
#include "QuickGeometryUI.hpp"
namespace typist
{
class SceneMgr;

// ...

class TypistCentralBox : public harbin::GeometryBox<TypistFrame, TypistCentralBox>
{
public:
// ...
private:
std::shared_ptr<SceneMgr> _scene_mgr;
}
}

构造函数初始化_scene_mgr

1
2
3
4
5
6
// TypistWindow.cpp
typist::TypistCentralBox::TypistCentralBox(TypistFrame* frame, std::wstring const& name)
: GeometryBox{ frame, name.c_str() }
{
_scene_mgr = std::shared_ptr<SceneMgr>(new SceneMgr);
}

OnPaint实现:

1
2
3
4
5
6
7
typist::TypistCentralBox::OnPaint(Graphics& graphics, HDC hDC, PAINTSTRUCT* pPS, bool bDragRepaint/* = false */)
{
if (_scene_mgr)
{
_scene_mgr->render(graphics);
}
}

对InputMgr的处理

构造函数中订阅InputMgr:

1
2
3
4
5
6
7
8
9
10
// TypistWindow.cpp
typist::TypistCentralBox::TypistCentralBox(TypistFrame* frame, std::wstring const& name)
: GeometryBox{ frame, name.c_str() }
{
// ...

InputMgr::instance_ptr()->add_listener(TPMSG::Generate, _scene_mgr);
InputMgr::instance_ptr()->add_listener(TPMSG::Update, _scene_mgr);

}

析构函数中注销订阅InputMgr:

1
2
3
4
5
6
7
8
typist::TypistCentralBox::~TypistCentralBox()
{
if (_scene_mgr)
{
InputMgr::instance_ptr()->remove_listener(TPMSG::Generate, _scene_mgr);
InputMgr::instance_ptr()->remove_listener(TPMSG::Update, _scene_mgr);
}
}

定时器

定时器的功能继承于基类GeometryBox

1
2
3
4
5
6
7
8
9
// TypistWindow.h
class TypistCentralBox : public harbin::GeometryBox<TypistFrame, TypistCentralBox>
{
public:
// ...
void OnTimer(int iIdentifier);
private:
// ...
}

构造函数中SetTimer:

  1. 参数1是ID号,宏定义给出
  2. 参数2是interval,间隔多久更新一次,单位为ms
1
2
3
4
5
6
7
8
9
10
11
12
13
14
// TypistWindow.cpp

#define UPDATE_TIMER_ID 10
#define GENERATE_TIMER_ID 11

typist::TypistCentralBox::TypistCentralBox(TypistFrame* frame, std::wstring const& name)
: GeometryBox{ frame, name.c_str() }
{
// ...

SetTimer(UPDATE_TIMER_ID, 500); // 500ms刷新一次
SetTimer(GENERATE_TIMER_ID, 3000);// 3s 产生一个字符

}

析构函数中 KillTimer:

1
2
3
4
5
6
typist::TypistCentralBox::~TypistCentralBox()
{
KillTimer(UPDATE_TIMER_ID);
KillTimer(GENERATE_TIMER_ID);
// ...
}

实现OnTimer:

  1. 处理TIMER,进行notify相应的消息
  2. ReDrawBox重绘,是基类的方法
1
2
3
4
5
6
7
8
9
10
11
12
13
14
15
16
void typist::TypistCentralBox::OnTimer(int iIdentifier)
{
switch (iIdentifier)
{
case UPDATE_TIMER_ID:
InputMgr::instance_ptr()->notify(TPMSG::Update);
ReDrawBox();
break;
case GENERATE_TIMER_ID:
InputMgr::instance_ptr()->notify(TPMSG::Generate);
ReDrawBox();
break;
default:
break;
}
}