Agave™ C++20标准协程库框架
严格遵循C++20标准,并对其进行了深度设计、封装,性能优良,易用,适用于协程库开发厂商和终端用户使用
设计了通用协程类型返回对象:AsyncAction、AsyncActionWithProgress、AsyncOperation、AsyncOperationWithProgress,开发方式合二为一,无论库厂商还是最终用户,使用方式完全相同,并可再次co_await等待,轻松构成协程任务链
只使用co_await标准关键字几乎可以完成所有操作,如:进行环境切换、功能设置等等。
co_await agave::resume_background();进入后台线程环境co_await agave::resume_foreground();进入前台线程环境co_await agave::get_cancellation_token();获取停止token。
深度整合了chrono库,并设计了BJobScheduler并行协程调度器,支持便捷语法:co_await 30ms;暂停当前协程,并送入调度器待后续唤醒执行。
高度可扩展设计,所有执行环境均可配置,如前台、后台、时间调度等,均可以配置连接自定义的高效线程池
协程返回对象中均配置了condition variable对象,包含于get方法中,既可以使用异步功能又可兼容经典同步模型使用方法。
支持progress自定义进度类型,并通过co_await即可获得(内部使用co_yield实现,可多次co_await)
现有多个基于此框架的商业项目已运行至少 2 年:DevilStation、TeXsh等,性能稳定
1 2 3 4 RTN_OBJ MyCoroutine () co_await / co_yield / co_return ; }
1 2 3 4 5 6 7 8 9 10 11 12 13 14 15 16 17 18 19 20 21 22 23 24 class RTN_OBJ { public : class promise_type { public : RTN_OBJ get_return_object () { return {}; } std::suspend_never initial_suspend () noexcept { return {}; } std::suspend_never final_suspend () noexcept { return {}; } void return_void () void unhandled_exception () }; }; RTN_OBJ MyCoroutine () co_return ; } int main () auto promise = new RTN_OBJ::promise_type; RTN_OBJ rtn_obj = promise->get_return_object (); return 0 ; }
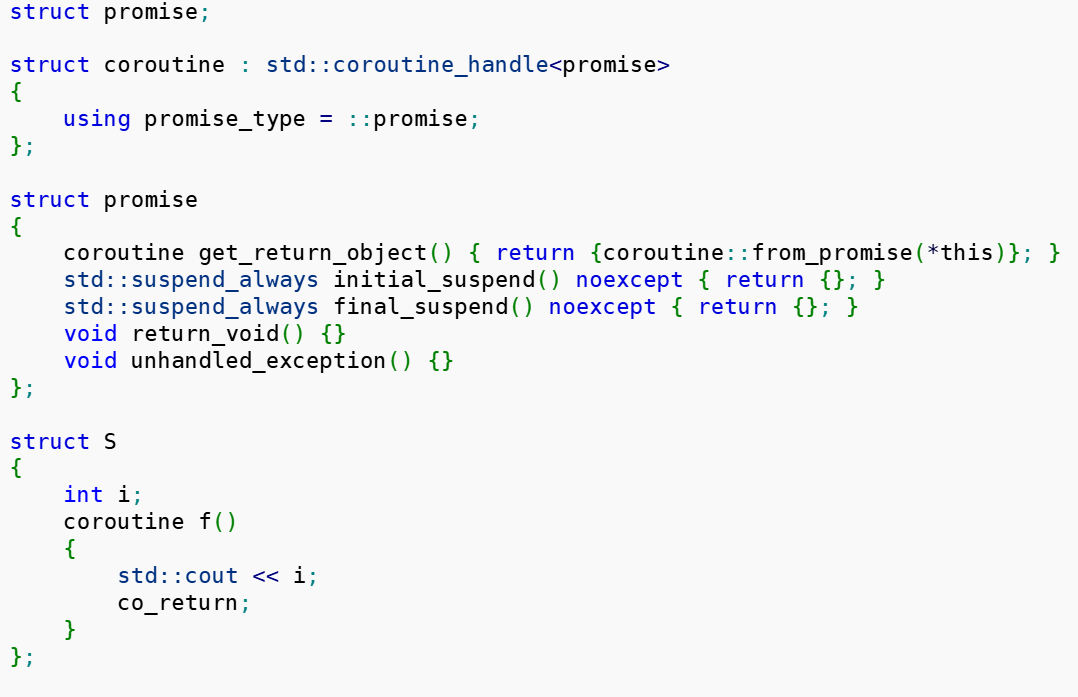
经过promise_type创建。RTN_OBJ的内容与promise绑定。promise的接口函数可以直接操作RTN_OBJ。
RTN_OBJ是实例。
promise_type是系统控制和协程内部交互的。就像是协程的总经理的地位,可以在initial_suspend、final_suspend函数体内写明要做的事务。return_void或return_value,和unhandled_exception。
总的来说,记住,promise_type用于控制协程内部行为。
1 2 3 4 5 6 7 8 class promise_type { public : RTN_OBJ get_return_object () { auto h = std::coroutine_handle<promise_type>::from_promise (*this ); } };
比如,可以在promise_type成员函数体中:通过promise_type作为模板参数,调用from_promise(*this),获得此协程的内部句柄。std::coroutine_handle, std::noop_coroutine_handle - cppreference.com
可以co_await的对象。bool await_ready、void await_suspend(coroutine_handle<>)、void await_resume()(最后一个,返回值不一定是void,可以是其他)。
await_suspend(std::coroutine_handle<> h)中的h是外部传入的。用于和外界发送信号。co_await此Awaiter时,外部h传入,则await_suspend函数在执行过程中(比如读取文件完成)可以调用h.resume,唤醒外部。await_suspend函数中起了一个新线程,那么这个线程可以异步IO(detach)。await_suspend可以返回了。h.resume。则该Awaiter此时就要转向执行await_resume(),执行完后,外部的co_await就完毕,恢复执行下一步。
1 2 3 4 5 6 7 8 9 10 11 12 13 14 15 16 17 18 19 20 21 22 23 24 25 26 27 28 struct Awaiter { constexpr bool await_ready () const noexcept { return false ; } void await_suspend (std::coroutine_handle<> h) const noexcept { std::thread t ([h]() -> void ) { }); t.detach (); return ; } constexpr int await_resume () const noexcept { return 100 ; } }; RTN_OBJ MyCoroutine (void ) std::println ("running MyCoroutine..." ); int res = co_await Awaiter{}; co_return ; }
实际上,Awaiter,是ReadFileAsync这样的异步操作对象的本质。
我们要做的是,怎么包装这样的Awaiter,让用户用起来简单?
1 2 3 4 5 6 7 8 9 10 11 12 13 _EXPORT_STD struct suspend_never { _NODISCARD constexpr bool await_ready () const noexcept { return true ; } constexpr void await_suspend (coroutine_handle<>) const noexcept { } constexpr void await_resume () const noexcept { } }
1 2 3 4 5 6 7 8 9 10 11 12 13 14 15 16 17 18 19 20 21 22 23 24 25 26 27 28 29 30 31 32 33 34 35 36 37 38 39 40 41 42 43 44 45 46 47 48 49 50 51 52 53 54 55 56 57 58 59 60 61 62 63 64 65 66 67 68 69 70 71 72 73 74 75 76 77 78 79 80 81 82 83 84 85 86 87 88 89 90 #include <iostream> #include <coroutine> #include <thread> #include <chrono> #include <print> using namespace std::chrono_literals;class RTN_OBJ { public : class promise_type { public : RTN_OBJ get_return_object () { std::println ("get_return_object()..." ); return {}; } std::suspend_never initial_suspend () noexcept { std::println ("initial_suspend()..." ); return {}; } std::suspend_never final_suspend () noexcept { std::println ("final_suspend()..." ); return {}; } void return_void () { std::println ("return_void()..." ); } void unhandled_exception () { std::println ("unhandled_exception()..." ); } }; }; struct Awaiter { bool await_ready () const noexcept { std::println ("{} {}" , std::this_thread::get_id (), "await_ready()..." ); return false ; } void await_suspend (std::coroutine_handle<> h) noexcept { std::println ("{} {}" , std::this_thread::get_id (), "await_suspend()..." ); std::thread t ([h](int &m_res) -> void { std::println("{} {}" , std::this_thread::get_id(), "sleep 5s..." ); std::this_thread::sleep_for(5 s); m_res = 100 ; std::println("{} {} {}{}" , std::this_thread::get_id(), "write m_res" , m_res, "..." ); }, std::ref(m_res)) t.join (); h.resume (); return ; } int await_resume () const noexcept { std::println ("{} {}" , std::this_thread::get_id (), "await_resume()..." ); return m_res; } int m_res; }; RTN_OBJ MyCoroutine () std::println ("{} {}" , std::this_thread::get_id (), "Running MyCoroutine..." ); auto res = co_await Awaiter{}; std::println ("{} {} {}" , std::this_thread::get_id (), "After Awaiter get res:" , res); co_return ; } int main () std::println ("{} {}" , std::this_thread::get_id (), "Create MyCoroutine" ); auto rtn = MyCoroutine (); std::println ("{} {}" , std::this_thread::get_id (), "Finish MyCoroutine" ); return 0 ; }
我们可以看到,主线程的操作:
调用协程函数,一旦调用了协程函数,就会触发promise_type的成员函数,类似于构造的await_ready()。然后主线程继续调用协程函数的每一句。
直到遇到了co_await,则就掉到了Awaiter对象内部的操作,如await_ready()、await_suspend()。
新协程(Awaiter)内部,起线程。进行await_suspend()的内部操作。
操作完后,主动h.resume,回到了主线程。执行await_resume()。
之后,回到一开始的协程函数。co_await这一行结束。主线程继续执行co_await的下面的内容。
主线程执行协程函数中的co_return。会触发协程内部promise_type的成员函数,return_void(),和类似于析构的final_suspend()。
1 2 3 4 5 6 7 8 9 10 11 12 13 14 100592 Create MyCoroutine get_return_object()... initial_suspend()... 100592 Running MyCoroutine... 100592 await_ready()... 100592 await_suspend()... 101320 sleep 5s... 101320 write m_res 100... 100592 await_resume()... 100592 After Awaiter get res: 100 return_void()... final_suspend()... 100592 Finish MyCoroutine
Awaiter
奇技淫巧:重载operator co_await。
1 2 3 4 5 6 7 8 9 10 11 12 13 14 15 16 17 18 19 20 21 22 template <typename P>inline agave::details::async_action_t <P> operator co_await (agave::details::async_action_base_t <P> const & async) return agave::details::async_action_t <P>{ async }; } template <typename T, typename P>inline agave::details::async_operation_t <T, P> operator co_await (agave::details::async_operation_base_t <T, P> const & async) return agave::details::async_operation_t <T, P>{ async }; }
1 2 3 4 5 6 7 8 9 10 11 template <typename Progress = void , typename Action = async_action_t <Progress>>class async_action_base_t : public async_progress_base_t <Progress>template <typename Progress = void >class async_action_t : public async_action_base_t <Progress, async_action_t <Progress>>
1 2 3 4 5 6 7 8 9 10 11 12 13 template <typename T, typename Progress = void , typename Operation = async_operation_t <T, Progress>> requires (!std::is_void_v<T>) class async_operation_base_t : public async_progress_base_t <Progress>template <typename T, typename Progress = void >class async_operation_t : public async_operation_base_t <T, Progress, async_operation_t <T, Progress>>
1 2 3 4 5 6 7 8 9 10 template <>class async_progress_base_t <void >{ public : };
类async_action_t与async_operation_t。内部都定义了await_ready()、await_suspend()、await_resume()。是个Awaiter对象。
1 2 3 4 5 6 7 8 9 10 11 12 13 14 15 16 using AsyncAction = details::async_action_base_t <>; template <typename P> using AsyncActionWithProgress = details::async_action_base_t <P>; template <typename T> using AsyncOperation = details::async_operation_base_t <T>; template <typename T, typename P>using AsyncOperationWithProgress = details::async_operation_base_t <T, P>;